Seite wählen

NETWAYS Blog

NETWAYS Web Services: GitLab EE


The NETWAYS Web Services Team is proud to announce the arrival of a new product: Customers can now have their GitLab EE instances hosted on our NWS platform.
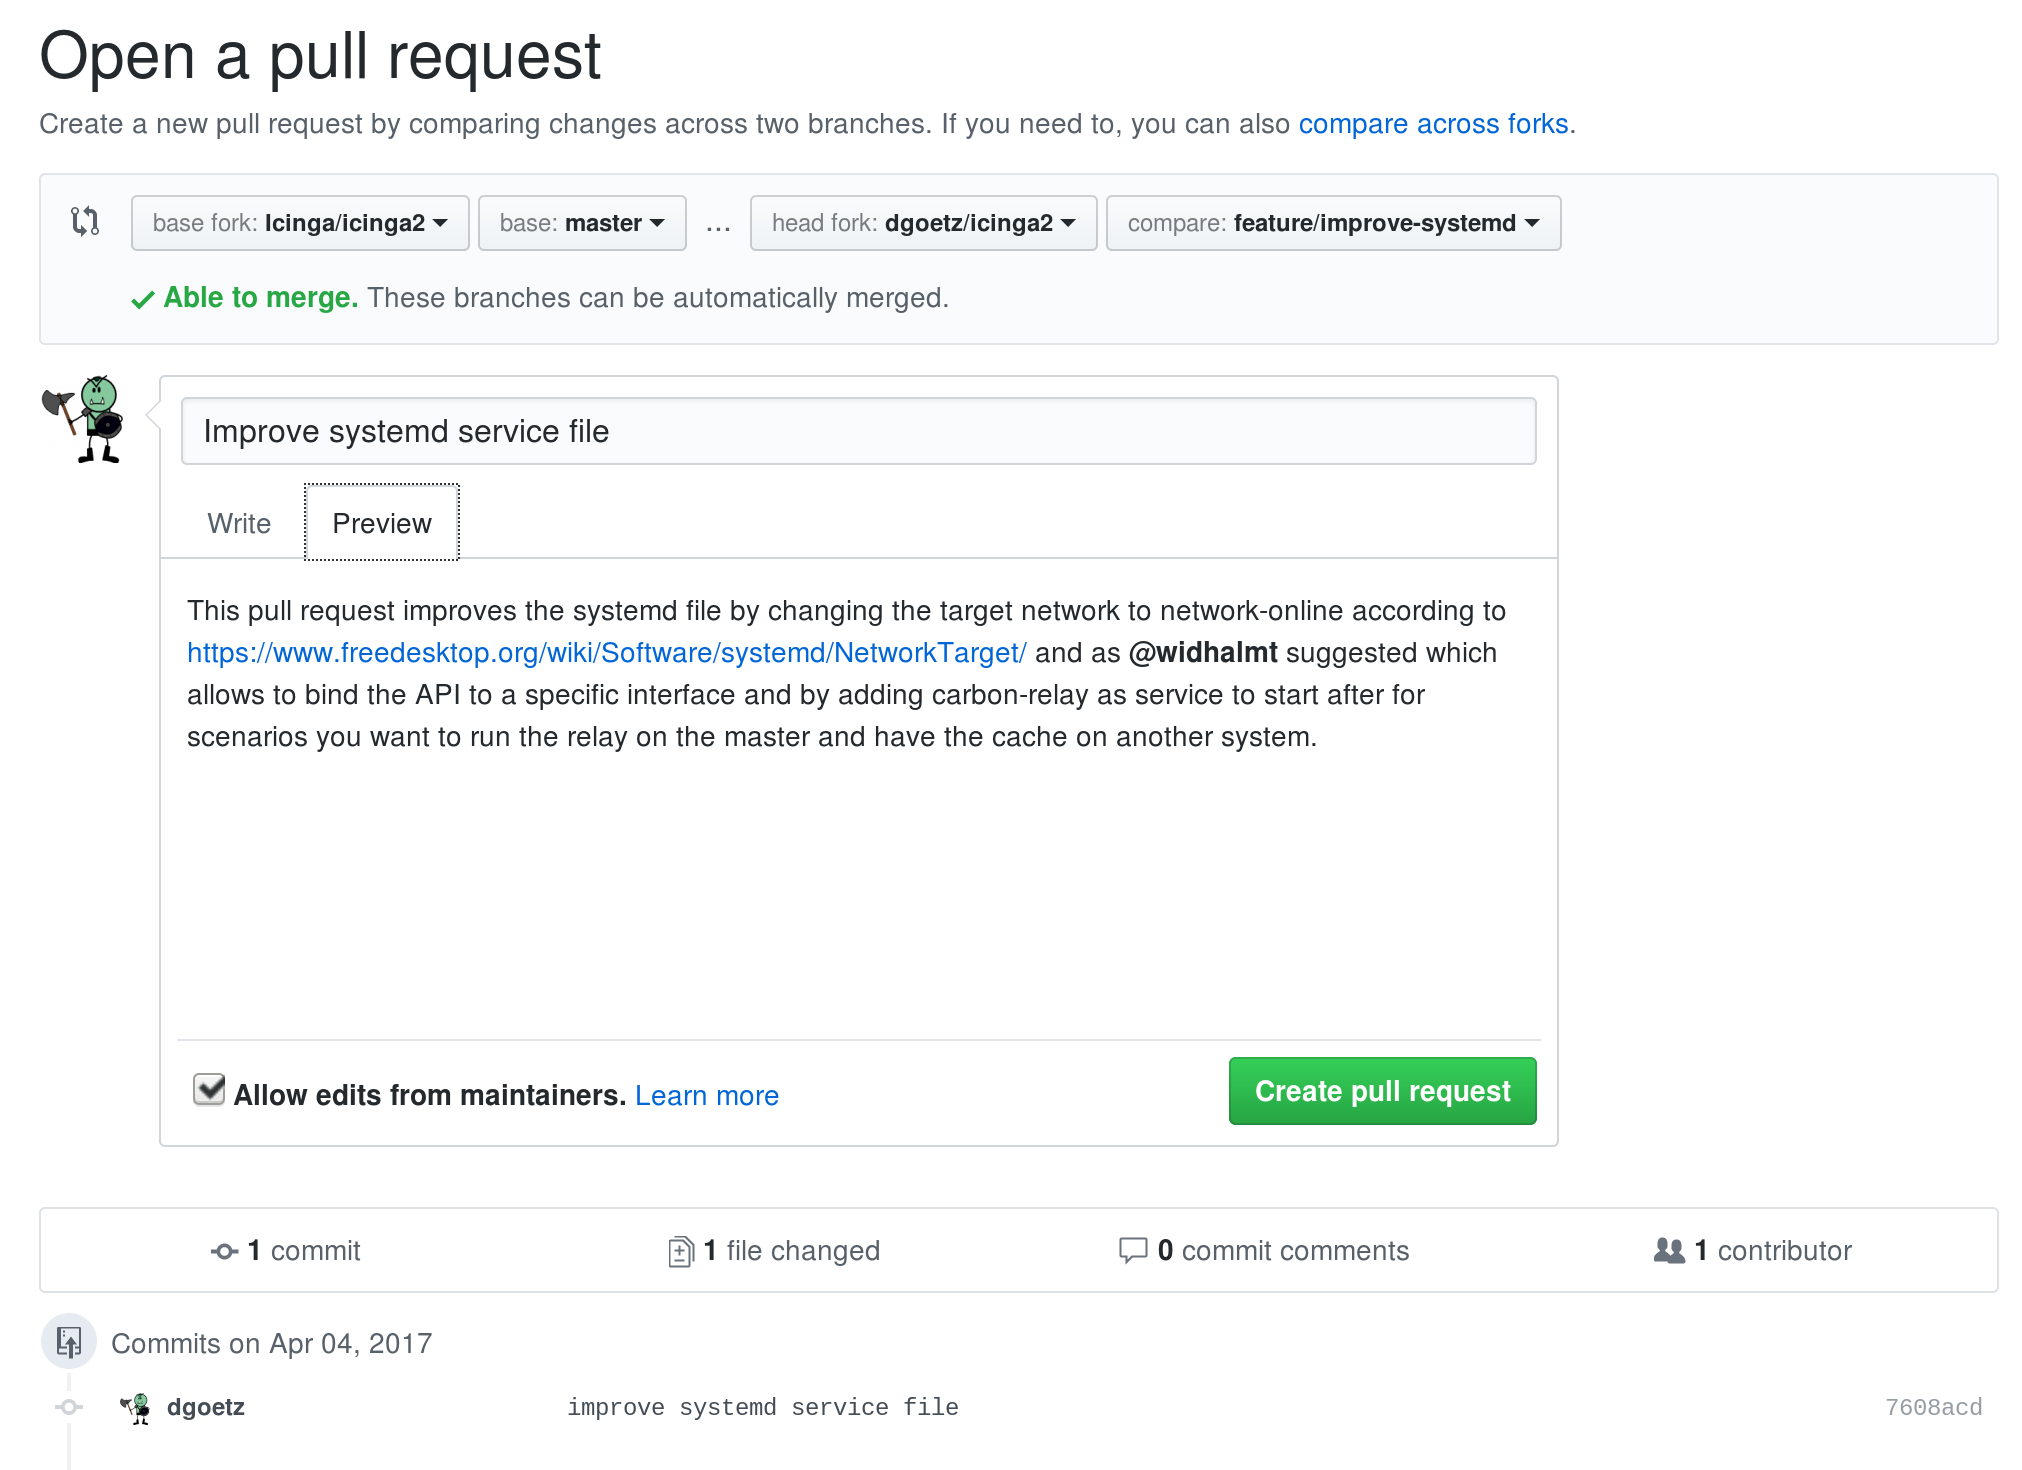
Version control has become one of the most important aspects of everyday work life and has gone far beyond being only used by development teams. Many more use cases for version control have been created so far and are still to come. Even small teams are already using GitLab CE for controlling their workflows which is one of our reasons to offer this software as a hosted product.
After realizing that many users needed higher performance for increasing their productivity, we decided to add GitLab EE to our portofolio as it offers many more options and features than the CE version – without having to take care of the underlying hard- and software layers needed for running the application.
The process of hosting GitLab EE with us is almost as simple and comfortable as with all our other products – create an NWS account, choose a product and get started. GitLab EE makes a little exception for it is an Enterprise product and therefore customers need to provide a license acquired at GitLab. You can be sure that all features included in your license will be available in your NWS container right from the start.

This license is the only aspect the customer needs to take care of – NWS will provide all the comfort our customers already know from our other products, like maintenance works, updates, patches and a stable and well monitored platform underneath.

All those who do not want to worry about their version control should take a look at our attractive and scalable plans as well as individually sized solutions for hosting GitLab EE. More information can be found on our NWS homepage, in our GitLab EE section or by contacting us via the NWS livechat.
Important note: All NWS products are up for a 30 day free trial!

Contributing to projects on GitHub

GitHub Logo
Today I want to share my workflow for contributing to projects hosted on GitHub because I believe it works very well for me and I regularly contribute to various projects. Of course most of this also applies to other hosted Git platforms like GitLab. It will not involve any Git magic as there are other posts to do that. So let’s use adding a check command to Icinga 2 as my example.
The obvious first step is finding the Git repository for the project and reading contribution guidelines because there are some projects which aren’t hosted on GitHub and some have additional requirements like submitting an issue in addition to a pull request. You should always familiarize yourself with and stick to those policies if you want your pull request to be accepted. For Icinga 2 there currently aren’t any additional project-specific guidelines.
Your next step is to create a fork on GitHub and clone the repository. So in the GitHub web interface click on „Fork“ and select your own account (or company account as long as you are allowed to push). Once you’ve forked the repository you can check out a local copy using the following command:

git clone git@github.com/dgoetz/icinga2.git

Afterwards you should add another „remote“ for the original Git repository in order to be able to update your own repository with changes from the upstream project:

cd icinga2/
git remote add upstream git@github.com:icinga/icinga2.git

After these initial steps you can create a Git branch for your feature or bug fix. Using the „master“ branch for pull requests is strongly discouraged because things tend to get complicated once you have more than one pull request. Another recommendation is to use branch names that match the upstream repository’s style. This however is not a hard requirement:

git checkout -b feature/expand-check-foo

This also automatically switches to the newly-created branch which means you can now start to edit files for your pull request. Once you’re done you can add them to the Git index and create a commit. Typically upstream projects have guidelines for this, so do not forget to include documentation, make only one commit out of your work (perhaps by squashing) and so on.

vi itl/plugins-contrib.d/network-components.conf
vi doc/10-icinga-template-library.md
git add itl/plugins-contrib.d/network-components.conf doc/10-icinga-template-library.md
git commit -m "ITL: expanded check foo"

Afterwards push your commit to your forked repository and then create your pull request using the GitHub webinterface:

git push -u origin feature/expand-check-foo

When creating the pull request make sure to provide a detailed description of your changes and the reason why you feel that your pull request should be merged. Keep the setting checked to allow edits from maintainers. Depending on the project make sure to reference any related issues, fill in their pull request template or do whatever else they require for pull requests.
GitHub pull request
Typically once a pull request is created automated tests will be run and a review process by the project team will start, so it’s possible that you’ll be asked to make changes before your pull request is accepted. If this happens simply edit your branch to fix whatever problems were found during the review, amend your commit and force push it to your fork. This will also automatically update your pull request but you might want to provide a comment for the pull request as to what has changed:

vi doc/10-icinga-template-library.md
git add doc/10-icinga-template-library.md
git commit --amend -m "ITL: expanded check foo"
git push -f

Another commonly requested change is that you rebase your branch before the pull request is accepted. This usually happens when significant changes were made to the upstream repository while your pull request was waiting to be merged. In order to rebase your branch the following commands should be all you need, however in some cases you may also have to manually resolve conflicts:

git pull --rebase upstream master
git push -f

And of course you will sometimes want to create additional pull requests. For these make sure to start with a new branch based on the upstream repository:

git checkout master
git pull upstream master
git checkout -b fix/check-bar
...
git push -u origin fix/check-bar

So, this is it, this is my basic workflow for easy contributions on GitHub. I hope it helps you to get involved with your favorite projects and your fixes and features to get upstream. If you prefer to do all step in the command line, you can have a look at GitHub’s command-line wrapper for git hub. If you need more general Git knowledge I recommend the Git book and our training. If you need a GitLab system to play around, have a look at our NWS platform.

Dirk Götz
Dirk Götz
Principal Consultant

Dirk ist Red Hat Spezialist und arbeitet bei NETWAYS im Bereich Consulting für Icinga, Puppet, Ansible, Foreman und andere Systems-Management-Lösungen. Früher war er bei einem Träger der gesetzlichen Rentenversicherung als Senior Administrator beschäftigt und auch für die Ausbildung der Azubis verantwortlich wie nun bei NETWAYS.

It's magic: git squash

training_gitA common technique for feature development with Git is to start with a new feature branch. You’ll continue to add and commit changes into that branch and at some point in time you want to merge the many work-in-progress commits into one. The Git terminology references that as „squash„.
Another common best practice is to use the Git forking model you are probably familiar with on GitHub. You’ll fork your own repository, start adding a new Icinga 2 ITL CheckCommand definition, later on you are adding the missing documentation bits. Then you’ll send a pull request to the upstream repository. Developers will review your changes and probably ask you to rebase and squash your commits into one commit.
Let’s just try that.

michi@mbmif ~/coding/icinga/icinga2 (master) $ git checkout -b feature/itl-checkcommand-13079
<change, add, commit>
michi@mbmif ~/coding/icinga/icinga2 (feature/itl-checkcommand-13079) $ git l
* ed6a68f- (HEAD -> feature/itl-checkcommand-13079) Docs: Fix phrasing (5 minutes ago)
* ce90e16- Add documentation for logfiles (5 minutes ago)
* 5a31d9e- Add CheckCommand "logfiles" (6 minutes ago)
* dc29924- (origin/master, origin/HEAD, master) Deprecate the client 'bottom up' mode w/ node update-config (2 hours ago)
...

Now I want to merge that feature branch back to the master. Our development guidelines require me to squash the three commits first.
Generally speaking you can use the interactive „git rebase -i“ command here. It requires an additional parameter about the commits we will be editing, counting from HEAD back in the history. In my case I want to edit HEAD minus 3 commits.
The interactive mode will open the configured editor, vim in my case.

michi@mbmif ~/coding/icinga/icinga2 (feature/itl-checkcommand-13079) $ git rebase -i HEAD~3
pick 5a31d9e Add CheckCommand "logfiles"
pick ce90e16 Add documentation for logfiles
pick ed6a68f Docs: Fix phrasing
# Rebase dc29924..ed6a68f onto dc29924 (3 commands)
#
# Commands:
# p, pick = use commit
# r, reword = use commit, but edit the commit message
# e, edit = use commit, but stop for amending
# s, squash = use commit, but meld into previous commit
# f, fixup = like "squash", but discard this commit's log message
# x, exec = run command (the rest of the line) using shell
# d, drop = remove commit
#
# These lines can be re-ordered; they are executed from top to bottom.
#
# If you remove a line here THAT COMMIT WILL BE LOST.
#
# However, if you remove everything, the rebase will be aborted.
#
# Note that empty commits are commented out

Git informs us about the possible options here. I could just use „edit“ which iterates over the commits, stops for amending the commit message and/or the commit changes itself.
I want to squash the commits. This requires the base commit (usually the first one) to stay on „pick“ while the others are changed to „squash“.

pick 5a31d9e Add CheckCommand "logfiles"
squash ce90e16 Add documentation for logfiles
squash ed6a68f Docs: Fix phrasing

This will squash the commits one by one onto the last picked one. Save the changes and continue.

# This is a combination of 3 commits.
# This is the 1st commit message:
Add CheckCommand "logfiles"
# This is the commit message #2:
Add documentation for logfiles
# This is the commit message #3:
Docs: Fix phrasing
# Please enter the commit message for your changes. Lines starting
# with '#' will be ignored, and an empty message aborts the commit.
#
# Date:      Wed Nov 23 17:19:55 2016 +0100
#
# interactive rebase in progress; onto dc29924
# Last commands done (3 commands done):
#    squash ce90e16 Add documentation for logfiles
#    squash ed6a68f Docs: Fix phrasing
# No commands remaining.
# You are currently editing a commit while rebasing branch 'feature/itl-checkcommand-13079' on 'dc29924'.
#
# Changes to be committed:
#       modified:   doc/10-icinga-template-library.md
#       modified:   itl/plugins-contrib.d/logmanagement.conf

Edit the commit message (comments starting with „#“ will be ignored) and make it a good one (also something you learn in the training session ;)).

Add CheckCommand "logfiles"
refs #13079

Save and continue.

[detached HEAD f1445eb] Add CheckCommand "logfiles"
 Date: Wed Nov 23 17:19:55 2016 +0100
 3 files changed, 8 insertions(+)
Successfully rebased and updated refs/heads/feature/itl-checkcommand-13079.

Verify the changed commit history.

michi@mbmif ~/coding/icinga/icinga2 (feature/itl-checkcommand-13079) $ git l
* f1445eb- (HEAD -> feature/itl-checkcommand-13079) Add CheckCommand "logfiles" (3 minutes ago)
* dc29924- (origin/master, origin/HEAD, master) Deprecate the client 'bottom up' mode w/ node update-config (2 hours ago)

When you are updating your remote repository you’ll need to override the remote history with the local history. Be careful when using „-f“!

michi@mbmif ~/coding/icinga/icinga2 (feature/itl-checkcommand-13079) $ git push -f origin feature/itl-checkcommand-13079

Voilà – our Git commit history is now rebased and squashed.
This example works in a similar fashion with a forked repository on GitHub, thus requiring you to update your PR then.
Hint: I’m using Git shell integration as well Git aliases here („git l“). We’ll dive into these topics in our Git training too 🙂

$ git config --list | grep 'alias.l'
alias.l=log --graph --pretty=format:'%Cred%h%Creset-%C(yellow)%d%Creset %s %Cgreen(%cr) %C(bold blue)<%an>%Creset' --abbrev-commit --date=relative --

Sharing Git patches in a different way

training_gitSometimes it is necessary to share git patches locally. Either you cannot push it to the public domain in a feature or master branch or you simply don’t have an internet connection – for example while working in a customer VPN reproducing issues locally.
You could hope for XMPP sending patch files or any other local transport. But if you don’t want to add, commit, format-patch and send a patch file you’ll obviously go for plain text copy paste of a ‚git diff‘ output. Editors and messengers tend to destroy the tab indent. Now what?
base64 encoding to the rescue.

michi@mbmif ~/coding/icinga/icinga2 (master) $ git diff | base64

Send the blob to your colleague who can easily apply it. Example on MacOS:

michi@mbmif ~/coding/icinga/icinga2 (master) $ base64 -D | patch -p1

Or if written to a temporary file:

michi@mbmif ~/coding/icinga/icinga2 (master) $ base64 -D < patchfile | patch -p1

More about working with Git and applying patches can be learned in our Git training sessions. There’s also a Git workshop during this years OSMC 🙂

Monthly Snap June: Icinga2, Training, Foreman, GitLab, Icinga director, OpenNebula

Martin presented in June our new book about Icinga 2 written by our very own Lennart Betz and Thomas Widhalm.
Julia announced the official Foreman training material and Michael recommended the new DEV-Trainings: Git and Jenkins.weekly snap
Tim explained how to use OpenNebula ACLs and Foreman in Part 1 and Part 2 while Florian showed us how to animate vector graphics with CSS.
Julia gave us a nice update of our new training facility – the „Kesselhaus“.
Dirk announced that the Foreman Project will be 7 years at the 21st of July – so safe the date and visit us at the German Foreman birthday event that will take place in our event room „Kesselhaus“.
Enrico shared some tips and tricks about how to work with GitLab web hooks and Thomas Gelf showed us the new and shiny Icinga director 1.10.

Vanessa Erk
Vanessa Erk
Head of Finance & Administration

Vanessa ist unsere Leiterin des Finanzbereichs. Zusammen mit ihrem Team verantwortet sie das Controlling, den Cashflow sowie die Personalangelegenheiten in der Unternehmensgruppe. Abseits des Büros taucht sie leidenschaftlich gerne in die Welt des Yogas ein – vor allem im Bereich Frauen und Kinder. Durch zahlreiche Weiterbildungen hat sie ihr Fachwissen dazu vertieft und ist Expertin in ihrem Gebiet. Als Mutter von 2 Kindern kümmert sie sich liebevoll um ihre Tochter und ihren Sohn. In ihrer Freizeit liebt sie es, mit ihrer Familie zu reisen und neue Orte zu erkunden. Dabei genießt sie besonders die Zeit in der Natur und unternimmt...