Select Page

NETWAYS Blog

Text-Utils unter Linux – Wer kennt sie?

Bei aller Automatisierung, Systemmanagement oder Cloud und Log-Management  ist oben genannte Frage berechtigt.
Ich persönlich, stelle als Support-Engineer immer wieder fest, wie wichtig das eine oder andere Text-Util von Linux auf der Kommandozeile ist, deswegen möchte ich hier mal ein paar  Text-Utils und Anwendung vorstellen:

cat & split
Erklärung: Hier wird eine 100MB große Datei angelegt, die in 14MB große einzelne Dateien zerlegt wird und danach wieder zusammengefügt wird.
dd if=/dev/urandom of=test1.big count=100 bs=1M
split -b14m test1.big
cat x?? > test2.big
md5sum test.big test2.big

tac
Erklärung: Hier wird einen Liste der letzten installierten Pakete ausgeben und anschließend herumgedreht, damit das letzte installierte Paket unten in der Liste steht.
rpm -qa --last | tac

cut
Erklärung: Hier werden die ersten 25 Bytes aus Logfile messages vom Seiten-Anfang herausgeschnitten, setzt man das Minus vor die Zahl wird alles nach den 25 Byte herausgeschnitten
cut -b25- /var/log/messages | sort

cut & paste
Erklärung: Ausschneiden von Textausschnitte aus einer Datei, in einzelne Dateien kopiert und dann wieder zusammen in eine Datei zusammengeführt.
cut -d: -f1-3 /etc/passwd > spalte1-3
cut -d: -f4- /etc/passwd > spalte4-7

Wieder  zusammensetzen
paste -d: spalte1-3 spalte4-7

sort mit du
Erklärung: Hier wird mit du (disk usage) die Größe der Verzeichnisse ausgegeben und sortiert
du -mx / | sort -n
Hier ist der Beitrag Disk Usage (du) von mir, wenn jemand das Tool noch nicht kennen sollte.
Noch ein Beispiel:
sort -t : -k 3n /etc/passwd
Erklärung: Hier werden die User in der passwd nach der id sortiert aufsteigend sortiert, Trenner ist der Doppelpunkt.

column
Erklärung: Hier werden die IP-Routen schön in Spalten angezeigt um die Lesbarkeit zu verbessern.
ip r s | column -t

pr
Erklärung: Hier wird die Ausgabe des Textes zur besseren Lesbarkeit oder zum Ausdrucken aufbereitet und mit Seitenzahl angezeigt
wget -q -O - www.gnu.org/licenses/gpl-3.0.txt | pr | less

Alle Text-Utils können noch mehr, dazu bitte die Man-Pages zu Gemüte ziehen, oder vielleicht unsere Linux-Schulung im Bereich Trainings buchen.

In diesem Sinne Viel Spaß beim ausprobieren!

Johannes Carraro
Johannes Carraro
Senior Systems Engineer

Bevor Johannes bei NETWAYS anheuerte war er knapp drei Jahre als Systemadministrator in Ansbach tätig. Seit Februar 2016 verstärkt er nun unser Team Operations als Senior Systems Engineer. In seiner Freizeit spielt Johannes E-Gitarre, bastelt an Linux Systemen zuhause herum und ertüchtigt sich beim Tischtennisspielen im Verein, bzw. Mountainbiken, Inlinern und nicht zuletzt Skifahren.

Introduction to SVG: The Basics

Lately I’ve been spending a some time building SVGs.
When I told my colleagues about what I was doing they asked me to write a short guide about what exactly that is and what you can do with it.
Since I got those questions, i thought that might be interesting for others out there, so here goes nothing:

First of all: what is SVG?

Just like JPEG or PNG, SVG is an image format, which lets us display images or graphics on the web.
SVG stands for ‘Scalable Vector Graphics’ – You might have heard about vectors in a different context already, like maths class or physics maybe?
The concept is the same: there is a direction and a force which helps to describe a path.
This means, that those graphics do not consist of fixed pixel values, but instead they’re a set of directions for whoever renders it (usually the user agent / browser) to follow.

SVG is written in a format that resembles XML, which means you have your image in a human readable plaintext file!

Why does that make it special?

The fact, that the graphics are made up with vectors comes with a bunch of useful qualities:

  • Scalability: It doesn’t matter, if you make the image 30x30px or 3000x3000px, it will stay sharp
  • Responsiveness: Because of its’ scalability you can have it take up whatever space you need it to
  • Programmable: Since your image is basically a text file, you can modify it programmatically as well, which gives it a flexibility unmatched by other common options.
  • Performance: Since we’re not sending out a binary blob of pixels but a text file, there is next to no loading time for the images.

The most common use cases are logos, icons and icon fonts, animations and diagrams.

What does it look like?

This is a simple svg, which we will be building together over the course of this blogpost:

First we define a simple 20×20 “coordinate system”, where 0,0 is in the top left corner.
In the viewBox we define what part of the SVG we will see when it is rendered. Positive x values move to the right and positive y values move downwards.
<svg viewBox="0 0 20 20"></svg> For a better understanding of the slightly mind-fucky topic of the viewBox property, check this out.


To start of with we want to draw the head:
For that we just use a <rect> element to draw a rectangle that fills the entire space.
<rect class="body" width="20" height="20"></rect>


The eyes consist of two <circle> elements that we position with cx and cy and give them a radius r of 1 unit.
<circle class="eye" cx="5" cy="15" r="1"></circle>
<circle class="eye" cx="15" cy="15" r="1"></circle>


When you put everything together the code for it looks something like this:

<svg viewBox="0 0 20 20">
  <rect class="body" width="20" height="20"></rect>
  <circle class="eye" cx="5" cy="15" r="1"></circle>
  <circle class="eye" cx="15" cy="15" r="1"></circle>
</svg>

So far we’d only have a black box, but as you might have noticed, I also added the class attribute into the elements.
This is for styling the SVG via CSS.
It is also possible to style the elements within their tags, but using CSS is usually preferred, since it makes it possible to style images with user themes as well!
This is the CSS:

.eye {
fill: #444;
}

.body {
stroke-width: 2;
stroke: #444;
fill: #f15a22;
}


The drawn lines can be edited with stroke  and if the fill attribute changes the colour that fills up the shape:

You can find the pen here.

Drawing our own images

Combining shapes is all nice and cool, but there are a lot more you can do with SVGs – for example create your own shapes.
We can do this with the path element. For it to know what to draw it needs the d attribute in which we can describe the path of the element.

<path d="M1,2 l4,4 h10 l4,-4 v17 h-18 Z"></path>


The d attribute has a syntax consisting of a few letters and a lot of numbers, that can look quite scary and unreadable at first, but when we break it down, it should look a lot clearer:
The letters are the commands and the numbers are their passing values.


M is the first command used. It’s the move command – so what it does is move the cursor to the position indicated by the numbers and is the starting point for our path.
M1,2 means it starts one unit to the right and two down.


The letters for the commands can either be uppercase to indicate absolute values or lowercase to indicate values that are relative to the last point we drew.
While m4,0 means “Move the cursor 4 units to the right”, M4,0 means move it to the position 4,0.

Basic commands for drawing lines

The next commands we want to look at describe straight lines:
L: any direction
H: horizontal
V: vertical
Z: last element for closing path


<path d="M1,2 L5,6 H15 L19,2 V19 H1 Z"></path>
We’re starting at M1,2.
First line is to position 5,6, so 4 to the right and 4 down with L5,6.
Then a horizontal line to H15.
Another line that goes up and to the right with L19,2.
Down to y value 19 with V19.
All the way left to x position 1 with H1
Finally, we close the path with the Z command.


It’s entirely up to you if you want to draw with relative or absolute values, in a 20×20 grid those two would draw the same image:

<path d="M1,2 l4,4 h10 l4,-4 v17 h-18 Z"></path>
<path d="M1,2 L5,6 H15 L19,2 V19 H1 Z"></path>

Adding the path together with the circles from our first head and applying the CSS again the image looks like this:

You can find the pen here.

Getting those round corners

The little fox looks a little square still, so we want to edit it to give it some round cheeks.

For this we use the q command, which stands for ‘quadratic curve’.

The q command requires two points, the one around which the curve should be and the point to which the line will go.

We draw the ears like we have before but instead of going down to the 19,19 corner, we stop 2 units further up.

From the point 19,17 we use the command Q19,19 17,19.
This indicates, that we want to wrap around the 19,19 and end at the 17,19 point.

The d value for this fox looks like this:

d="M1,2 L5,6 H15 L19,2 V17 Q19,19 17,19 H3 Q1,19 1,17 Z"

You can find the pen here.


Next in the series is going to be a bit more in depth about the more advanced commands and we will extend on the foxes head to make it look like this:
So stay tuned!

If you thought this was fun, maybe you want join our development team, to learn more about the SVGs and the like?

Feu Mourek
Feu Mourek
Developer Advocate

Feu verbrachte seine Kindheit im schönen Steigerwald, bevor es sich aufmachte die Welt zu Erkunden. Seit September 2016 unterstützt es Icinga zunächst als Developer und seit 2020 als Developer Advocate, und NETWAYS als Git und GitLab Trainer. Seine Freizeit verbringt es hauptsächlich damit Video-, und Pen and Paper Rollenspiele zu spielen, sich Häuser zu designen (die es sich nie leisten können wird) oder ganz lässig mit seinem Cabrio durch die Gegend zu düsen.

C++Go. Halb C++ – halb Go.

Scherz beiseite, die Go-Entwickler bieten noch keine Möglichkeit, C++-Bibliotheken ohne weiteres anzusprechen. Aber es geht ja auch mit weiteres. Das weitere besteht darin, dass C++-Funktionen mittels C-Bibliotheken gewrapped werden können. Und in meinem letzten Blogpost zu diesem Thema habe ich bereits erklärt, wie C-Bibliotheken in Go angesprochen werden können. Sprich, es braucht nur eine hauchdünne C-Schicht zwischen C++ und Go.

Multilingual++ in der Praxis

Wie auch letztes mal habe ich schon mal was vorbereitet – eine Schnittstelle für die Boost.Regex-Bibliothek. Diese findet sich in diesem GitHub-Repo und besteht aus folgenden Komponenten:

  • Ein Struct, das boost::basic_regex<char> wrapped
  • Eine C-Bibliothek, die den C++-Teil wrapped
  • Die Go-Bibliothek, die die C-Bibliothek verwendet

Wrapper-Struct

Dieses Struct ist Notwendig, da die Größe von boost::basic_regex<char> zwar C++ bekannt ist, aber nicht Go. Das Wrapper-Struct hingegen hat eine feste Größe (ein Zeiger).

libcxx/regex.hpp

[c language=”++”]
#pragma once

#include <boost/regex.hpp>
// boost::basic_regex
// boost::match_results
// boost::regex_search

#include <utility>
// std::forward
// std::move

template<class Char>
struct Regex
{
template<class… Args>
inline
Regex(Args&&… args) : Rgx(new boost::basic_regex<Char>(std::forward<Args>(args)…))
{
}

Regex(const Regex& origin) : Rgx(new boost::basic_regex<Char>(*origin.Rgx))
{
}

Regex& operator=(const Regex& origin)
{
Regex copy (origin);
return *this = std::move(copy);
}

inline
Regex(Regex&& origin) noexcept : Rgx(origin.Rgx)
{
origin.Rgx = nullptr;
}

inline
Regex& operator=(Regex&& origin) noexcept
{
this->~Regex();
new(this) Regex(std::move(origin));
return *this;
}

inline
~Regex()
{
delete this->Rgx;
}

template<class Iterator>
bool MatchesSomewhere(Iterator first, Iterator last) const
{
boost::match_results<Iterator> m;
return boost::regex_search(first, last, m, *(const boost::basic_regex<Char>*)this->Rgx);
}

boost::basic_regex<Char>* Rgx;
};
[/c]

Eine C-Bibliothek, die den C++-Teil wrapped

Die folgenden Funktionen sind zwar waschechte C++-Funktionen, aber dank dem extern "C" werden sind sie in der Bibliothek als C-Funktionen sichtbar und können von Go angesprochen werden.

libcxx/regex.cpp

[c language=”++”]
#include "regex.hpp"
// Regex

#include <boost/regex.hpp>
using boost::bad_expression;

#include <stdint.h>
// uint64_t

#include <utility>
using std::move;

extern "C" unsigned char CompileRegex(uint64_t pattern_start, uint64_t pattern_end, uint64_t out)
{
try {
*(Regex<char>*)out = Regex<char>((const char*)pattern_start, (const char*)pattern_end);
} catch (const boost::bad_expression&) {
return 2;
} catch (…) {
return 1;
}

return 0;
}

extern "C" void FreeRegex(uint64_t rgx)
{
try {
Regex<char> r (move(*(Regex<char>*)rgx));
} catch (…) {
}
}

extern "C" signed char MatchesSomewhere(uint64_t rgx, uint64_t subject_start, uint64_t subject_end)
{
try {
return ((const Regex<char>*)rgx)->MatchesSomewhere((const char*)subject_start, (const char*)subject_end);
} catch (…) {
return -1;
}
}
[/c]

libcxx/regex.h

[c language=”++”]
#pragma once

#include <stdint.h>
// uint64_t

unsigned char CompileRegex(uint64_t pattern_start, uint64_t pattern_end, uint64_t out);

void FreeRegex(uint64_t rgx);

signed char MatchesSomewhere(uint64_t rgx, uint64_t subject_start, uint64_t subject_end);
[/c]

Go-Bibliothek

Diese spricht letztendlich die C-Funktionen an. Dabei übergibt sie die Zeiger als Ganzzahlen, um gewisse Sicherheitsmaßnahmen von CGo zu umgehen. Das Regex-Struct entspricht dem Regex-Struct aus dem C++-Teil.

regex.go

[c language=”go”]
package boostregex2go

import (
"io"
"reflect"
"runtime"
"unsafe"
)

/*
#include "libcxx/regex.h"
// CompileRegex
// FreeRegex
// MatchesSomewhere
*/
import "C"

type OOM struct {
}

var _ error = OOM{}

func (OOM) Error() string {
return "out of memory"
}

type BadPattern struct {
}

var _ error = BadPattern{}

func (BadPattern) Error() string {
return "bad pattern"
}

type Regex struct {
rgx unsafe.Pointer
}

var _ io.Closer = (*Regex)(nil)

func (r *Regex) Close() error {
C.FreeRegex(rgxPtr64(r))
return nil
}

func (r *Regex) MatchesSomewhere(subject []byte) (bool, error) {
defer runtime.KeepAlive(subject)
start, end := bytesToCharRange(subject)

switch C.MatchesSomewhere(rgxPtr64(r), start, end) {
case 0:
return false, nil
case 1:
return true, nil
default:
return false, OOM{}
}
}

func NewRegex(pattern []byte) (*Regex, error) {
rgx := &Regex{}

defer runtime.KeepAlive(pattern)
start, end := bytesToCharRange(pattern)

switch C.CompileRegex(start, end, rgxPtr64(rgx)) {
case 0:
return rgx, nil
case 2:
return nil, BadPattern{}
default:
return nil, OOM{}
}
}

func bytesToCharRange(b []byte) (C.uint64_t, C.uint64_t) {
sh := (*reflect.SliceHeader)(unsafe.Pointer(&b))
return C.uint64_t(sh.Data), C.uint64_t(sh.Data + uintptr(sh.Len))
}

func rgxPtr64(p *Regex) C.uint64_t {
return C.uint64_t(uintptr(unsafe.Pointer(p)))
}
[/c]

Fazit++

Wenn etwas abgedrehtes mal nicht zu gehen scheint, dann gebe ich doch nicht auf, sondern ich mache es einfach noch abgedrehter. Impossible is nothing.

Wenn Du auch lernen willst, wie man unmögliches möglich macht, komm auf unsere Seite der Macht.

Alexander Klimov
Alexander Klimov
Senior Developer

Alexander hat 2017 seine Ausbildung zum Developer bei NETWAYS erfolgreich abgeschlossen. Als leidenschaftlicher Programmierer und begeisterter Anhänger der Idee freier Software, hat er sich dabei innerhalb kürzester Zeit in die Herzen seiner Kollegen im Development geschlichen. Wäre nicht ausgerechnet Gandhi sein Vorbild, würde er von dort aus daran arbeiten, seinen geheimen Plan, erst die Abteilung und dann die Weltherrschaft an sich zu reißen, zu realisieren - tut er aber nicht. Stattdessen beschreitet er mit der Arbeit an Icinga Web 2 bei uns friedliche Wege.

Managing your Ansible Environment with Galaxy

Ansible is known for its simplicity, lightweight footprint and flexibility to configure nearly any device in your infrastructure. Therefore it’s used in large scale environments shared between teams or departments. This leads to even bigger Ansible environments which need to be tracked or managed in version control systems like Git.

Mostly environments grow with their usage over time, in this case it can happen that all roles are managed inside one big repository. Which will eventually lead to quite messy configuration and loss of knowledge if roles are tested or work the way they supposed to work.

Ansible provides a solution which is called Galaxy, it’s basically a command line tool which keeps your environment structured, lightweight and enforces your roles to be available in a specific version.

First of all you can use the tool to download and manage roles from the Ansible Galaxy which hosts many roles written by open-source enthusiasts. 🙂


# ansible-galaxy install geerlingguy.ntp -v
Using /Users/twening/ansible.cfg as config file
 - downloading role 'ntp', owned by geerlingguy
 - downloading role from https://github.com/geerlingguy/ansible-role-ntp/archive/1.6.4.tar.gz
 - extracting geerlingguy.ntp to /Users/twening/.ansible/roles/geerlingguy.ntp
 - geerlingguy.ntp (1.6.4) was installed successfully

# ansible-galaxy list
# /Users/twening/.ansible/roles
 - geerlingguy.apache, 3.1.0
 - geerlingguy.ntp, 1.6.4
 - geerlingguy.mysql, 2.9.5

Furthermore it can handle roles from your own Git based repository. Tags, branches and commit hashes can be used to ensure it’s installed in the right version.


ansible-galaxy install git+https://github.com/Icinga/ansible-icinga2.git,v0.2.0
 - extracting ansible-icinga2 to /Users/twening/.ansible/roles/ansible-icinga2
 - ansible-icinga2 (v0.2.0) was installed successfully

It’s pretty neat but how does this help us in large environments with hundreds of roles?

The galaxy command can read requirement files, which are passed with the “-r” flag. This requirements.yml file can be a replacement for roles in the roles path and includes all managed roles of the environment.


# vim requirements.yml
- src: https://github.com/Icinga/ansible-icinga2.git
  version: v0.2.0
  name: icinga2

- src: geerlingguy.mysql
  version: 2.9.5
  name: mysql

Then run ansible-galaxy with the “–role-file” parameter and let galaxy manage all your roles.


# ansible-galaxy install -r requirements.yml
 - icinga2 (v0.2.0) is already installed, skipping.
 - downloading role 'mysql', owned by geerlingguy
 - downloading role from https://github.com/geerlingguy/ansible-role-mysql/archive/2.9.5.tar.gz
 - extracting mysql to /Users/twening/.ansible/roles/mysql
 - mysql (2.9.5) was installed successfully

In case you work with Ansible AWX, you can easily replace all your roles with this file in the roles directory and AWX will download and manage your roles directory automatically.

A example project could look like this.


awx_project/
├── example_playbook.yml
├── group_vars
├── host_vars
├── hosts
└── roles
    └── requirements.yml

In summary, in large environments try to keep your code and configuration data separated, try to maintain your roles in their own repository to avoid conflicts at the main project.

Check out our Blog for more awesome posts and if you need help with Ansible send us a message or sign up for one of our trainings!

Thilo Wening
Thilo Wening
Manager Consulting

Thilo hat bei NETWAYS mit der Ausbildung zum Fachinformatiker, Schwerpunkt Systemadministration begonnen und unterstützt nun nach erfolgreich bestandener Prüfung tatkräftig die Kollegen im Consulting. In seiner Freizeit ist er athletisch in der Senkrechten unterwegs und stählt seine Muskeln beim Bouldern. Als richtiger Profi macht er das natürlich am liebsten in der Natur und geht nur noch in Ausnahmefällen in die Kletterhalle.

Entwicklerazubis: Jahr 1, das Projekt

Man bekommt nicht immer das, was man will… außer, man ist bei NETWAYS Azubi!


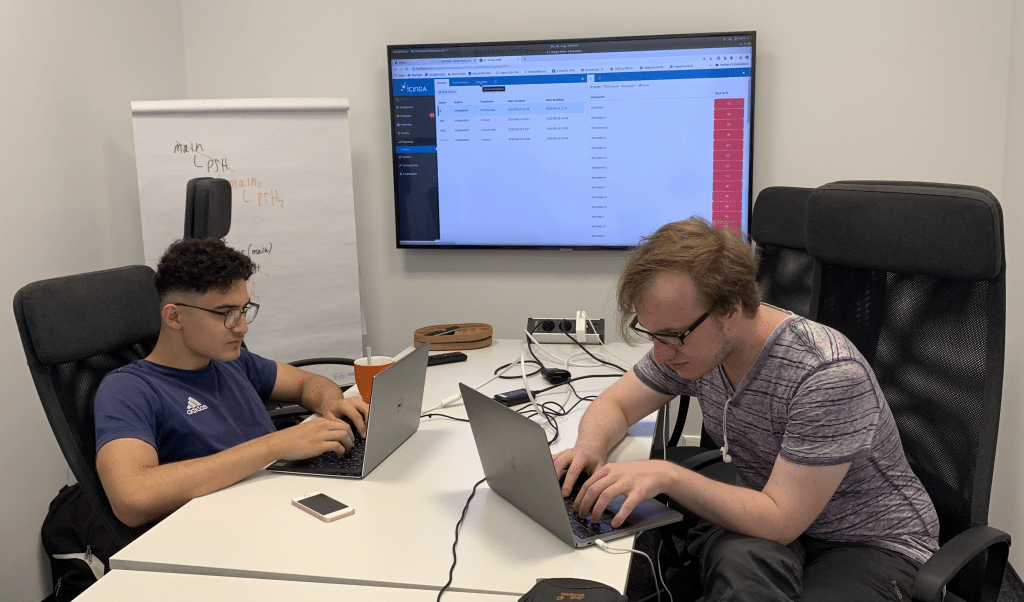
Mein erstes Jahr bei NETWAYS ist fast vorüber, und meine jugendlichen Ambitionen haben den Wunsch in mir erweckt, mit den beiden anderen Dev-Azubis meines Jahres, Loei und Niko, ein eigenes Projekt zu übernehmen, um unsere erlernten Fertigkeiten zu prüfen, eine Übersicht davon zu bekommen, auf welchem Stand wir alle sind, den ein oder anderen Trick voneinander aufzuschnappen und eigenverantwortlich und kooperativ ein Projekt zu vervollständigen. Und alles, was es gebraucht hat, um diesen Wunsch zu erfüllen, war diese Idee zu pitchen und klar und deutlich zu vermitteln, warum dieses Interesse besteht, und was wir uns davon erhoffen. Meine Vorgesetzten scheinen von der Idee zumindest angetan genug gewesen zu sein, dass wir drei Wochen eingeräumt bekommen haben, um uns um dieses Projekt zu kümmern. Danke, NETWAYS!

Die Aufgabe klingt einfach, hat es aber doch durchaus in sich – aus Berichten in Icinga sollen PDFs generiert werden. Die Funktionalität ist schon vorhanden – unsere Aufgabe ist es, den Benutzern mehr Features zur Verfügung zu stellen, damit man eigene Anpassungen an dem Aussehen der PDFs vornehmen kann. Das Schöne an dieser Aufgabe ist die Breite der Elemente und Bereiche, welche eine Rolle dabei spielen. Icingaweb, PHP, HTML, CSS, Google Chrome… es ist in gewisser Art und Weise eine große Reise in das Unbekannte, und natürlich können wir alle drei uns nicht sicher sein, welche Probleme und Hürden sich uns in den Weg stellen werden, und wie die zündenen Ideen kommen, die uns helfen, diese Hürden zu überwinden.


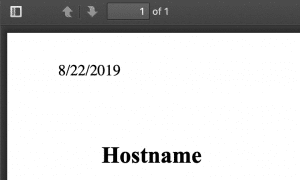
Boo

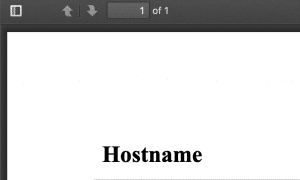
Much better

Und zündende Ideen gab’ es bereits! Ein Beispiel: Google Chrome baut sich aus HTML-Code die PDFs zusammen, lässt sich es aber nicht nehmen, automatisch generierte Header und Footer anzufügen, mit Seitenzahl und Datum. Das ist natürlich ein Element, welches wir gerne unter Kontrolle hätten! Der erste Hack, mit dem ich mich über diese Hürde bewegt habe, ist ein CSS-Styleelement an den übergeben HTML-Code anzufügen. Das ist in seinem momentanen Zustand natürlich noch etwas unschön gelöst, wenn einfach nur der HTML-Code um ein fest eingebautes Codeelement erweitert wird, aber wir haben einen Einstiegspunkt, einen Ansatz, mit der wir weiterbauen und -basteln können.


Scheue Dich vor Fragen nicht!

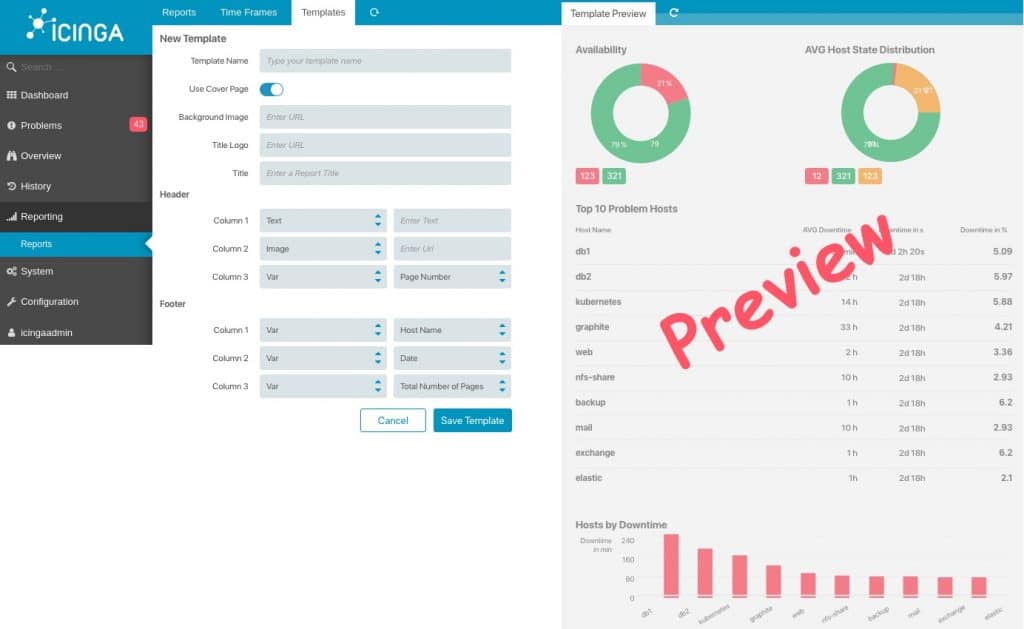
Auch wenn der Kerngedanke dieses Projekts natürlich daraus besteht, dass wir uns selbst beweisen, spricht natürlich Nichts dagegen, bei Fragen, die aufkommen, einen der zahlreichen Experten die NETWAYS hat zu involvieren. Was Benutzeroberflächen angeht, ist bei uns UX-Designer Florian der Ansprechpartner Nummer 1. Wir haben uns zusammengesetzt und konnten ihm live beim Bauen eines Mockups in Sketch zusehen. Eine Gelegenheit, durch die großen Augen, die wir gemacht haben, auch etwas über grundlegende Designansätze in Icingaweb zu lernen, und Grundsätze bezüglich Design. Mit diesem Wissen können wir erstmal diesen Pfad weiter selbst beschreiten, aber natürlich werden wir viel Rücksprache führen. Nur weil man bisher nicht dazu kam, sich extensive Kenntnisse in einem Bereich selbst anzueignen, heißt das nicht, dass man dieses Wissen, wenn es einem zur Verfügung steht, nicht nutzen kann. Und immer schön dran denken, selbst den Fundus an Talenten zu erweitern.

A mockup of things to come…


Kooperatives Kodieren

Einer der in meiner Einleitung angesprochenen Tricks, den ich einfach für neat halte, und sehr dem Spirit dieses Projektes entspricht, ist die Möglichkeit in git Co-Authoren einzutragen. Dafür muss man in der commit message einfach

 Co-authored-by: Name <e-mail>

angeben, und git verlinkt automatisch zwei Autoren für diesen commit. In diesem Fall meine beiden Kollegen bei diesem Projekt. Gute Arbeit, Jungs!

Da kann man ruhig mal klatschen! ?


Willst Du uns vielleicht nächstes Jahr bei dem nächsten Entwicklungsprojekt behilflich sein? Dann raus mit Deiner Bewerbung an NETWAYS! Wir freuen uns schon auf dich!