 In April, Isabel startet with announcing a new Software Update for Braintower and Martin K. continued with a new NETWAYS Web Services tool: Rocket.Chat Hosting.
Then Julia announced the call for papers for the Open Source Backup Conference 2017 in Cologne while Marius wrote about the end of Ubuntu 12.04 LTS.
Later in April, Marius H. gave some practical tips for the Galera Cluster and Dirk wrote about contributing to projects on GitHub.
Then Martin K. presented the next NETWAYS Web Services App, GitLab CE Hosting, and Julia told about the latest OSDC-News.
Furthermore, Catharina reviewed the team event of the commercial departments while Noah told us how to block some Google searches in Google Chrome.
Lennart gave an insight in the monitoring project at htp GmbH and Daniel introduced himself.
Towards the end of April, Isabel told about the latest news concerning the AKCP sensorProbe 2+ and Martin S. explained external monitoring by the Icinga2 satellites at NETWAYS Web Services.
Last but not least, Jean reported on monitoring powershell scripts with Icinga 2, while Lennart went on with part 2 of automated monitoring with Puppet.
NETWAYS Blog
Neuigkeiten rund um die AKCP sensorProbe 2+
 Der Online-Store hat schon immer Umweltmonitore von AKCP im Angebot. Die Qualität der Ware ist unbestritten und unsere Kunden und wir profitieren von der gut durchdachten Hardware. Bei unseren Kunden ist die Ware sehr beliebt und gehört zu unseren Topsellern.
Im vergangenen Jahr wurde nun die AKCP sensorProbe2 komplett überarbeitet und nennt sich nun sensorProbe2+. Alle bekannten Features blieben erhalten und auch die Kompatibilität mit allen Sensoren der sensorProbe-Reihe bleibt gegeben.
Ab der neuen Baureihe ist es endlich auch möglich, ein GSM-Modem zu integrieren, wobei dies bei der Erstbestellung der AKCP sensorProbe2+ zwingend mitbestellt werden muss. Außerdem sind bei allen Geräten der AKCP sensorProbe2+– Reihe die VPN Funktion und ein Upgrade auf SNMPv3 optional bestellbar. Neuheit: Bei der E-Mail-Alarmierung wird nun auf TLS-Verschlüsselung gesetzt, die es bislang nur bei den securityProbes gab.
Bei der AKCP SP2+ können neben den bekannten RJ45-Sensoren, von denen vier angeschlossen werden können, auch bis zu 20 potentialfreie Kontakte genutzt werden. Für den Anschluss der potentialfreien Kontakte ist sowohl der Kauf des Sensors: Inputs für potentialfreie Kontakte (5 potentialfreie Kontakte) und eine Lizenz, die jeweils für 5 potentialfreie Kontakte gilt, erforderlich.
Technische Daten AKCP sensorProbe2+
- Anschlüsse: 4 RJ45 Ports, für sämtliche AKCP-Sensoren der sensorProbe-Reihe, bis zu 20 potentialfreie Kontakte (über speziellen Sensor + Lizenz)
- Maße/Gewicht: (ca. BxHxT in cm) 11,5 x 6,35 x 3,2/ 0,3 kg
- GSM-Modem: optional, inklusive externer Antenne
- sensorProbe2+ Expansion: mit Expansion Unit für bis zu 100 Sensoren
- Stromversorgung: 12 VDC, 1 Amp; inkl Modem: 12 VDC, 2 Amp
- Arbeitsumgebung: Temperatur: -35 bis +80 C / Luftfeuchte: 20 bis 80 % (ohne Kondensation)
Intelligente Erweiterung: AKCP sensorProbe2+ Expansion
4 Sensoren reichen Ihnen nicht? Prima, dann können Sie die AKCP sensorProbe2+ Expansion nutzen. Einer der 4 RJ45 Ports kann dort dazu genutzt werden, die von der AKCP securityProbe Reihe bekannten Expansion Units anzuschließen. Hier kann auf die Erweiterung um 8 Ports und/oder die Erweiterung um 16 potentialfreie Kontakte zurückgegriffen werden. Im Daisy Chain Verfahren können somit bis zu 100 Sensoren angeschlossen werden. Ausnahme: Die o.g. VPN Funktion wurde zusätzlich e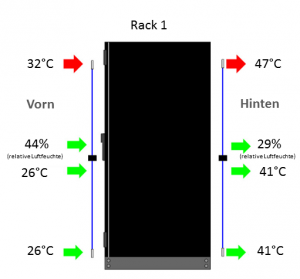 ingekauft. Damit verringert sich die Anzahl der Sensoren auf 50.
Thermal Mapping: Noch genauere Überwachung Ihrer Serverschränke möglich
Die genauere Auswertung und Erfassung thermischer Bedingungen eines Serverracks wird nun durch den neuen Thermal Map Sensor ermöglicht. Dabei wird der Sensor wie im Schaubild rechts zu sehen, an unterschiedlichen Stellen des Racks positioniert. So können „Hot-Spots“ leicht lokalisiert werden, was ein gezieltes Eingreifen schneller ermöglicht. Hier kann durch effizientes Kühlen an den besonders warmen und kühlen Stellen, bares Geld gespart werden. Der Thermal Map Sensor kann separat gekauft werden, es gibt aber auch ein Bundle in Form der AKCP sensorProbe2+ inkl. Thermal Map Sensor (Temperatur + Luftfeuchte).
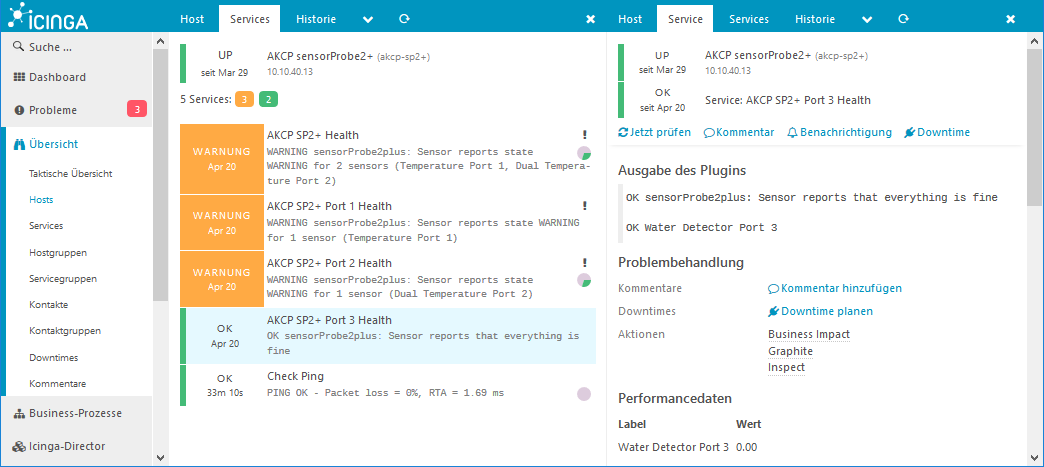
Neues Icinga 2 check-Plugin für AKCP sensorProbe 2+ verfügbar!
Ab sofort steht das neue Plugin für die AKCP sensorProbe 2+ im Github bereit. Unser Entwicklungsteam hat sich das bereits bestehende, seit Jahren funktionierende check_AKCP -Plugin zur Vorlage genommen und ein neues Plugin kreiert. Hier war es notwendig die erweiterte Funktionalität des Gerätes zu berücksichtigen. Hier mal eine Ansicht dazu:
Webinar AKCP SP2+: Die Neuheiten und Icinga 2 Integration
Wer sich die Funktionalität und die Integration in Icinga 2 einmal anschauen möchte, sei herzlich zu unserem Webinar zum AKCP sensorProbe 2+ am 27.04.2017 um 10:30 Uhr eingeladen. Im Anschluss an die Präsentation und die Livedemo gibt es auch die Möglichkeit per Chat Fragen zu stellen. Wir freuen uns auf Sie!
Contributing to projects on GitHub

Today I want to share my workflow for contributing to projects hosted on GitHub because I believe it works very well for me and I regularly contribute to various projects. Of course most of this also applies to other hosted Git platforms like GitLab. It will not involve any Git magic as there are other posts to do that. So let’s use adding a check command to Icinga 2 as my example.
The obvious first step is finding the Git repository for the project and reading contribution guidelines because there are some projects which aren’t hosted on GitHub and some have additional requirements like submitting an issue in addition to a pull request. You should always familiarize yourself with and stick to those policies if you want your pull request to be accepted. For Icinga 2 there currently aren’t any additional project-specific guidelines.
Your next step is to create a fork on GitHub and clone the repository. So in the GitHub web interface click on „Fork“ and select your own account (or company account as long as you are allowed to push). Once you’ve forked the repository you can check out a local copy using the following command:
git clone git@github.com/dgoetz/icinga2.git
Afterwards you should add another „remote“ for the original Git repository in order to be able to update your own repository with changes from the upstream project:
cd icinga2/

git remote add upstream git@github.com:icinga/icinga2.git
After these initial steps you can create a Git branch for your feature or bug fix. Using the „master“ branch for pull requests is strongly discouraged because things tend to get complicated once you have more than one pull request. Another recommendation is to use branch names that match the upstream repository’s style. This however is not a hard requirement:
git checkout -b feature/expand-check-foo
This also automatically switches to the newly-created branch which means you can now start to edit files for your pull request. Once you’re done you can add them to the Git index and create a commit. Typically upstream projects have guidelines for this, so do not forget to include documentation, make only one commit out of your work (perhaps by squashing) and so on.
vi itl/plugins-contrib.d/network-components.conf

vi doc/10-icinga-template-library.md

git add itl/plugins-contrib.d/network-components.conf doc/10-icinga-template-library.md

git commit -m "ITL: expanded check foo"
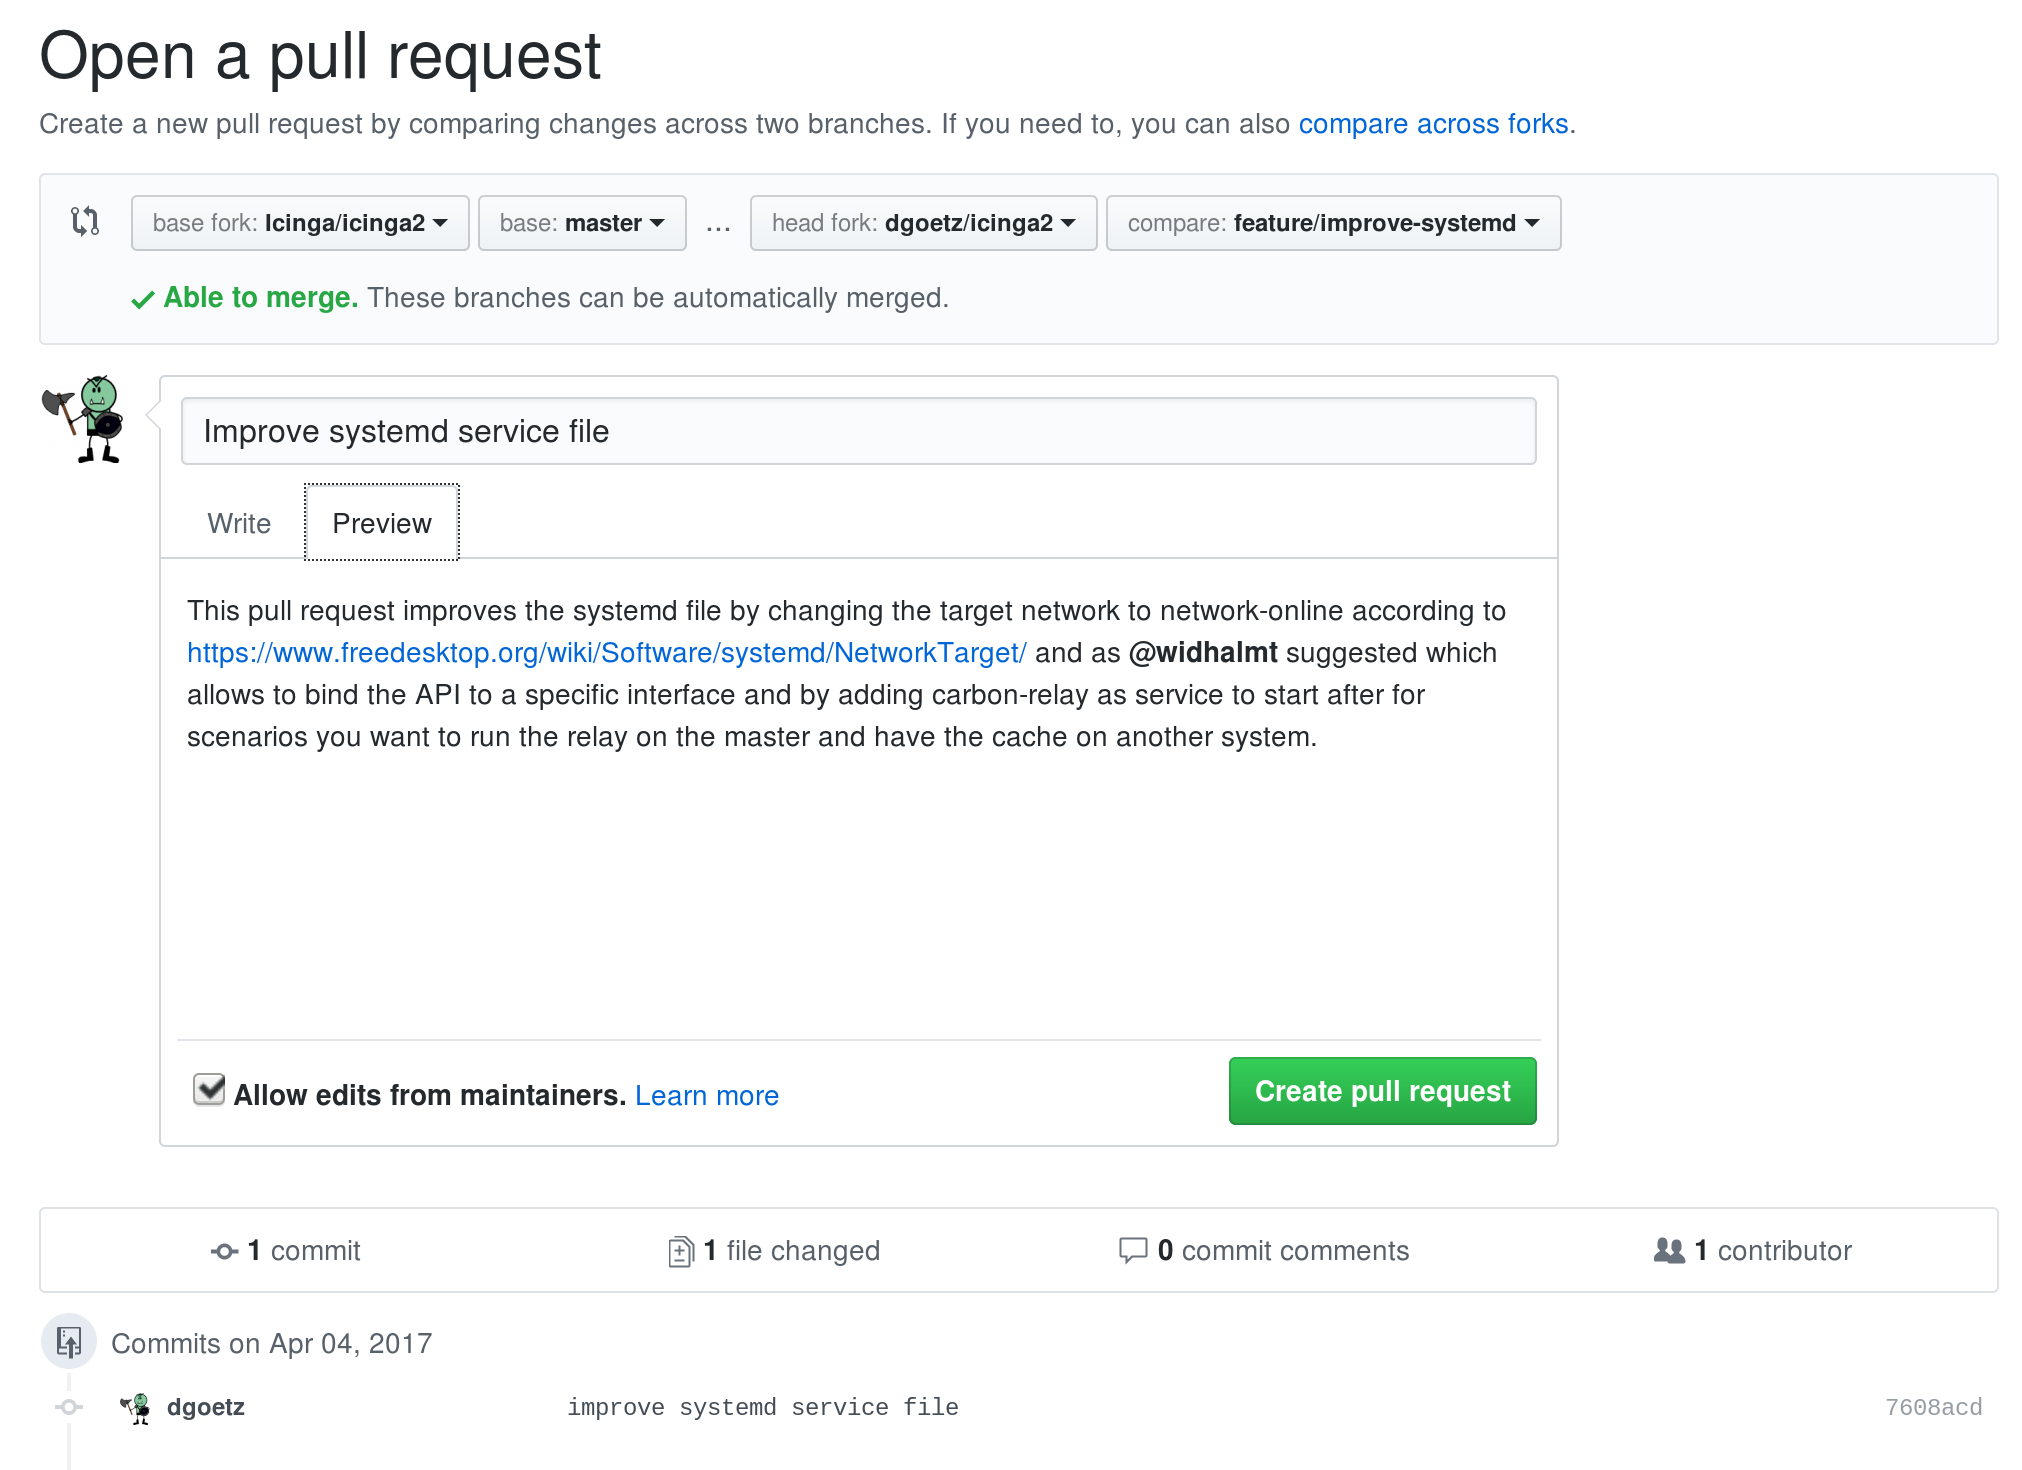
Afterwards push your commit to your forked repository and then create your pull request using the GitHub webinterface:
git push -u origin feature/expand-check-foo
When creating the pull request make sure to provide a detailed description of your changes and the reason why you feel that your pull request should be merged. Keep the setting checked to allow edits from maintainers. Depending on the project make sure to reference any related issues, fill in their pull request template or do whatever else they require for pull requests.
Typically once a pull request is created automated tests will be run and a review process by the project team will start, so it’s possible that you’ll be asked to make changes before your pull request is accepted. If this happens simply edit your branch to fix whatever problems were found during the review, amend your commit and force push it to your fork. This will also automatically update your pull request but you might want to provide a comment for the pull request as to what has changed:
vi doc/10-icinga-template-library.md

git add doc/10-icinga-template-library.md

git commit --amend -m "ITL: expanded check foo"

git push -f
Another commonly requested change is that you rebase your branch before the pull request is accepted. This usually happens when significant changes were made to the upstream repository while your pull request was waiting to be merged. In order to rebase your branch the following commands should be all you need, however in some cases you may also have to manually resolve conflicts:
git pull --rebase upstream master

git push -f
And of course you will sometimes want to create additional pull requests. For these make sure to start with a new branch based on the upstream repository:
git checkout master

git pull upstream master

git checkout -b fix/check-bar

...

git push -u origin fix/check-bar
So, this is it, this is my basic workflow for easy contributions on GitHub. I hope it helps you to get involved with your favorite projects and your fixes and features to get upstream. If you prefer to do all step in the command line, you can have a look at GitHub’s command-line wrapper for git hub. If you need more general Git knowledge I recommend the Git book and our training. If you need a GitLab system to play around, have a look at our NWS platform.

Dirk Götz
Principal Consultant
Dirk ist Red Hat Spezialist und arbeitet bei NETWAYS im Bereich Consulting für Icinga, Puppet, Ansible, Foreman und andere Systems-Management-Lösungen. Früher war er bei einem Träger der gesetzlichen Rentenversicherung als Senior Administrator beschäftigt und auch für die Ausbildung der Azubis verantwortlich wie nun bei NETWAYS.
Authentication with OAuth
It’s pretty safe to say, that everyone using the web has already made an account for some website. For the broad masses the most common ones would be social media sites like facebook, youtube and twitter. Then there are also online shopping platforms like e-bay and amazon, and more techie orientated pages like stack overflow and all sorts of version control repositories.
(And of course various others for anything and everything else…)
Third party applications often allow you to sign in with your account from another website.
The good thing is, that you don’t need to create a separate account for every single one, but are offered the possibility to just sign in with an account you created for a different service.
The page for which you want to use a different account needs to request data from the original website and use it to authenticate the user (without their input).
In order to give both the requesting website and the user assurance that the data will be safe and reliable some sort of standardisation is required.
Most commonly used is the open standard for authorisation OAuth.
With OAuth it is possible for users to grant access to their information from a certain website without giving away their credentials.
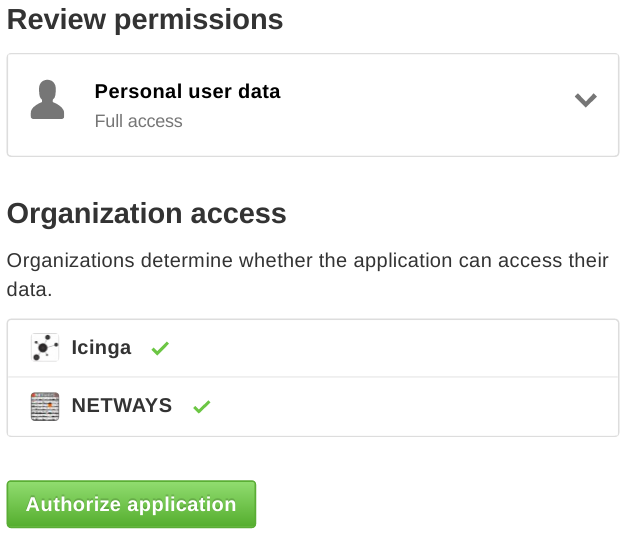
This is what it looks like when the user reviews the permissions.
In order for the third party application to obtain specific information about a user, it has to request an access token from the authorisation server, and when the user grants the permission, use that token to access the resources from the website.
In our specific case we want users to be able to log in to Icinga Exchange with their GitHub accounts.
If you now also want to integrate GitHub on your website and/or see how it’s done: they have a detailed tutorial here.

Feu Mourek
Developer Advocate
Feu verbrachte seine Kindheit im schönen Steigerwald, bevor es sich aufmachte die Welt zu Erkunden. Seit September 2016 unterstützt es Icinga zunächst als Developer und seit 2020 als Developer Advocate, und NETWAYS als Git und GitLab Trainer. Seine Freizeit verbringt es hauptsächlich damit Video-, und Pen and Paper Rollenspiele zu spielen, sich Häuser zu designen (die es sich nie leisten können wird) oder ganz lässig mit seinem Cabrio durch die Gegend zu düsen.
Netways Managed Services Status Page – Github is your friend
Unser neues Familienmitglied
Als neuestes Angebot für unsere Hosting-Kunden haben wir nun eine Wartungsseite ins Leben gerufen. Diese ist öffentlich sichtbar unter status.netways.de und soll über Wartungsintervalle unserer Systeme informieren.
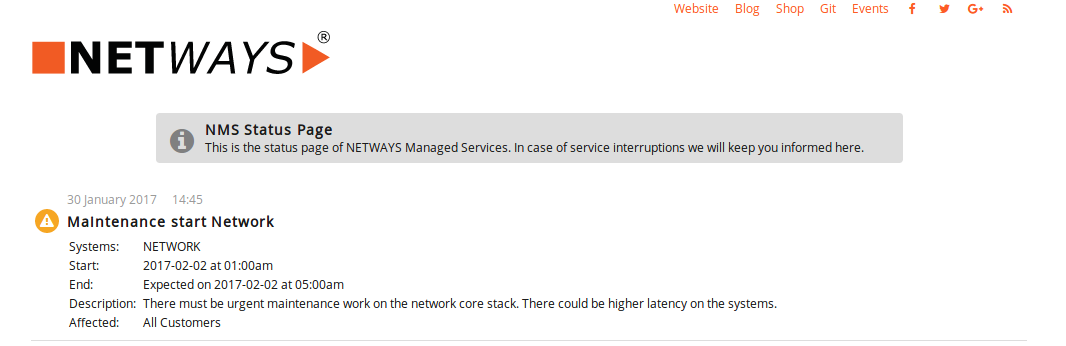
Diese Informationen sind in Form eines Blogs aufbereitet und umfassen Meldungen zu Wartungsbeginn, Wartungsende, Verlaufsupdates sowie den betroffenen Systemen und Services.
Blick hinter die Kulissen
Es gibt natürlich sehr viele Varianten, eine Webseite mit Blog umzusetzen. Eines unserer Kriterien war, dass die Wartungsseite extern gehostet sein sollte, um auch bei Wartungen an Webservern oder eventuellen Ausfällen den Informationsfluss zum Kunden garantieren zu können. Des Weiteren sollten Posts schnell und mit Methoden erstellt werden, die das Team bereits im Einsatz hat. Recht schnell fiel die Entscheidung dann auf das Format Github Pages, das all dies nativ bietet.
Wie funktioniert Github Pages?
Github Pages bietet die Möglichkeit, in einem Repository eine Webseite zu erstellen, die unter der URL <username>.github.io online verfügbar ist. Die Struktur der Webseite ist frei wählbar und kann mit den üblichen Layout-Sprachen wie HTML und CSS erstellt werden. Änderungen an der Webseite und das Hinzfügen von Posts können zum einen über die Github-Webseite, aber auch wie gewohnt über die git-Kommandozeile durchgeführt werden.
Nun fragen sich wahrscheinlich viele, wo denn jetzt der Clou an Github Pages ist – Jekyll!
Jekyll ist die Engine, die für uns im Hintergrund den Blog erstellt und die Webseite aktualisiert, sobald ein neuer Post oder eine Änderung an einem bereits bestehenden Post erfolgt. Dies ist nativ in Github Pages eingebaut, so dass hier nichts installiert werden muss – es gilt nur, die von Jekyll erwarteten Konventionen einzuhalten. Dazu gehören z. B. die Directory-Struktur im Repository sowie die File-Namen der Blog-Posts. Damit Jekyll den Blog korrekt generieren kann, werden Layouts hinterlegt, so dass die Posts als schön formatierte Einträge auf der Webseite erscheinen. Mithilfe dieser Layouts kann Jekyll die in Markdown verfassten Inhalte der Posts interpretieren.
Github Pages steht jedem zur Verfügung, der einen Github-Account besitzt. Was man daraus macht, bleibt einem selbst überlassen – jedoch sollte man sich dieses Angebot nicht entgehen lassen.
Als Startpunkt für die Reise durch Github Pages ist das Tutorial von Jonathan McGlone sehr zu empfehlen:
Creating and Hosting a Personal Site on GitHub
Ich wünsche allen Interessierten viel Spaß beim Ausprobieren!


