Seite wählen

NETWAYS Blog

From Monitoring to Observability: Distributed Tracing with Jaeger

Modern cloud environments and microservice architectures need a changed mindset when it comes to monitoring. Classic host/service object relations are not always applicable, containers run in Kubernetes are short lived, and application performance within distributed networks is hard to monitor. Especially with applications running millions of operations, where to start the root cause analysis for slow client responses in your web shop? Is it just slow connections to MySQL, or does the application’s debug log slow down the entire fleet?

This is where observability with tracing comes into play. In the cloud native space, OpenTracing evolved as vendor neutral standardized API including client instrumentation. Famous tools are Zipkin and Jaeger which was contributed from Uber to the CNCF.

Let’s have a look into Jaeger today.


Getting Started

The easiest way to try Jaeger is with using the Docker container explained in the documentation.

docker run -d --name jaeger \
  -e COLLECTOR_ZIPKIN_HTTP_PORT=9411 \
  -p 5775:5775/udp \
  -p 6831:6831/udp \
  -p 6832:6832/udp \
  -p 5778:5778 \
  -p 16686:16686 \
  -p 14268:14268 \
  -p 9411:9411 \
  jaegertracing/all-in-one:1.16

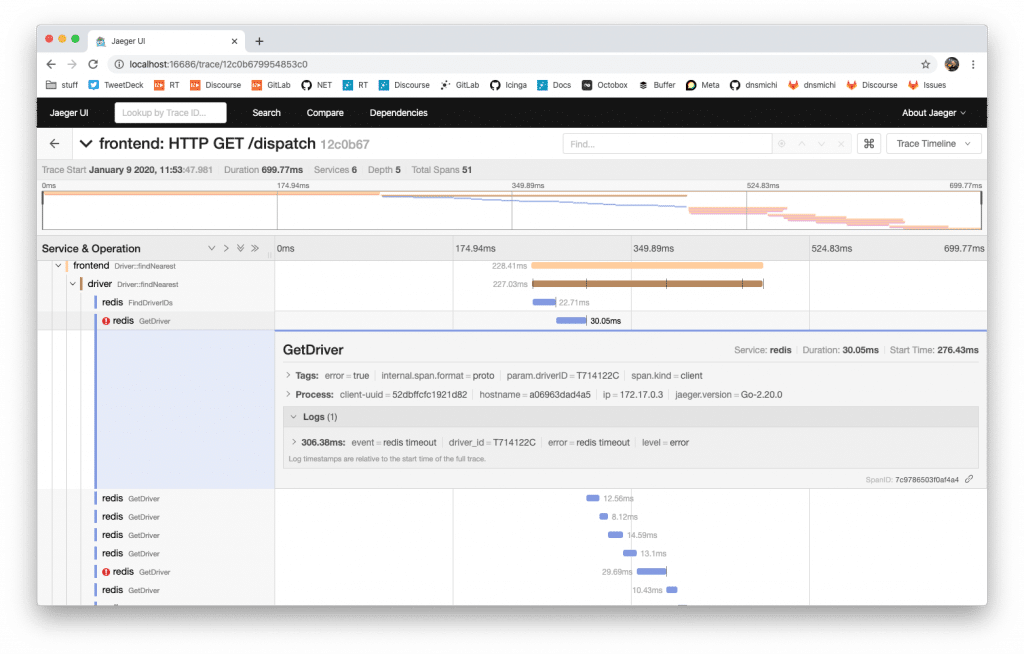
Navigate to http://localhost:16686 to get greeted by Jaeger.


Try it

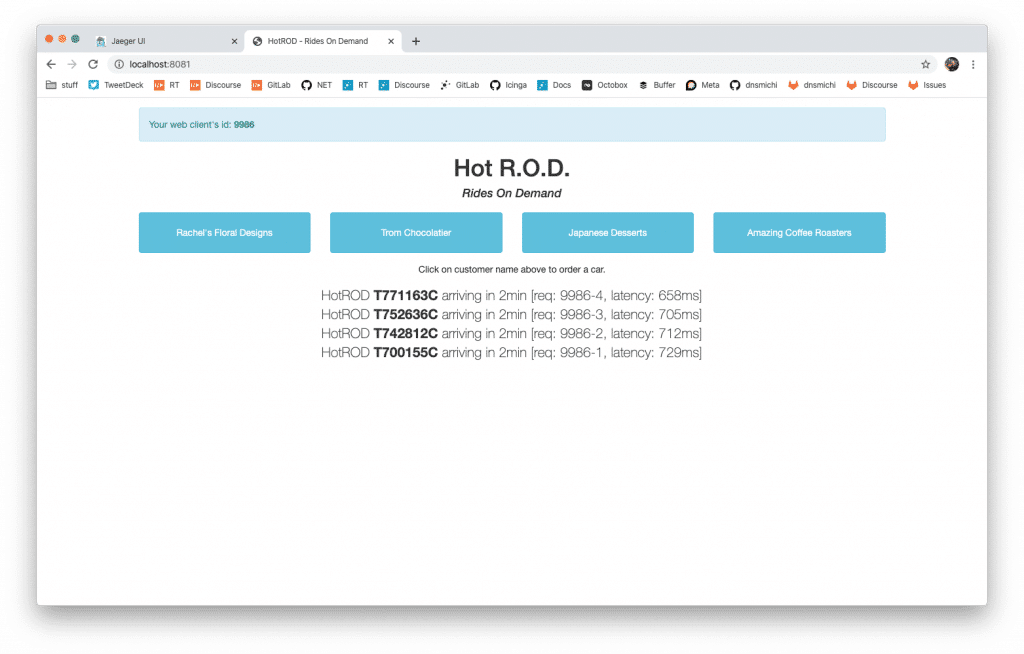
A sample application is available as container. I’m using a modified port mapping with 8081-8084 here since port 8080 is already assigned.

docker run --rm -it \
  --link jaeger \
  -p8081-8084:8080-8083 \
  -e JAEGER_AGENT_HOST="jaeger" \
  jaegertracing/example-hotrod:1.16 \
  all

Navigate to http://localhost:8081 and click the buttons to order some cars.

Within Jaeger itself, start analyzing the traces and for example learn that Redis runs into timeouts quite often delaying the HTTP responses to the clients.


Traces for applications

Jaeger provides officially supported client libraries for Go, Java, Python, NodeJS, C/C++, C#/.NET, others are in the making. Let’s see if we can add it into Icinga 2 and do some tracing here.

First off, clone the repository, build and install the client libraries. You’ll need CMake, a C++ compiler, etc. – basically everything which is required for Icinga 2 too and documented here. In this example, I’m compiling on my Macbook. There are additional libraries and headers required. Hint: Boost 1.72 has a bug which needs a patch.

brew install yaml-cpp thrift 
git clone https://github.com/opentracing/opentracing-cpp && cd opentracing-cpp
# 1.6.0 doesn't work atm
git checkout v1.5.1
mkdir -p build && cd build
cmake ..
make && make install
cd ..

Then clone, cmake, make, install.

git clone https://github.com/jaegertracing/jaeger-client-cpp && cd jaeger-client-cpp
git checkout v0.5.0
# regenerate thrift headers for 0.11.0
find idl/thrift/ -type f -name \*.thrift -exec thrift -gen cpp -out src/jaegertracing/thrift-gen {} \;
mkdir -p build && cd build
cmake ..
make && make install
cd ..

In order to add Jaeger into Icinga 2, there are the following steps necessary:

  • Add CMake functions to lookup yaml-cpp, opentracing, jaeger headers and libraries
  • Optionally enable Jaeger tracing code, link the icinga2 binary against it
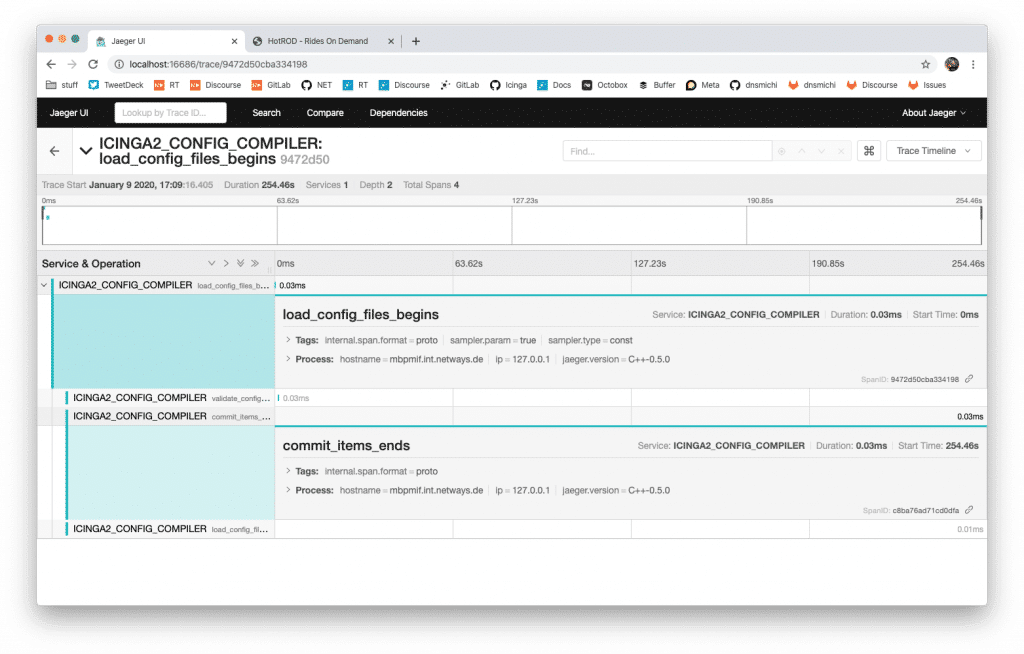
  • Add a new tracer into the Config Compiler CLI command to measure the timing points

The majority of development time today was to resolve compile and linking issues, adding spans and traces is really simple. You can follow my progress in this Icinga PR – developers, get started wtih the client libraries and help your colleagues with enhanced observability!


Conclusion

Tracing application performance, cluster messages, end2end tests and any sort of event span provides valuable insights for both, devs and ops. With the new cloud native landscape evolving fast, we have additional possibilities to analyze our environments. Next to the now standardized tools for parsing and ingesting logs with Elastic Stack or Graylog, tracing has found its place in the observability stack.

Jaeger Tracing also is part of the GitLab observability suite which will be moved to the free core edition in 2020. Metrics, logging, alerts and tracing are key elements in modern cloud environments. Prometheus monitors everything from classic load checks to Kubernetes containers, Jaeger provides application performance insights and on top of that, Grafana combines the view on problems and trends. You can learn more about GitLab’s vision here.

Exploring these cool new features in GitLab are our mission in future trainings and workshops, watch this space in 2020!

GitLab CI Runners with Auto-scaling on OpenStack


With migrating our CI/CD pipelines from Jenkins to GitLab CI in the past months, we’ve also looked into possible performance enhancements for binary package builds. GitLab and its CI functionality is really really great in this regard, and many things hide under the hood. Did you know that „Auto DevOps“ is just an example template for your CI/CD pipeline running in the cloud or your own Kubernetes cluster? But there’s more, the GitLab CI runners can run jobs in different environments with using different hypervisors and the power of docker-machine.

One of them is OpenStack available at NWS and ready to use. The following examples are from the Icinga production environment and help us on a daily basis to build, test and release Icinga products.


Preparations

Install the GitLab Runner on the GitLab instance or in a dedicated VM. Follow along in the docs where this is explained in detail. Install the docker-machine binary and inspect its option for creating a new machine.

curl -L https://packages.gitlab.com/install/repositories/runner/gitlab-runner/script.deb.sh | sudo bash
apt-get install -y gitlab-runner
  
curl -L `uname -s`-`uname -m` -o /usr/local/bin/docker-machine
chmod +x /usr/local/bin/docker-machine
  
docker-machine create --driver openstack --help

Next, register the GitLab CI initially. Note: This is just to ensure that the runner is up and running in the GitLab admin interface. You’ll need to modify the configuration in a bit.

gitlab-runner register \
  --non-interactive \
  --url https://git.icinga.com/ \
  --tag-list docker \
  --registration-token SUPERSECRETKEKSI \
  --name "docker-machine on OpenStack" \
  --executor docker+machine \
  --docker-image alpine


Docker Machine with OpenStack Deployment

Edit „/etc/gitlab-runner/config.toml“ and add/modify the „[[runners]]“ section entry for OpenStack and Docker Machine. Ensure that the MachineDriver, MachineName and MachineOptions match the requirements. Within „MachineOptions“, add the credentials, flavors, network settings just as with other deployment providers. All available options are explained in the documentation.

vim /etc/gitlab-runner/config.toml

  [runners.machine]
    IdleCount = 4
    IdleTime = 3600
    MaxBuilds = 100
    MachineDriver = "openstack"
    MachineName = "customer-%s"
    MachineOptions = [
      "openstack-auth-url=https://cloud.netways.de:5000/v3/",
      "openstack-tenant-name=1234-openstack-customer",
      "openstack-username=customer-login",
      "openstack-password=sup3rS3cr3t4ndsup3rl0ng",
      "openstack-flavor-name=s1.large",
      "openstack-image-name=Debian 10.1",
      "openstack-domain-name=default",
      "openstack-net-name=customer-network",
      "openstack-sec-groups="mine",
      "openstack-ssh-user=debian",
      "openstack-user-data-file=/etc/gitlab-runner/user-data",
      "openstack-private-key-file=/etc/gitlab-runner/id_rsa",
      "openstack-keypair-name=GitLab Runner"
    ]

The runners cache can be put onto S3 granted that you have this service available. NWS luckily provides S3 compatible object storage.

  [runners.cache]
    Type = "s3"
    Shared = true
    [runners.cache.s3]
      ServerAddress = "s3provider.domain.localdomain"
      AccessKey = "supersecretaccesskey"
      SecretKey = "supersecretsecretkey"
      BucketName = "openstack-gitlab-runner"

Bootstrap Docker in the OpenStack VM

Last but not least, these VMs need to be bootstrapped with Docker inside a small script. Check the „–engine-install-url“ parameter in the help output:

root@icinga-gitlab:/etc/gitlab-runner# docker-machine create --help
  ...
  --engine-install-url "https://get.docker.com"							Custom URL to use for engine installation 

You can use the official way of doing this, but putting this into a small script also allows customizations like QEMU used for Raspbian builds. Ensure that the script is available via HTTP e.g. from a dedicated GitLab repository 😉

#!/bin/sh
#
# This script helps us to prepare a Docker host for the build system
#
# It is used with Docker Machine to install Docker, plus addons
#
# See --engine-install-url at docker-machine create --help

set -e

run() {
  (set -x; "$@")
}

echo "Installing Docker via get.docker.com"
run curl -LsS https://get.docker.com -o /tmp/get-docker.sh
run sh /tmp/get-docker.sh

echo "Installing QEMU and helpers"
run sudo apt-get update
run sudo apt-get install -y qemu-user-static binfmt-support

Once everything is up and running, the GitLab runners are ready to fire the jobs.


Auto-Scaling

Jobs and builds are not run all the time, and especially with cloud resources, this should be a cost-efficient thing. When building Icinga 2 for example, the 20+ different distribution jobs generate a usage peak. With the same resources assigned all the time, this would tremendously slow down the build and release times. In that case, it is desirable to automatically spin up more VMs with Docker and let the GitLab runner take care of distributing the jobs. On the other hand, auto-scaling should also shut down resources in idle times.

By default, one has 4 VMs assigned to the GitLab runner. These builds run non-privileged in Docker, the example below also shows another runner which can run privileged builds. This is needed for Docker-in-Docker to create Docker images and push them to GitLab’s container registry.

root@icinga-gitlab:~# docker-machine ls
NAME                                               ACTIVE   DRIVER      STATE     URL                      SWARM   DOCKER     ERRORS
runner-privileged-icinga-1571900582-bed0b282       -        openstack   Running   tcp://10.10.27.10:2376           v19.03.4
runner-privileged-icinga-1571903235-379e0601       -        openstack   Running   tcp://10.10.27.11:2376           v19.03.4
runner-non-privileged-icinga-1571904408-5bb761b5   -        openstack   Running   tcp://10.10.27.20:2376           v19.03.4
runner-non-privileged-icinga-1571904408-52b9bcc4   -        openstack   Running   tcp://10.10.27.21:2376           v19.03.4
runner-non-privileged-icinga-1571904408-97bf8992   -        openstack   Running   tcp://10.10.27.22:2376           v19.03.4

Once it detects a peak in the pending job pipeline, the runner is allowed to start additional VMs in OpenStack.

root@icinga-gitlab:~# docker-machine ls
NAME                                               ACTIVE   DRIVER      STATE     URL                      SWARM   DOCKER     ERRORS
runner-privileged-icinga-1571900582-bed0b282       -        openstack   Running   tcp://10.10.27.10:2376           v19.03.4
runner-privileged-icinga-1571903235-379e0601       -        openstack   Running   tcp://10.10.27.11:2376           v19.03.4
runner-non-privileged-icinga-1571904408-5bb761b5   -        openstack   Running   tcp://10.10.27.20:2376           v19.03.4
runner-non-privileged-icinga-1571904408-52b9bcc4   -        openstack   Running   tcp://10.10.27.21:2376           v19.03.4
runner-non-privileged-icinga-1571904408-97bf8992   -        openstack   Running   tcp://10.10.27.22:2376           v19.03.4
runner-non-privileged-icinga-1571904408-97bf8992   -        openstack   Running   tcp://10.10.27.23:2376           v19.03.4

...

runner-non-privileged-icinga-1571904534-0661c396   -        openstack   Running   tcp://10.10.27.24:2376           v19.03.4
runner-non-privileged-icinga-1571904543-6e9622fd   -        openstack   Running   tcp://10.10.27.25:2376           v19.03.4
runner-non-privileged-icinga-1571904549-c456e119   -        openstack   Running   tcp://10.10.27.27:2376           v19.03.4
runner-non-privileged-icinga-1571904750-8f6b08c8   -        openstack   Running   tcp://10.10.27.29:2376           v19.03.4


In order to achieve this setting, modify the runner configuration and increase the limit.

vim /etc/gitlab-runner/config.toml

[[runners]]
  name = "docker-machine on OpenStack"
  limit = 24
  output_limit = 20480
  url = "https://git.icinga.com/"
  token = "supersecrettoken"
  executor = "docker+machine"

This would result in 24 OpenStack VMs after a while, and all are idle 24/7. In order to automatically decrease the deployed VMs, use the OffPeak settings. This also ensures that resources are available during workhours while spare time and weekend are considered „off peak“ with shutting down unneeded resources automatically.

    OffPeakTimezone = "Europe/Berlin"
    OffPeakIdleCount = 2
    OffPeakIdleTime = 1800
    OffPeakPeriods = [
      "* * 0-8,22-23 * * mon-fri *",
      "* * * * * sat,sun *"
    ]

Pretty neat functionality 🙂


Troubleshooting & Monitoring

„docker-machine ls“ provides the full overview and tells whenever e.g. a connection to OpenStack did not work, or if the VM is currently unavailable.

root@icinga-gitlab:~# docker-machine ls
NAME                                               ACTIVE   DRIVER      STATE     URL                      SWARM   DOCKER     ERRORS
runner-privileged-icinga-1571900582-bed0b282       -        openstack   Error                                      Unknown    Expected HTTP response code [200 203] when accessing [GET https://cloud.netways.de:8774/v2.1/servers/], but got 404 instead

In case you have deleted the running VMs to start fresh, provisioning might take a while and the above can be a false positive. Check the OpenStack management interface to see whether the VMs booted correctly. You can also remove a VM with „docker-machine rm <id>“ and run „gitlab-runner restart“ to automatically provision it again.

Whenever the VM provisioning fails, a gentle look into the syslog (or runner log) unveils what’s the problem. Lately we had used a wrong OpenStack flavor configuration which was fixed after investigating in the logs.

Oct 18 07:08:48 3 icinga-gitlab gitlab-runner[30988]:  #033[31;1mERROR: Error creating machine: Error in driver during machine creation: Unable to find flavor named 1234-customer-id-4-8#033[0;m  #033[31;1mdriver#033[0;m=openstack #033[31;1mname#033[0;m=runner-non-privilegued-icinga-1571375325-3f8176c3 #033[31;1moperation#033[0;m=create

Monitoring your GitLab CI runners is key, and with the help of the REST API, this becomes a breeze with Icinga checks. You can inspect the runner state and notify everyone on-call whenever CI pipelines are stuck.


Conclusion

Developers depend on fast CI feedback these days, speeding up their workflow – make them move fast again. Admins need to understand their requirements, and everyone needs a deep-dive into GitLab and its possibilities. Join our training sessions for more practical exercises or immediately start playing in NWS!

GitLab Commit London Recap

A while ago, when GitHub announced CI/CD for the upcoming actions feature, I’ve been sharing with Priyanka on Twitter how we use GitLab. The GitLab stack with the runners, Docker registry and all-in-one interface not only speeds up our development process and packaging pipelines, it also scales our infrastructure deployments even better. With the love for GitLab, we’ve also created our GitLab training sharing all the knowledge about this great tool stack.


GitLab, GitLab, GitLab

Priyanka was so kind to invite us over to GitLab Commit in London, GitLab’s first European user conference. At first glance, Bernd and I didn’t know what would happen – turns out, this wasn’t a product conference. Instead, meeting new people and learning how they use GitLab in their environments was put into focus. Sid Sijbrandij, GitLab’s CEO, kicked off the event in the morning and after sharing the roots of GitLab being in Europe, he asked the audience to „meet your neighbour and connect“. Really an icebreaker for the coming talks and sessions.

The next keynote was presented by engineers from Porsche sharing their move to GitLab. With Java Boot Spring and iOS application development, and the requirement of deeper collaboration between teams, they took the challenge and are using GitLab since ~1 year. Interesting to learn was that nearly everyone at GitLab Commit uses Terraform for deployments. Matt did so too in his live coding session with a full blown web application Kubernetes container setup all managed and deployed with GitLab and Terraform. After 20 minutes of talking way too fast, it worked. What a great way of showing what’s possible with today’s tool stack!


DevOps for everyone

One thing I’ve also recognized – everyone seems to be moving to Kubernetes and Terraform. Rancher, Jenkins and other tools in the same ecosystem seem to be falling short in modern DevOps environments. I really liked the security panel where ideas like automated dependency scanning in merge requests have been shared. Modern days with easy to use libraries typically pull in lots of unforeseen dependencies and who really knows about all the vulnerabilities? Blocking the merge request in case of emergency is a killer feature for current development workflows.

In terms of the product roadmap, GitLab has a huge vision which is not easy to summarize. On the other hand, having a maybe-not-reachable vision empowers a great team to work even harder. The short term improvements for CI are for example Directed Acyclic Graphs allowing parallel pipelines to continue faster. This will greatly enhance our package pipelines in the future. While tweeting about this, Jason was so kind to share the build matrix feature known from Travis coming soon with GitLab 12.6. Spot on, testing e.g. different PHP versions for the same job is greatly missed being as easy as Travis. GitLab Runners will receive support for ARM soon, and also Vault integration is coming. GitLab also announced their startup Meltano, an open source data to dashboard workflow platform – looks really promising.

The afternoon sessions were split into 3 tracks each, with even more user stories. Moving along from Delta with their many of thousands of repositories, we’ve also learned more about VMware’s cloud architects and how they incorporate GitLab & Terraform for deployments. Last but not least we’ve joined Philipp sharing his story on migrating from Jenkins to GitLab CI. Since we struggled from the same problems (XML config, plugins breaking upgrades, etc.) we were enlightened to see that he even developed a GitHub to GitLab issue migrator, fully open source. Moving to a central platform and away from 5+ browser tabs really is a key argument in stressful (development) times. Avoiding context switches for developers improves quality and ensures better releases from my experience.


Get the party started

The evening event took place at Swingers, a bar which had a Mini Golf playground built-in. We were going there with the iconic London Bus, and the nice people from GitLab even ensured that Gin&Tonic made this a great starter. Right after arriving, the fire alarm rang off and we had to move outside. Party like NETWAYS 😉 And finally we met Priyanka to say hi, lovely memory. We also met Brian, proud Irish, challenging us with funny stories and finding out that Germans do not know everything. Really charming and much to laugh.

Thanks GitLab for this top notch event and see you next year!

More Monitoring at OSMC: Workshops & Hackathon

OSMC’s two-day lecture program on November 5 and 6 is framed by two further highlights.

OSMC Highlight #1 – Workshops

In four Workshops on November 4, experienced trainers impart their comprehensive knowledge. Get your Add-On-Ticket to join one of them and extend your knowledge & stay!

    • Prometheus
    • Foreman
    • GitLab
    • OpenNMS

OSMC Highlight #2 – Hackathon

In the Hackathon on November 7, participants will share their own ideas and knowledge and hack in groups. Spread the word about your project, share your newest findings and learn about other’s challenges. Register now!

Since 2006 OSMC has gained importance as annual meeting of the international monitoring community. The event brings together 250+ participants, leading international system engineers, developers, IT managers, users and open source community members.

Tickets and more available at: osmc.de

Quick and Dirty: OpenStack + CoreOS + GitLab Runner

Wer in GitLab die CI/CD-Features nutzen möchte und nicht zufällig einen ungenutzten Kubernetes-Cluster übrig hat, mit dem man GitLab’s Auto DevOps Funktion einrichten kann, der benötigt zumindest einen GitLab Runner, um Build-Jobs und Tests zum Laufen zu bekommen.
Der GitLab Runner ist eine zusätzliche Anwendung, welche sich ausschließlich darum kümmert, bei einer GitLab-CE/-EE Instanz die CI/CD-Aufträge abzuholen und diese abzuarbeiten. Der Runner muss dabei nicht zwingend auf dem selben System wie das GitLab installiert sein und kann somit auch extern auf einem anderen Host laufen. Der Hintergrund, weshalb man das auch so umsetzen sollte, ist eigentlich recht klar: ein GitLab Runner steht bei einer aktiven CI/CD-Pipeline oftmals unter hoher Last und würde er auf dem gleichen Host wie das GitLab selbst laufen, so könnte er dessen Performance stark beeinträchtigen. Deshalb macht es Sinn, den GitLab Runner z.B. auf eine VM in OpenStack auszulagern.
In diesem Blogpost werde ich kurz darauf eingehen, wie man schnell und einfach eine GitLab Runner VM per CLI in OpenStack aufsetzen kann. Da ich den Runner als Docker-Container starten möchte, bietet sich CoreOS an. CoreOS kommt mit Docker vorinstalliert und es bietet die Möglichkeit per Ignition Config nach dem Start des Betriebssystems Container, oder auch andere Prozesse, automatisch starten zu lassen.

Sobald man sich bei seinem OpenStack-Anbieter in sein Projekt eingeloggt hat, kann man sich dort unter „API Zugriff“ die OpenStack-RC-Datei herunterladen. Damit kann man sich dann recht einfach per CLI bei OpenStack authentifizieren. Voraussetzung für die Nutzung der CLI ist, dass man bei sich den OpenStack Command-Line Client installiert hat.
Sobald man beides hat, kann es auch schon losgehen:

    1. Runner Registration Token abholen
      Dazu loggt man sich als Admin in sein GitLab-CE/-EE ein und navigiert zu „Admin Area“ -> „Overview“ -> „Runners“. Hier findet man den aktuellen Registration Token.
    2. CoreOS Ignition Config
      Die Konfigurationsdatei für CoreOS nennt man z.B. config.ign. Diese legt man sich ebenfalls auf dem Rechner ab.
      Der Inhalt muss im nächsten Schritt geringfügig angepasst werden.

      config.ign

      { "ignition": { "version": "2.2.0", "config": {} }, "storage": { "filesystems": [{ "mount": { "device": "/dev/disk/by-label/ROOT", "format": "btrfs", "wipeFilesystem": true, "label": "ROOT" } }] }, "storage": { "files": [{ "filesystem": "root", "path": "/etc/hostname", "mode": 420, "contents": { "source": "data:,core1" } }, { "filesystem": "root", "path": "/home/core/config.toml", "mode": 644, "contents": { "source": "data:,concurrent=4" } } ] }, "systemd": { "units": [ { "name": "gitlab-runner.service", "enable": true, "contents": "[Service]\nType=simple\nRestart=always\nRestartSec=10\nExecStartPre=/sbin/rngd -r /dev/urandom\nExecStart=/usr/bin/docker run --rm --name gitlab-runner -e 'GIT_SSL_NO_VERIFY=true' -v /home/core:/etc/gitlab-runner -v /var/run/docker.sock:/var/run/docker.sock gitlab/gitlab-runner:v11.8.0 \n\n[Install]\nWantedBy=multi-user.target" }, { "name": "gitlab-runner-register.service", "enable": true, "contents": "[Unit]\nRequires=gitlab-runner.service\n[Service]\nType=simple\nRestart=on-failure\nRestartSec=20\nExecStart=/usr/bin/docker exec gitlab-runner gitlab-runner register -n --env 'GIT_SSL_NO_VERIFY=true' --url https://$URL -r $TOKEN --description myOpenStackRunner--locked=false --executor docker --docker-volumes /var/run/docker.sock:/var/run/docker.sock --docker-image ruby:2.5 \n\n[Install]\nWantedBy=multi-user.target" } ] }, "networkd": {}, "passwd": { "users": [ { "name": "core", "sshAuthorizedKeys": [ "$your-ssh-pub-key" ] } ] } }
    3. Ignition Config anpassen
      Beim Systemd-Unit „gitlab-runner-register.service“ setzt man im Content bei den Variablen „$URL“ den FQDN der eigenen GitLab-Instanz und bei „$TOKEN“ den in Schritt 1 kopierten Registration Token ein.
      Außerdem kann man gleich noch seinen SSH-Key mitgeben, damit man später auch per SSH auf die VM zugreifen kann. Diesen hinterlegt man unter dem Abschnitt „passwd“ im Platzhalter „$your-ssh-pub-key“.
    4. CLI Commands
      Nun kann man sich auch schon das Kommando zum anlegen der VM zusammenbauen.
      Als erstes muss man sich bei OpenStack authentifizieren, indem man die Datei sourced, die man sich eingangs aus seinem OpenStack Projekt geladen hat und dabei sein OpenStack Passwort angibt:

      source projectname-openrc.sh

      Man sollte außerdem sicherstellen, dass in dem Projekt ein CoreOS Image zur Verfügung steht.
      Anschließend kann man nach folgendem Schema die Runner-VM anlegen:

      openstack server create --network 1826-openstack-7f8d2 --user-data config.ign --flavor s1.medium --image CoreOS_Live "GitLab Runner"

      Network, Flavor und Image sollten aber individuell noch angepasst werden.

    Nach ca. zwei Minuten sollte dann der Runner auch schon zur Verfügung stehen. Überprüfen lässt sich das, indem man sich als Admin in seine GitLab-Instanz einloggt und im Bereich unter „Admin Area“ -> „Overview“ -> „Runners“ nach einem Runner mit dem Namen „myOpenStackRunner“ nachsieht.

    Wer noch auf der Suche nach einem OpenStack-Provider ist, der wird bei den NETWAYS Web Services fündig. Mit nur wenigen Clicks hat man sein eigenes OpenStack-Projekt und kann sofort loslegen.

Gabriel Hartmann
Gabriel Hartmann
Senior Systems Engineer

Gabriel hat 2016 als Auszubildender Fachinformatiker für Systemintegrator bei NETWAYS angefangen und 2019 die Ausbildung abgeschlossen. Als Mitglied des Web Services Teams kümmert er sich seither um viele technische Themen, die mit den NETWAYS Web Services und der Weiterentwicklung der Plattform zu tun haben. Aber auch im Support engagiert er sich, um den Kunden von NWS bei Fragen und Problemen zur Seite zu stehen.