
 Wir starten 2016 voll durch mit einem erweiterten Schulungsportfolio – neben Foreman und Ceph fokussieren wir uns im Development auf Git und Jenkins.
Die ersten Schulungen mit frisch erstellten Unterlagen fanden letzte Woche In-House bei einem unserer Kunden statt, sozusagen die „Feuertaufe“ für die kommenden Schulungen.
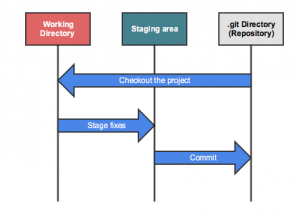 Nach einer kurzen Einführung in die Geschichte von VCS und der Entstehungsgeschichte von Git haben wir anhand von praktischen Beispielen erste Schritte mit Git gemacht – wie initialisiere ich ein Repository, was bedeutet „modified“, „staged“, „committed“, was passiert bei „git add“ und „git commit“? Bevor wir uns in die Tiefe mit Remote Repositories gestürzt haben, kam auch noch das Arbeiten mit Branches und unterschiedlicher Commit-Historie und – natürlich absichtlich provozierten – Fehlern beim Merge und Rebase dran.
Um das Gelernte auch in der Praxis weiterhin verwenden zu können, wurde die Arbeit mit einem lokalen Git-Server und fetch, pull, push und Branches vertieft. Das ganze kombiniert mit den unterschiedlichen Workflows (Feature-Branch, Gitflow, Forking) und praktischen Beispielen und nachgehender Analyse.
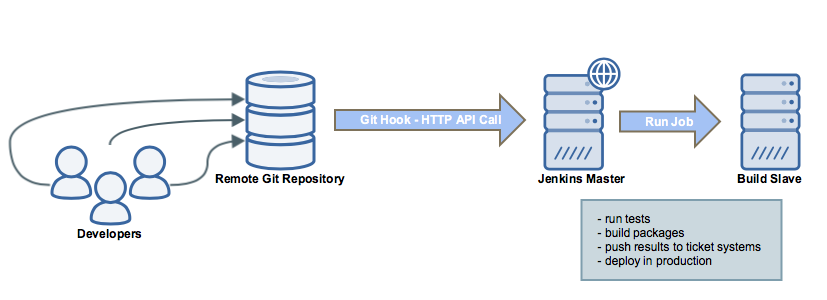
Die Brücke zur Jenkins-Schulung haben wir mit einem Git-Hook geschlagen, der für einen Git-Commit einen Jenkins-Job ansteuert.
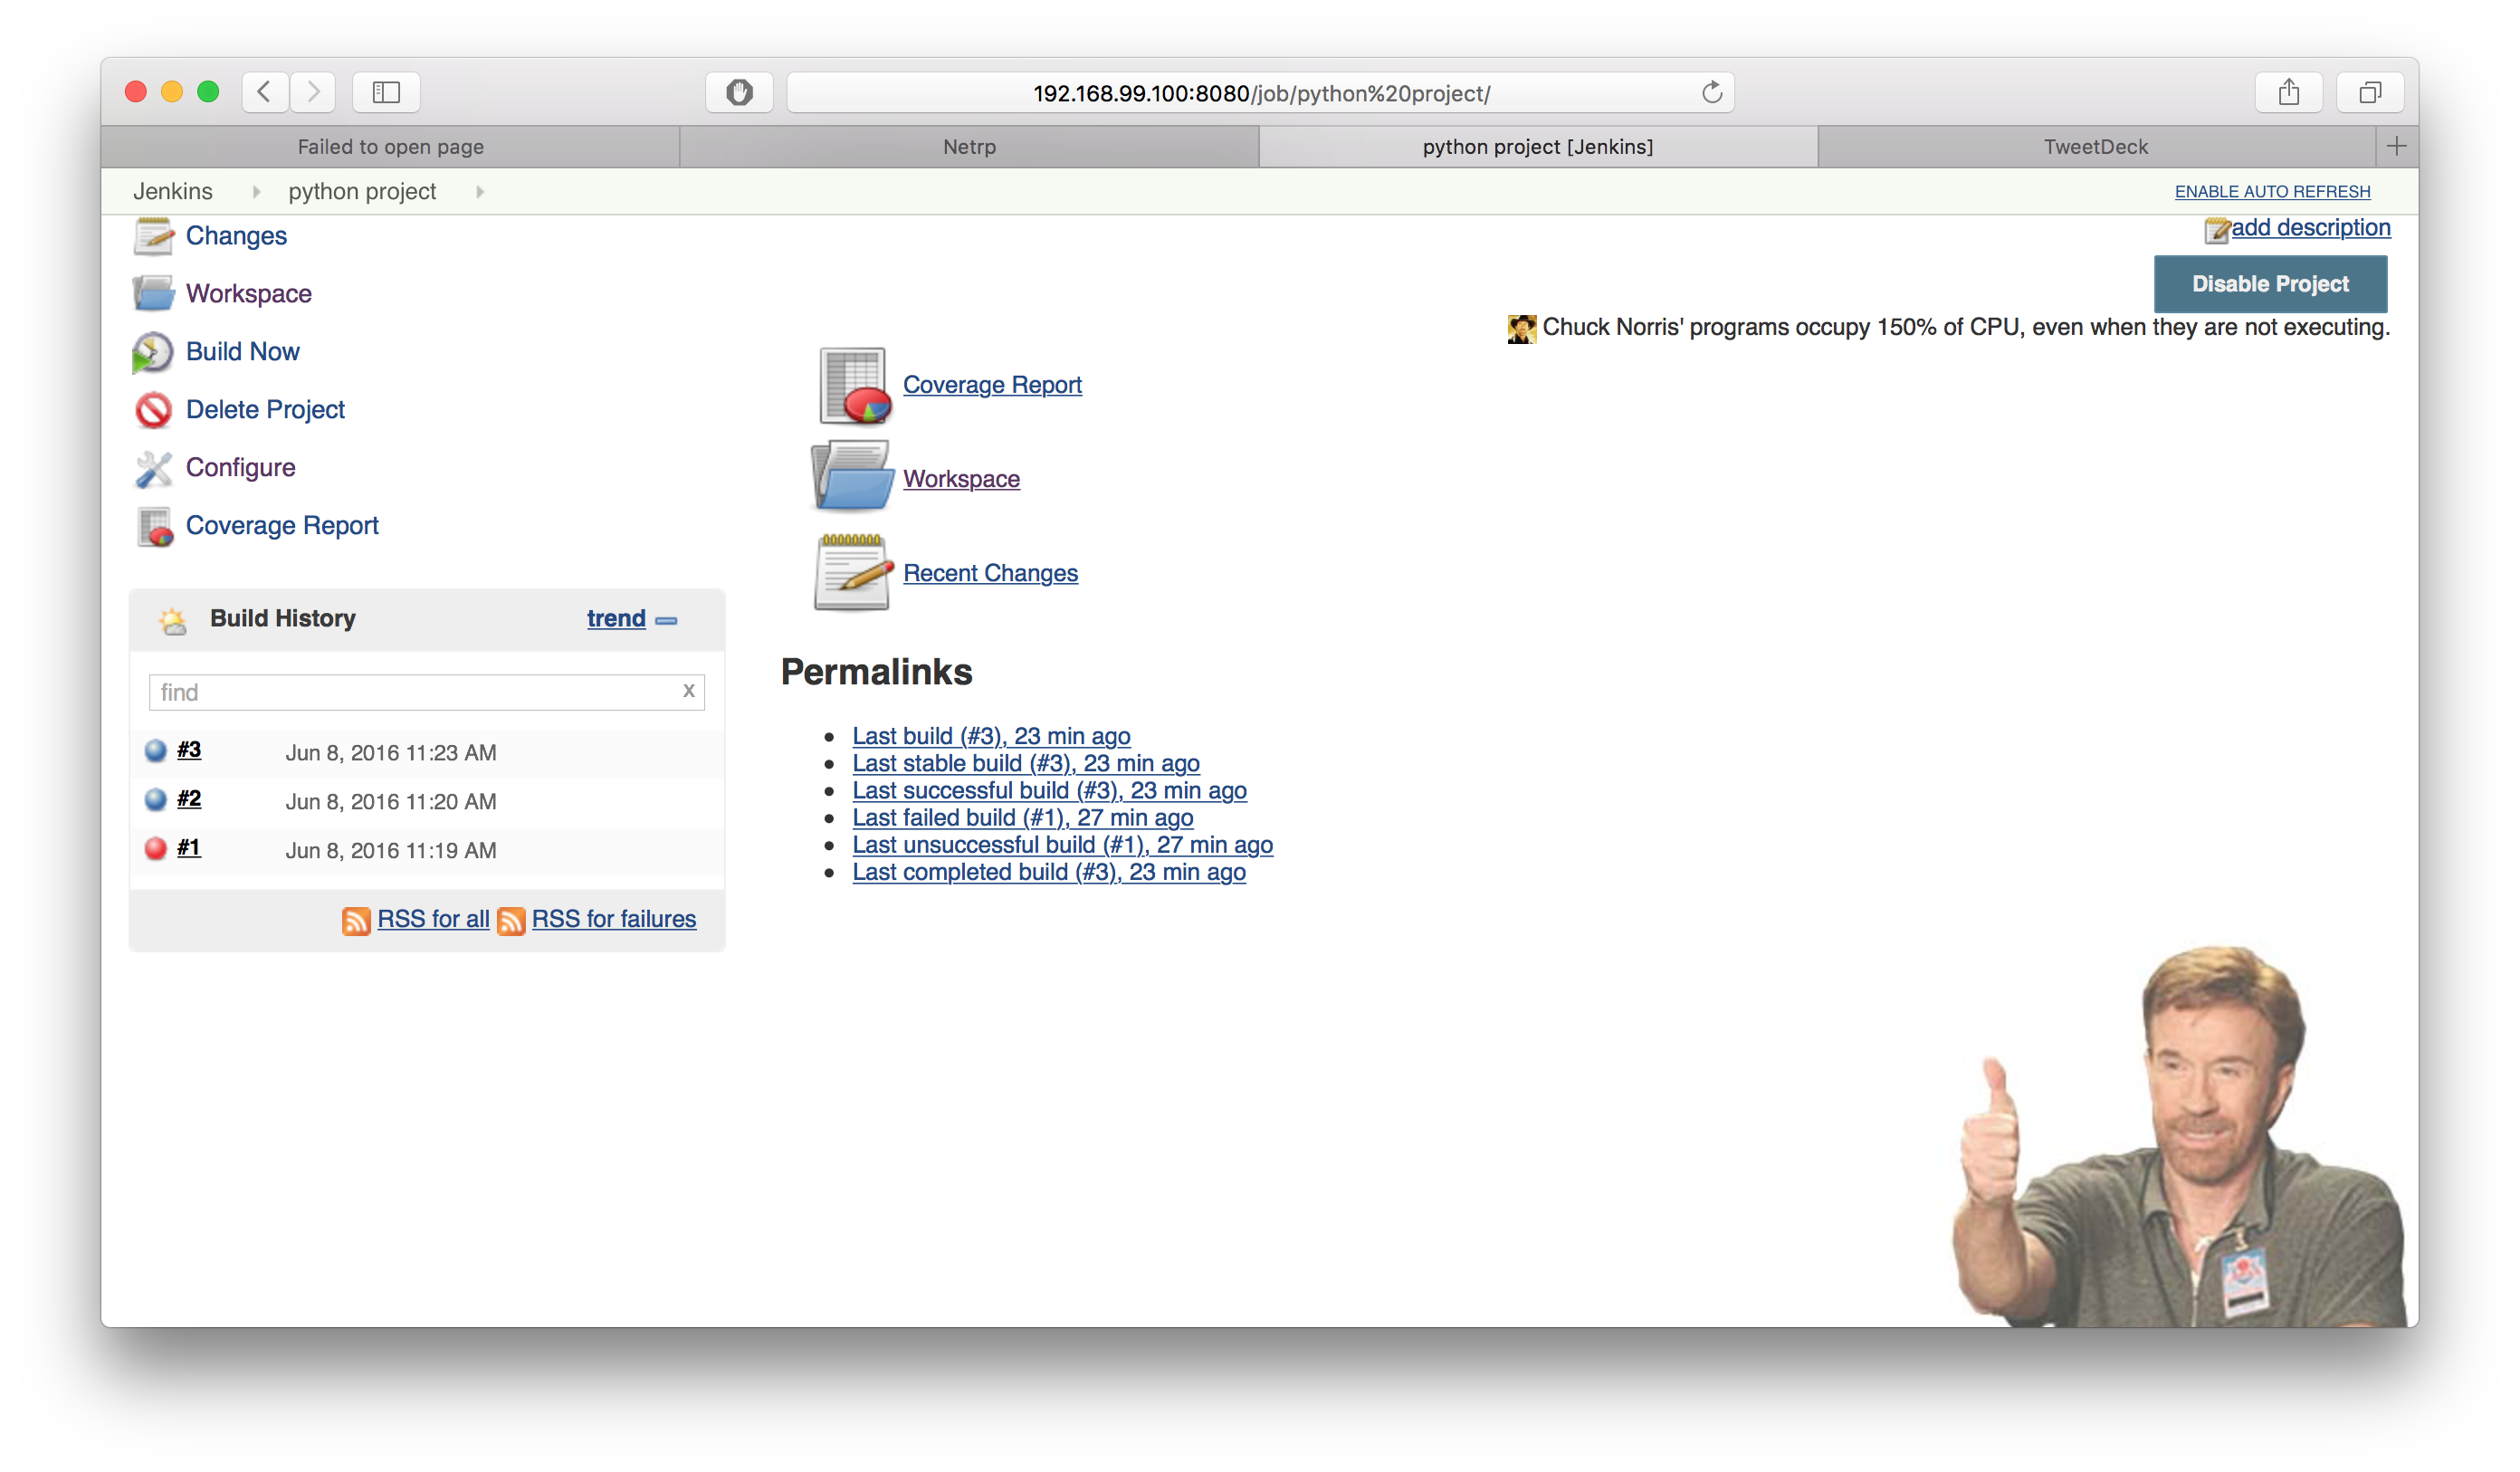 Nach der Installation des Jenkins-Installationspakets haben wir uns sogleich in die Konfiguration gestürzt – und natürlich in den ersten gemeinsamen Job. Ein Python-Script will gebaut werden, und später dann auch paketiert. In erster Linie haben wir uns Code Coverage und Qualität für CI und Test-Frameworks angesehen. Mit verschiedenen Build-Schritten und der Hilfe des Trainers gings dann auch gleich weiter mit der Einbindung an einen Jenkins-Agenten, der dediziert die Jenkins-Jobs ausführen sollte. Hierbei gibts einige Fallstricke zu beachten, gerade was SSH-Keys und shared Workspaces betrifft. Die Köpfe haben geraucht – aber spätestens dann als der frisch installierte Git-Hook den Jenkins-Paket-Bau angestossen hat, gabs für jeden das persönliche Erfolgserlebnis.
Neben den praktischen Beispielen haben wir uns auch Zeit genommen, gezielt Fragen zur eigenen Umgebung zu diskutieren, oder auch aus dem Nähkästchen zu plaudern. Git und Jenkins ist Teil unserer täglichen Arbeit an Icinga & Co und da gibts schon ein bissl Best Practice zu erzählen 😉
Für kurz entschlossene wissbegierige Anwender und jene die ihr Wissen auffrischen wollen – es gibt noch Plätze in unserer Git-Schulung am 28.6.2016 und Jenkins-Schulung am 30.8.2016 🙂
Und für all jene, die das Git-Fachwissen schon in sich aufgesaugt haben – wir hosten auch die eigene GitLab CE Instanz in unserer Cloud. Lust auf mehr? Kommt einfach auf uns zu!
PS: Trainings machen mir Spass – darum werd ich auch den diesjährigen Git-Workshop auf der OSMC halten 🙂
NETWAYS Blog
Windows git tools
From time to time I start up my Windows 7 VirtualBox because there is some Windows-specific issue in Icinga 2 to solve. And the first thing to do then is to pull the Icinga 2 repository. The obvious way to do that is to enter git pull in the right directory at least on *nix. But Windows is not Linux and likes to everything a bit more graphical so I put my cynicism aside and tried out two graphical Git tools (again): TortoiseGit and SourceTree
TortoiseGit
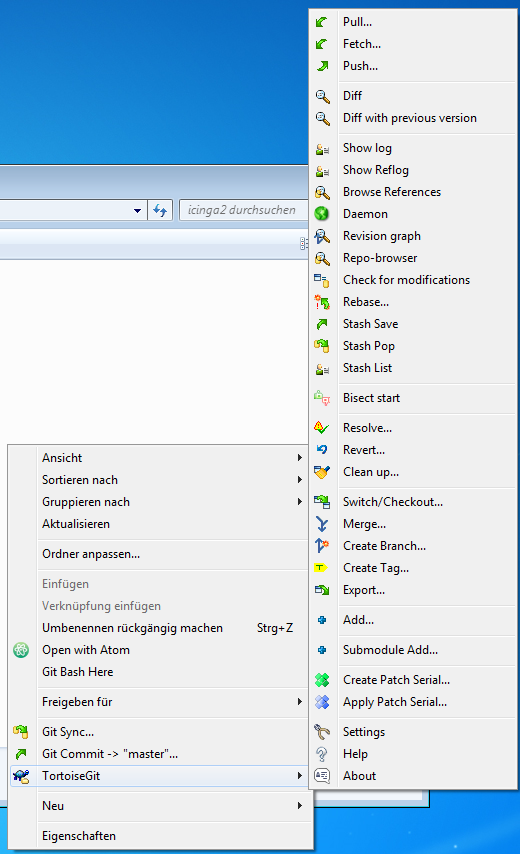
I used TortoiseSVN back in 2006/7 (that’s a long time so I might remember things incorrectly) and it was my first interaction with version control, without really knowing what version control was. And I wasn’t particularly fond of it, especially the gigantic right-click-context-menu was of my distaste. Now, nearly ten years later, I’m testing its sister software. And this time I know what I’m doing, I hope.
It all looks familiar but less Windows XPish. The context menus are still there but aren’t as intrusive as I remember them to be but I still get lost configuring it. Where or how do I add a SSH Key again? After that is taken care of it is time to check how it holds up against plain Git in a shell.
Commit, push, pull and fetch all work like expected. Amends are easy to make, bisect works reasonably well but can’t seem to find an equivalent of something like git rebase -i HEAD~3. One thing that stood out was the log, it’s neat. A bit ugly but really neat.
I’m surprised how good TortoiseGit works, yet there seems to be no way to access the full power of Git in case something goes really wrong. All you can do is delete the repository and delete the repo and clone it anew.
SourceTree
I used SourceTree when I first started at NETWAYS in 2014 and abandoned it after a short while. It looked nice but had too many problems to be of much use, so let’s see how it changed in over a year.
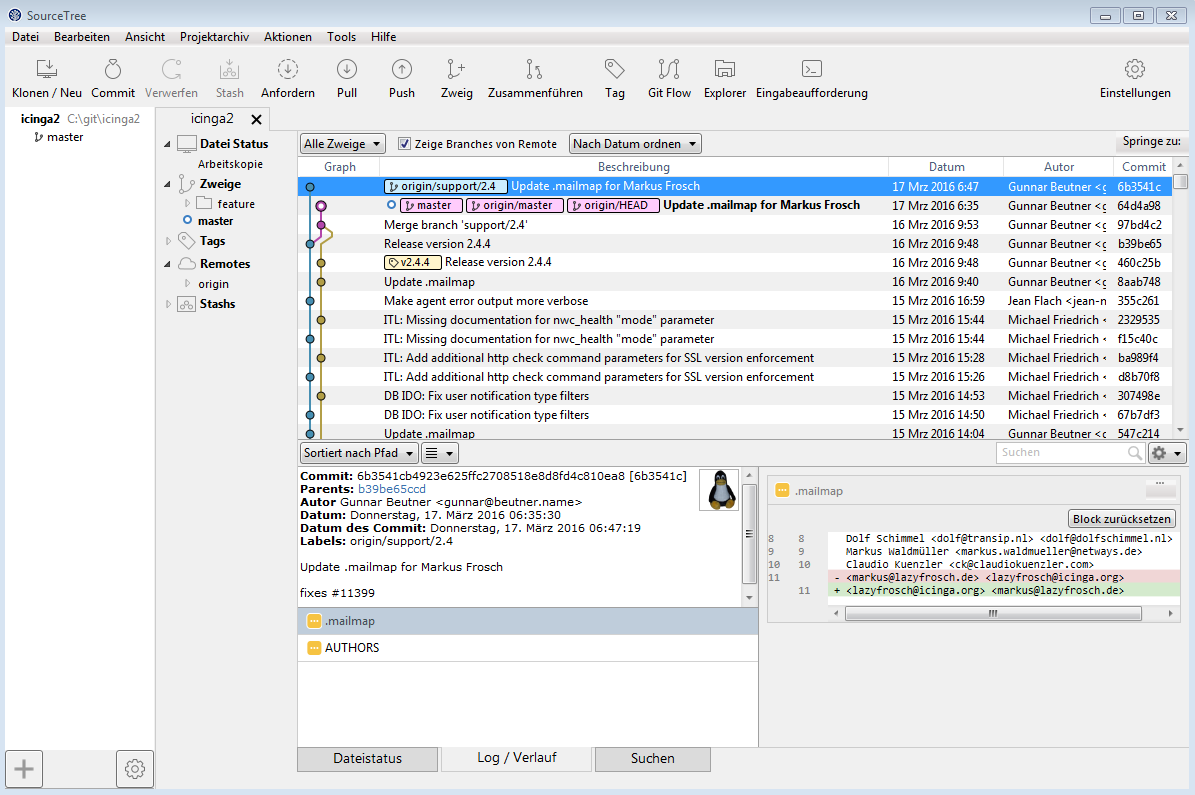 The first change I noticed is the installer, it now requires you to create an Atlassian account. After I gave my E-mail to Atlassian and accepted they may send me whatever information they think might interest me (you don’t get a choice there) I am greeted by a much smoother interface than a year ago, in German because the language default is based on you operating systems locale.
And what else did change? Not much, everything is still where it was. Commit still commits and pull still pulls. When I first used SourceTree I did not get too deep into it’s features but trying out a few of them I found them to be lacking: like TortoiseGit SourceTree is mostly just a fancy wrapper around Git commands, but SourceTree is missing bisect. Compared to TortoiseGit its actions are also hidden a lot deeper inside of sub menus, for example Actions->Resolve Conflicts->Launch External Merge Tool, to start vimdiff. To make up for it’s lack of features it hast the Terminal button which launches a Git shell in the selected repositories directory and you have the full power of Git at your fingertips.
Git Bash
In the end nothing beats Git Bash. It’s not fancy, it only has one context-menu: Git Bash here.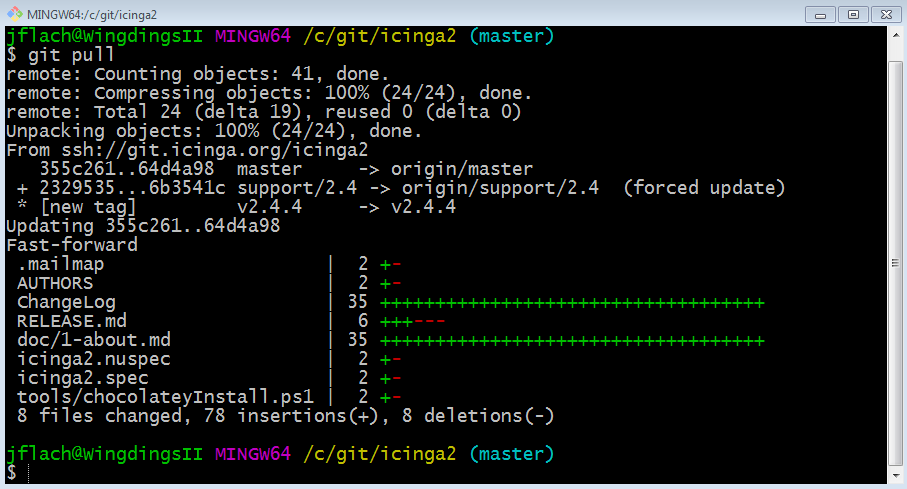
But don’t forget that „with great power comes great responsibility“, as Spiderman’s uncle used to say when he wrote sudo. You want to throw the remote master away and substitute you own, because you have some good reason to or just want to create chaos?
git push repo +master:new_master
If you want to learn more about Git, we are offering Git trainings too.
Monthly Snap January: Dev Tools, Clusters & Events and Trainings
January offered tips for cluster admins, programmers and technophiles, plus news on the events front. 
Pamela counted 13 weeks to the OSDC and introduced the thematic focuse of the conference. She went on to announce our participation and sponsorship of the OpenNebula TechDay in June. Daniela, meanwhile, explained how to become a Puppet expert in just 5 days.
Micheal shared tips to work with the git subtree and MarkusW then showed how to generate pdf´s with Showoff.
On clusters, Blerim looked at distributed containers with CoreOS, while Johannes introduced Bottle, a web-framework for Python.
Lastly, MariusH presented building automation systems as Cornelius presented the Raspberry Pi Touch Display.

Stephanie Kotilge
Accountant
Steffi ist seit 2011 bei NETWAYS. Sie fing als Office Managerin an und unterstützt seit 2017 als Accountant das Finance & Administration Team in allen buchhalterischen Belangen. In ihrer Freizeit ist sie mit ihrem Sohn immer auf der Suche nach den schönsten Spielplätzen in Nürnberg oder plant den nächsten Familientrip.
Working with git subtree
In case your are organising multiple git repositories and add them into one global, the most obvious choice is to use git submodule. It basically creates a pointer to a specific git commit hash in a remote repository allowing you to clone the repository into a sub directory as module.
Adding submodules is fairly easy, purging them can become cumbersome. When we were working on the Icinga Vagrant boxes one issue was to re-organize the used puppet modules into a central modules directory, as well as purge all local copies and instead use the official git repositories others provided.
Using git submodules turned out to be simple to add, but ugly to manage. Users normally forgot to initialise and update the submodules, and if the developers (me) decided to add/remove modules, it was always in sort of an incompatible check-out state. A fresh git clone –recursive always helped (hi Bernd) but in the end it wasn’t satisfying to work with as users struggled from a simple demo setup with Vagrant.
Looking for alternatives unveiled git subtree as originally suggested by Eric – instead of only adding a module and its commit pointer, you’ll add the repository and all of its commit history into your own git repository, as sub tree with directories and files. This also solves the problem that remote repositories might be gone, unreachable, or anything else hindering the successful clone.
There are several options like to squash the history into a single commit (like one would use git rebase) when adding a new subtree.
Add a subtree
When I was working on the Graphite/Grafana integration into the icinga2x box, I’ve just added the Grafana puppet module. The –prefix parameter defines the root directory for the cloned repository, then add the remote url, the branch and let it squash the entire commit history (–squash).
Git doesn’t like uncommitted changes so make sure to stash/commit any existing changes before adding a new subtree.
git subtree add --prefix modules/grafana https://github.com/bfraser/puppet-grafana.git master --squash
This results into two new commits:
commit 0b3e0c215e3021696fce3a37eff3274c174348a8
Merge: 482dc29 6d6fd37
Author: Michael Friedrich <michael.friedrich@netways.de>
Date:   Sat Nov 14 18:47:39 2015 +0100
    Merge commit '6d6fd37ec971314d820c210a50587b9d4ca2124b' as 'modules/grafana'
commit 6d6fd37ec971314d820c210a50587b9d4ca2124b
Author: Michael Friedrich <michael.friedrich@netways.de>
Date:   Sat Nov 14 18:47:39 2015 +0100
    Squashed 'modules/grafana/' content from commit 89fe873
    git-subtree-dir: modules/grafana
    git-subtree-split: 89fe873720a0a4d2d3c4363538b0fa5d71542f41
Update a subtree
In case the remote repository should be updated to incorporate the latest and greatest fixes, you can just use „git subtree pull“. You’ll need the repository url (that is merely why it is documented in README.md inside the Vagrant box project).
$ git subtree pull --prefix modules/grafana https://github.com/bfraser/puppet-grafana.git master --squash
From https://github.com/bfraser/puppet-grafana
 * branch            master     -> FETCH_HEAD
Subtree is already at commit 89fe873720a0a4d2d3c4363538b0fa5d71542f41.
Purge a subtree
Purging a git subtree is also fairly easy – just remove the directory and commit the change. There are no additional config settings to purge unlike known from git submodules.
If you want to get more in-depth insights into Git make sure to check out the new Git training 🙂
powerline-shell

Hi folks,
ich habe letztens bei meinem Kollegen Mr. Frog ein neues Bling-Bling entdeckt The Mighty Powerline-Shell die mir besonders gut gefallen hat, ich war so angefixt das Ich mir einbildete das auch haben zu müssen, gesagt getan.
Die Powerline-Shell ist richtig Gut, da Sie als Segmentiertes ’self contained‘ Python-Script folgende Features abdeckt.
- Ihr seht egal ob Git, SVN, Mercurial o. Fossil immer was gerade Sache ist
- wenn eure Pfade auf einer Zeile zu lang werden, dann werden Sie gekürzt ohne relevante Information zu verlieren
- viel Buntes für den Kreativen Ops/Dev ( Colored Themes )
- auch werden euch Rückgabe werte des letzten Befehls aus eurer Shell ungleich 0 zurückgegeben
- wenn Ihr euch per SSH auf entfernte Systeme verbindet, dann wird auch dies durch ein Schloss Symbol kenntlich gemacht
- wenn das aktuelle Verzeichnis nicht mit euren Rechten beschrieben werden darf, wird dies auch durch ein Schloss Symbol wiedergegeben
- Sie kann auch den Title eures TerminalEmulator mit user@host:/path Einträgen umschreiben
- zeigt auch Änderungen an der Umgebung an ( Virtual Environment )
- die aktuelle Zeit ist nun auch mit am Start ( Segment wurde von mir eingeführt, da ich dieses Feature für mein Daily benötige )
- zeigt auch laufende Hintergrund Jobs an ( Shell forks )
- die Features sind leicht zu erweitern ( Segmente werden in Python geschrieben )
Die Powerline-Shell ist auch sehr benutzerfreundlich in etwa 3 Schritten eingerichtet.
cd ~ && mkdir git && cd git
git clone https://github.com/powerline/fonts.git powerline-shell-fonts
git clone
./powerline-shell-fonts/install.sh
./powerline-shell/install.py
vi ~/.bashrc
Noch fix den Prompt auf die Powerline-Shell umbiegen. 😉
function _update_ps1() {
	export PS1="$(~/powerline-shell.py $? 2>> /dev/null)"
}
export PROMPT_COMMAND="_update_ps1; $PROMPT_COMMAND"
Und einen der neu installierten Fonts mit dem ‚Powerline‘ Suffix wählen, fertig.
Hier noch Bilder „weil Bilder mehr als tausend Worte …“ naja ihr wisst schon.

Links:


