NETWAYS Blog
A short introduction to Kubernetes
Ever since I was working in a DevOps role I was very curious about Kubernetes, what better way is there to learn through creating a YouTube video? Let me guide through the process of creating the YouTube Tutorial!
How did I get started?
First off I tried to watch a few different YouTube videos myself, and then transitioned to writing a script for it.
Since I was familiar with OpenStack, it was easier to get into it by diving head first into the documentation.
Even though the Kubernetes Documentation might be too technical or not well explained in some parts, in combination with the youtubers and blog posts you can get a good overview of K8s.
I gathered all the information I could find about all the objects and features in Kubernetes, and tried to get a broad understanding on how everything works.
Let’s hit the record button!
Since then I have been trying to see how I could record it best and which information I was getting across and what I needed to change.
 After redoing my script and selecting, what Kubernetes knowledge I’d like to convey, I was finally able to get more into doing a proper recording.
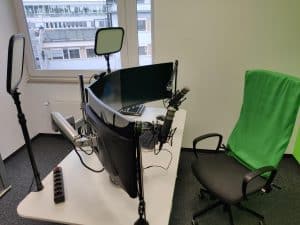
Check out our webinar room at NETWAYS HQ! I was really happy that we already have such a good lighting and recording setup!
Rinse and repeat.
I recorded with OBS and really had a fun time, trying to get everything right and present it in a nice way.
As soon as I got some proper recordings down I demuxed the files with OBS and went on to edit the footage.
First I sorted everything into Intro, Welcome, Objects, Features, Benefits of Kubernetes and how to get started folders.
So I could easily edit the footage before putting it together.
Then I went into Adobe Premiere and cut the clips short and removed the unnecessary audio tracks.
After that I put everything together, threw in the Intro and Outro.
I was almost done after that, just needed to denoise the audio tracks and find some music for the intro and outro!
It’s a wrap!
Then the whole thing was finished, yay!
Who would’ve thought, creating a 12-minute-video would need that many steps prior, before it is actually uploaded on the internet? 😀 It was exciting to create the Kubernetes YouTube Tutorial, but now it’s even more exciting having the video ready!
Here’s the result and I hope you have fun watching the video, and maybe it helps you to get into Kubernetes more easily now!
If you are curious about your own Managed Kubernetes environment, then our NWS website is a great source of information for that. Our MyEngineers are also always available to help you create your dream cluster.
Cheers and have a good one!
New graphics cards for your NETWAYS projects!
We want to get the most out of our servers with a new feature and have provided an upgrade to our hardware. GPUs now available! Despite the current graphics card shortage, NWS now has the NVIDIA A10 graphics card for your servers!
Whether it’s 3D rendering, machine learning, or artificial intelligence, the new GPU combines top-notch professional graphics with powerful processing power and AI acceleration. It meets today’s challenges in design, creativity, and science.
Boost your business with even more powerful VMs for your NETWAYS Cloud and Managed Kubernetes projects. Whether you’re in the cloud or using Managed Kubernetes, if you want to process very large or complex amounts of data especially quickly, you’ll now find the right VM model thanks to our GPU-equipped servers.
So what can you accelerate with the new GPUs now?
Media and Video Editing
The NVIDIA A10 can handle 3D rendering, video transcoding, AI audio and video effects, and significantly shorten your processing time. You can work on your projects faster and get results sooner.
Remote Collaboration
The graphics card also includes the ability to use a high performance workstation with NVIDIA RTX Technology for ray tracing.
Artificial Intelligence & Deep Learning
The graphics card instances also provide high performance for training your AI or Deep Learning processes. This can shorten learning processes and get your team to their desired goal faster! Likewise, data analysis and other workspaces benefit from the high performance improvement thanks to GPU.
How can I use the feature now? We’ll show you!
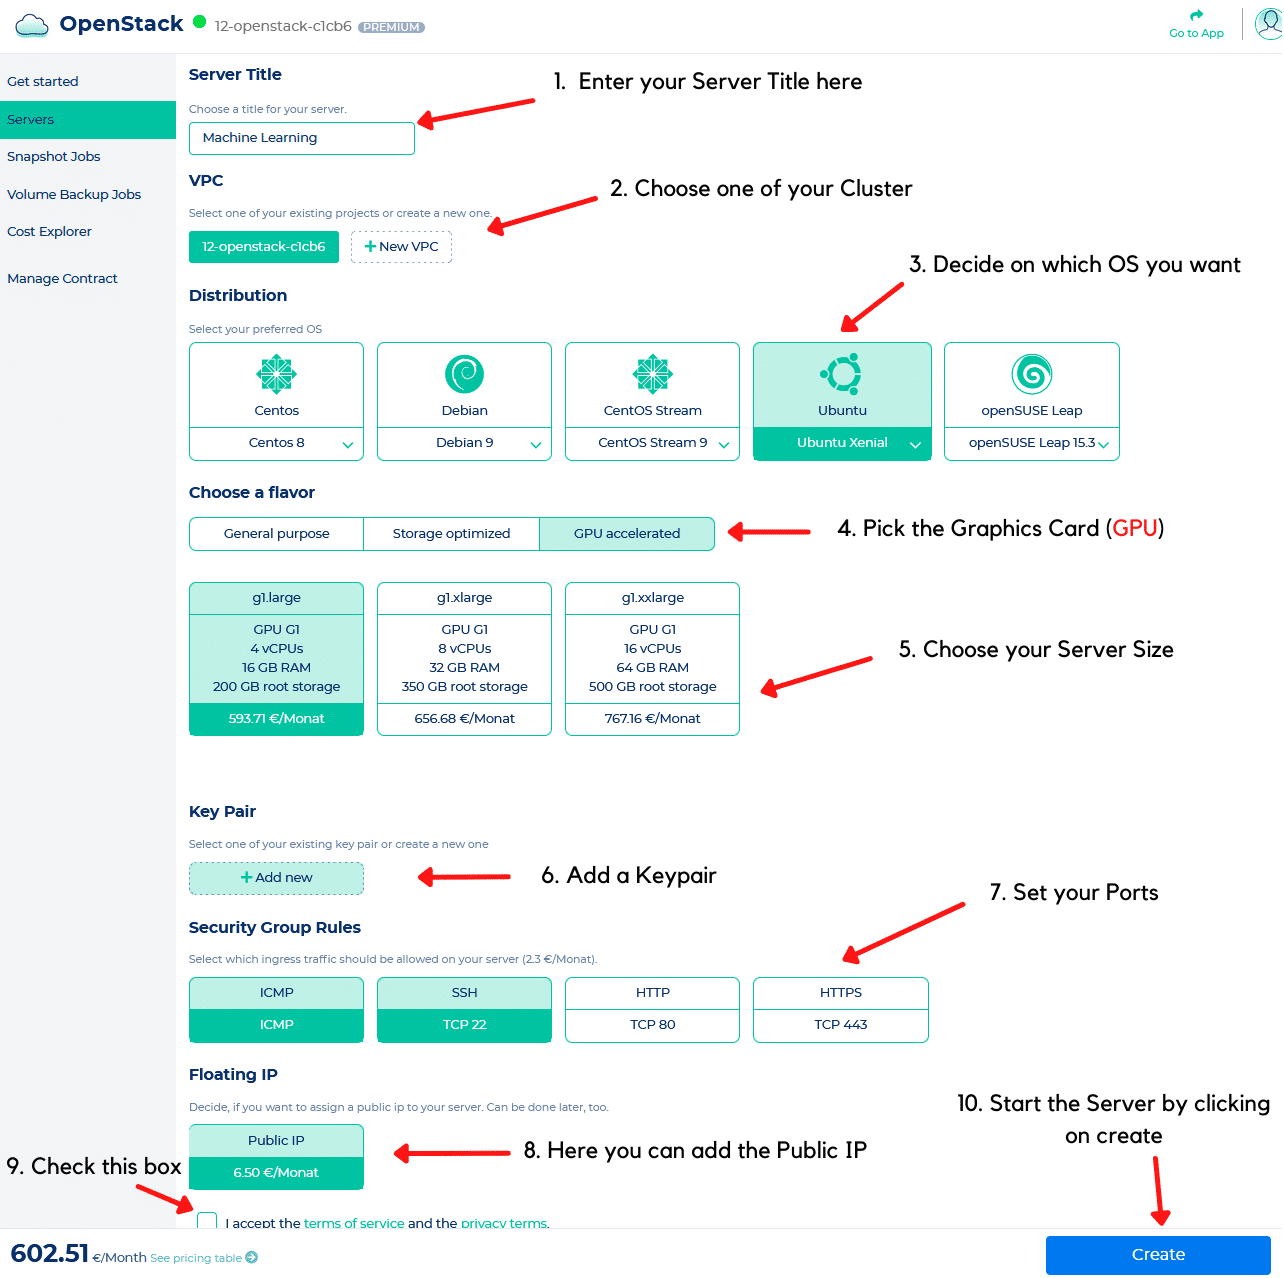
All you have to do is create a new server, select the operating system and add GPU Accelerated.
Here we show what this would look like:
This would conclude our newest feature.
If you have any questions or problems, our MyEngineer team is always there to help you out.
Have fun with the new performance, wishes you the NWS Team 🙂
LUKS LVM Resizing
Ever tried to create a Dual Boot Ubuntu AFTER you encrypted your whole hard drive already?
Well don’t worry we got you covered!
My Problem:
I want to shrink my encrypted Ubuntu installation to make room for another OS, which I need for my video editing.
For that I have a SSD 512GB, which is encrypted with LUKS, uses LVM and ist partitioned in ext 4 fs.
But I also have an encrypted LUKS Swap called “vgubuntu-swap_1”, who also uses LVM and is formated in swap fs.
My partition had a size around 475 GiB before shrinking. The swap volume helps to demonstrate that shrinking may lead to gaps between logical LVM volumes.
The plan is to shrink the file system, its volume, the volume group and also the encrypted partition.
I used a Live Ubuntu System from a USB stick, since I could not just take the hard drive out. If you have just one computer available, use either a Live System from a USB stick or a DVD.
Disclaimer: PLEASE MAKE A BACKUP of the whole disk first.
Please read carefully through the steps first before you do anything.
If you are unsure about the commands and what they mean or what consequences they have, do some research on the Internet ahead. Likewise in case of trouble or error messages. It definitely helps to be familiar with partitioning, LVM, dm-crypt and LUKS.
My Solution:
Resizing was a sequence of 14 steps – following the disk layout in reverse order, I started resizing from the filesystem to the LVM structure down to the partition.
You open an encrypted partition with LVM on LUKS just as any dm-crypt/LUKS-partition by:
cryptsetup open /dev/Disk-MAPPING-Name cryptdisk
For the mapping name I used “cryptdisk“. Note that closing the encrypted device requires to deactivate the volume groups in the kernel first; in our case:
vgchange -a n vg1;

cryptsetup close cryptdisk
Otherwise you may not be able to close your device.
Step 1: Take a look at your Block Devices
With lsblk you take a look at you partitions
lsblk
For instance for me the disk appeared as “/dev/nvme0n1” – the encrypted partition was located on “/dev/nvme0n1p3”.
Step 2: Opening the encrypted partition
ubuntu@ubuntu:~$ cryptsetup open /dev/nvme0n1p3 cryptdisk
Review it so you know the mapping is done correctly by “ls -la /dev/mapper”
Take a look at the “cryptdisk”-device, but keep a close eye on the LVM-volumes inside the encrypted partition. They should appear automatically as distinct devices.
Step 3: Let’s take a look at the LVM Structure
Next up we have:
pvdisplay
vgdisplay
lvdisplay
Pvdisplay and vgdisplay show you the PV device: “/dev/mapper/cryptdisk” and the volume group, like in my case “vgubuntu”.
With lvdisplay you can take a look at the logical volumes, so the path to the devices and LV Size. In this case it was: “/dev/vgubuntu/root” and “/dev/vgubuntu/swap_1”
Step 4: Filesystem Integrity check
With fsck we can make sure the filesystem is clean:
ubuntu@ubuntu:~$ sudo fsck /dev/vgubuntu/root
fsck from util-linux 2.36.1
e2fsck 1.46.3 (27-Jul-2021)
/dev/mapper/vgubuntu-root: clean, 530426/13107200 files, 14946582/52428800 blocks
That seems fine, let’s move on!
Step 5: Review filesystem physical block size and used space
Since we need to take a look at the phyisical block size, we can use “fdisk -l”.
There were also a lot of loop devices in my case, but the last entry showed my encrypted drive.
ubuntu@ubuntu:~$ sudo fdisk -l
…
Disk /dev/mapper/cryptdisk: 475.71 GiB, 510787584000 bytes, 997632000 sectors
Units: sectors of 1 * 512 = 512 bytes
Sector size (logical/physical): 512 bytes / 512 bytes
I/O size (minimum/optimal): 512 bytes / 512 bytes
Inode count:              13107200
Block count:              52428800
Reserved block count:     2621439
Free blocks:              37482218
Free inodes:              12576774
Step 6: Reducing the Volume and filesystem size
For the reduced filesystem I went with 210G, since it should be about 200GiB size at the end.
With lvreduce we work with GiB, so the filesystem size should be 5-10% smaller than the logical volume size. Then we would get 200 * 1024 * 1024 * 1024 Bytes = 214.748.364.800 Bytes.
Step 7: Actually shrinking the filesystem
Please check first if the filesystem is mounted somewhere and then proceed with:
ubuntu@ubuntu:~$ sudo resize2fs /dev/mapper/vgubuntu-root 210G
resize2fs 1.46.3 (22-Dez-2021)
Resizing the filesystem on /dev/mapper/vgubuntu-root to <pre style="padding:8px;"> (4k) blocks.
The filesystem on /dev/mapper/vgubuntu-root is now 52428800 (4k) blocks long.
Step 8: Shrink the logical volume
With “lvreduce” we can resize the LVM volume, the option parameter “L” together with a “size” determines how big the volume will become.
ubuntu@ubuntu:~$  lvreduce -L 200G /dev/vgubuntu/root
WARNING: Reducing active logical volume to 200 GiB.
THIS MAY DESTROY YOUR DATA (filesystem etc.)
Do you really want to reduce vgubuntu/root? [y/n]: y
Size of logical volume vgubuntu/root changed from 210 GiB (20480 extents) to 200.00 GiB (15360 extents).
Logical volume vgubuntu/root successfully resized.
Since we got the confirmation that it worked, we can now proceed.
Step 9: Check for gaps between the volumes of your LVM volume group
That was the trickiest part for me at least since I had a swap with my Ubuntu. The first thing I did was to scan for the Swap, on which Blocks it was located.

I then used “pvmove” to get the swap from the last blocks to the ones after my root volume.
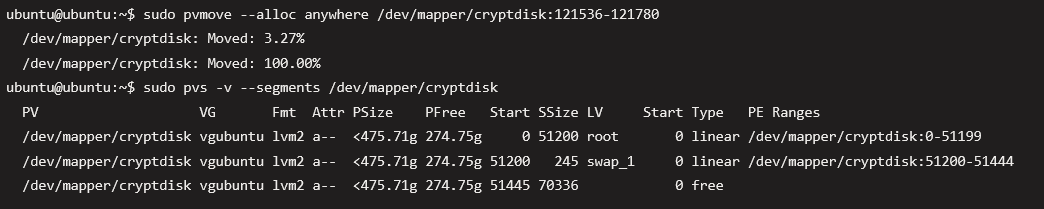
As you can see, my swap moved over and my free space had no further volumes in between.
Step 10: Resize/reduce the physical LVM
Next I had to resize and reduce the physical LVM to 200G
ubuntu@ubuntu:~$ sudo pvresize --setphysicalvolumesize 200.96G /dev/mapper/cryptdisk
/dev/mapper/cryptdisk: Requested size <200.96 GiB is less than real size <475.71 GiB. Proceed?  [y/n]: y
WARNING: /dev/mapper/cryptdisk: Pretending size is 421443665 not 997632000 sectors.
Physical volume "/dev/mapper/cryptdisk" changed
1 physical volume(s) resized or updated / 0 physical volume(s) not resized
Since the resize worked, I wanted to make sure everything was fine.
ubuntu@ubuntu:~$ sudo pvdisplay
--- Physical volume ---
PV Name               /dev/mapper/cryptdisk
VG Name               vgubuntu
PV Size               <200.96 GiB / not usable <2.04 MiB
Allocatable           yes (but full)
PE Size               4.00 MiB
Total PE              51445
Free PE               0
Allocated PE          51445
PV UUID               KpzZm…
Step 11: Setting up the encrypted regions size
First make sure which Block Size the current drive has:
ubuntu@ubuntu:~$ sudo cryptsetup status cryptdisk
/dev/mapper/cryptdisk is active and is in use.
type:    LUKS2
cipher:  aes-xts-plain64
keysize: 512 bits
key location: keyring
device:  /dev/nvme0n1p3
sector size:  512
offset:  32768 sectors
size:    997632000 sectors
mode:    read/write
Then I had to calculate the new blocksize for the encrypted disk, I used the formula on the Arch Wiki: NEW_LUKS_SECTOR_COUNT = PV_EXTENT_COUNT * PV_EXTENT_SIZE / LUKS_SECTOR_SIZE
From Step 10 (pvdisplay) and the cryptdisk status you can gather all the information needed to get:
(53880 extent + 1 unusable extent) * 4 MiB/extent /512 B/sector = 441393152 sectors
ubuntu@ubuntu:~$  sudo cryptsetup -b 441393152 resize cryptdisk
Enter passphrase for /dev/nvme0n1p3:
ubuntu@ubuntu:~$ sudo cryptsetup status cryptdisk
/dev/mapper/cryptdisk is active and is in use.
type:    LUKS2
cipher:  aes-xts-plain64
keysize: 512 bits
key location: keyring
device:  /dev/nvme0n1p3
sector size:  512
offset:  32768 sectors
size:    441393152 sectors
mode:    read/write
And now we have a smaller LUKS Partition. You came this far, now don’t stop!
Step 12: Reduce the size of the physical partition
Here I used parted to get an overview of my drives and resize it to the desired size:
ubuntu@ubuntu:~$ sudo parted /dev/nvme0n1
GNU Parted 3.4
Using /dev/nvme0n1
Welcome to GNU Parted! Type 'help' to view a list of commands.
(parted) print
Model: PM9A1 NVMe Samsung 512GB (nvme)
Disk /dev/nvme0n1: 512GB
Sector size (logical/physical): 512B/512B
Partition Table: gpt
Disk Flags:
Number  Start   End     Size   File system  Name                  Flags
1      1049kB  538MB   537MB  fat32        EFI System Partition  boot, esp
2      538MB   1305MB  768MB  ext4
3      1305MB  512GB   511GB

(parted) resizepart

Partition number? 3
End?  [512GB]? 211GB
Warning: Shrinking a partition can cause data loss, are you sure you want to continue?
Yes/No? y
(parted) print
Model: PM9A1 NVMe Samsung 512GB (nvme)
Disk /dev/nvme0n1: 512GB
Sector size (logical/physical): 512B/512B
Partition Table: gpt
Disk Flags:
Number  Start   End     Size   File system  Name                  Flags
1      1049kB  538MB   537MB  fat32        EFI System Partition  boot, esp
2      538MB   1305MB  768MB  ext4
3      1305MB  211GB   210GB

(parted) q

Information: You may need to update /etc/fstab.
I checked with print in between, to see if the parted resize worked.
Step 13: Set new size of the encrypted region
Now we just need to make sure we also have use the full partition size:
ubuntu@ubuntu:~$ sudo cryptsetup resize cryptdisk
ubuntu@ubuntu:~$ sudo cryptsetup status cryptdisk
/dev/mapper/cryptdisk is active.
type:    LUKS2
cipher:  aes-xts-plain64
keysize: 512 bits
key location: keyring

device:  /dev/nvme0n1p3
sector size:  512
offset:  32768 sectors
size:    409526848 sectors
mode:    read/write
Step 14: Reset the PV size to the full partition size
Next up we have to use pvresize so the cryptdisk gets also adjusted and then we can take a look at the volumes.
ubuntu@ubuntu:~$ pvresize  /dev/mapper/cryptdisk
Physical volume "/dev/mapper/cryptdisk" changed
1 physical volume(s) resized / 0 physical volume(s) not resized
ubuntu@ubuntu:~$ sudo pvdisplay
--- Physical volume ---
PV Name               /dev/mapper/cryptdisk
VG Name               vgubuntu
PV Size               210.47 GiB / not usable 2.00 MiB
Allocatable           yes
PE Size               4.00 MiB
Total PE              53880
Free PE               2435
Allocated PE          51445
PV UUID               Kpz...

ubuntu@ubuntu:~$ sudo vgdisplay
--- Volume group ---
VG Name               vgubuntu
System ID
Format                lvm2
...
VG Size               <210.47 GiB
PE Size               4.00 MiB
Total PE              53880
Alloc PE / Size       51445 / <200.96 GiB
Free  PE / Size       2435 / 9.51 GiB
VG UUID               dz0...
That’s it!
You can also do a checkup with gparted/disks, but apart from that I was just happy that I had more space for a second OS while also maintaining the encryption for Ubuntu!
(Now I will create another backup, just in case I break something with the new OS Installation.)
Neue Openstack Integration im NWS Kundenportal
Pünktlich zu Weihnachten beschenken wir unsere NWS Kunden mit einer kleinen, aber feinen Neuerung im Kundenportal von nws.netways.de. Dort könnt ihr ab sofort mit den ersten OpenStack Objekten/Ressourcen aus dem NWS Webinterface interagieren! VMs, Floating IPs und Keys lassen sich jetzt direkt im Kundenportal übersichtlich, schnell und einfach erstellen, anzeigen oder löschen. Weitere OpenStack Objekte/Ressourcen werden konsequenterweise im neuen Jahr folgen.
Für unsere Kunden hat das den Vorteil, dass sie über die vereinfachte Maske unkompliziert neue virtuelle Maschinen anlegen können, ohne sich – wie bisher – durch ein detaillierteres Interface zu klicken. Der bisherige Zugriff über die Openstack API sowie über cloud.netways.de, bleibt aber natürlich für unsere IT-Expert:innen weiterhin bestehen.
Welche Vorteile bringt die neue OpenStack Integration?
Zusätzlich zur einfacheren Benutzerführung wurde zudem das neue Interface deutlich schneller und asynchron umgebaut. Aufgaben wie das Erstellen von VMs oder Kubernetes Clustern, die in der Regel mehrere Sekunden bis Minuten benötigen, werden ab heute im Hintergrund verarbeitet. Einsehen könnt ihr diese Aufgaben über das Zahnrad neben dem Nutzerprofil. Alle laufenden Aufgaben lassen sich dort jederzeit abrufen.
Somit lassen sich alle VMs einfach und übersichtlich steuern und die Prozesse laufen im Hintergrund ab, ohne dass ihr sie weiter im Auge behalten müsst. Das bedeutet, dass ab jetzt zusätzlich andere Aufgaben hinzugefügt werden können!
Was genau ist also jetzt neu?
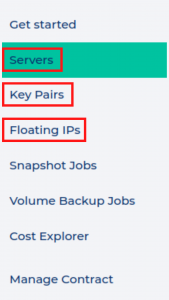
Ebenso neu im OpenStack Interface sind die Punkte Servers, Key Pairs und Floating IPs:
- Servers – Dies ist der wichtigste Abschnitt, unter dem die Erstellung der VMs stattfindet. Hier findet man zudem eine schnelle Übersicht über den Zustand aller aktiven Produkte.
- Key Pairs – die SSH-Schlüssel lassen sich hier einfach einsehen und verwalten
- Floating IPs – Server IP-Adressen lassen sich hier einsehen und löschen
Wie starte ich schnell und einfach diese VMs?
Bei der Erstellung eines neuen Servers hat man die Möglichkeit, den Server seinem Cluster zuzuordnen, ein Betriebssystem zu wählen, die benötigten Server Ressourcen festzulegen, einen SSH Schlüssel zu hinterlegen und die Port Freigabe festzulegen.
Im Interfacesieht sieht das dann wie folgt aus, wenn Du die einzelnen Optionen auswählst:
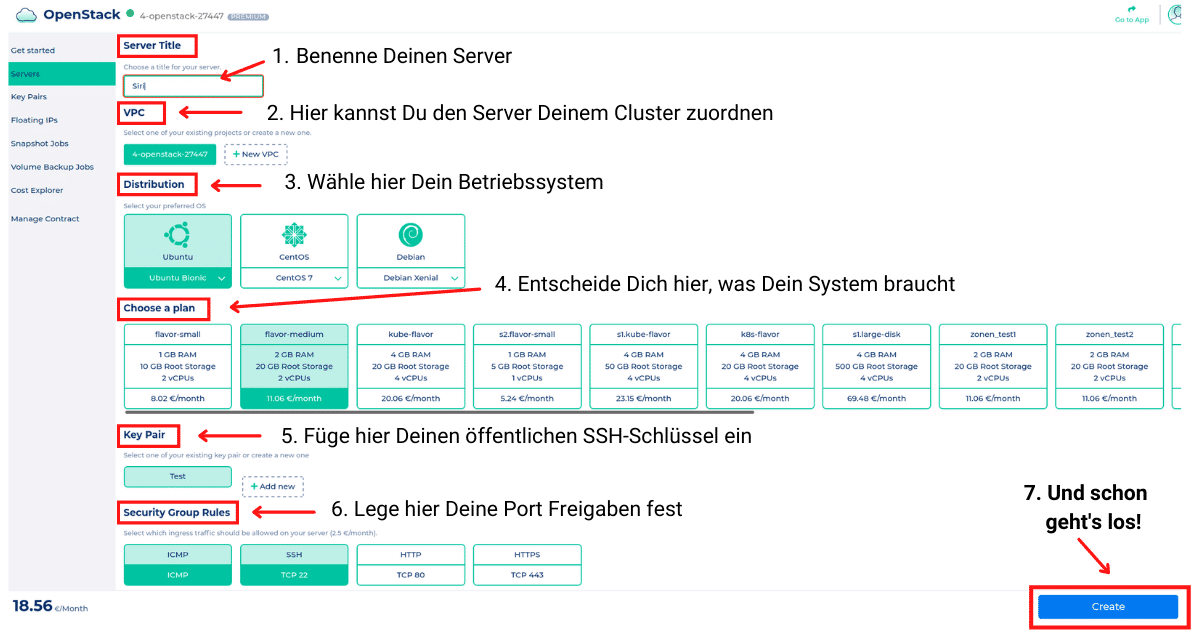
Und nicht vergessen einen Haken bei Terms of Service und Privacy Terms zu setzen! 🙂
Bearbeiten, während Du arbeitest!
Sobald alles ausgewählt ist und Du auf Create geklickt hast, geht’s direkt los. Du musst nicht auf die komplette Erstellung des Servers warten, sondern kannst direkt eine IP Adresse vergeben, die Ports nochmal abändern oder den Server auch direkt wieder löschen.
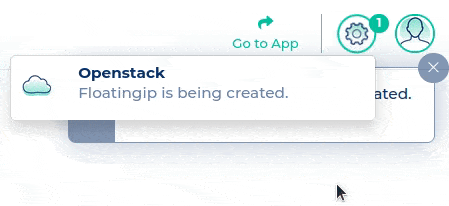
Parallel dazu kannst Du die einzelnen Aufgaben über das Zahnrad neben dem Login einsehen, während diese im Hintergrund ablaufen und wirst sofort benachrichtigt, sobald eine abgeschlossen ist.
In der Servers Übersicht, können die laufenden Server mit ihren eingestellten Ressourcen eingesehen werden. Ein Teil der Verwaltungsfunktionen sind direkt in der NWS Übersicht abrufbar. Funktionen die aktuell verfügbar sind:
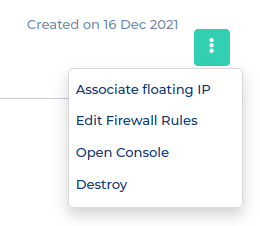
- Release/Associate Floating IP – Einsehen/Löschen
- Edit Firewall Rules – Einstellungen Port Freigabe
- Open Console – Direkter Zugriff auf die Server Console
- Destroy – Löschen des Servers
Bei Problemen mit der Erstellung oder Verwaltung der VMs stehen unsere MyEngineers jederzeit gerne mit Rat und Tat zur Seite. Wir sind zum Beispiel über das Kontaktformular zu erreichen.
Ein frohes Fest und schöne Feiertage wünscht Euch NETWAYS Web Services!


