The organization of the Icinga Camp would not be possible without the wonderful support of our great sponsors. This year, we want to say a big “THANK YOU” to Thomas-Krenn AG, Linux Magazin and Admin Network and Security.
We’re really happy to have you all with us in Berlin and are grateful for your support in every sense. WE LOVE YOU!

NETWAYS Blog
Generationswechsel bei GnuPG/PGP Schlüsseln
Die für digitale Signaturen und zum Verschlüsseln von Daten verwendeten GnuPG bzw. PGP Schlüssel sind keine reinen Schlüssel im eigentlichen Sinne. Stattdessen enthalten sie den eigentlichen Schlüssel und diverse zusätzliche Informationen wie, für welche „IDs“ (also Kombinationen aus Name und E-Mailadresse) sie gültig sind, wie lange sie gültig sind und einige Informationen über Hash- und Verschlüsselungsalgorithmen, die der Besitzer des Schlüssels vorzieht oder überhaupt zulässt.
![]() Da sich das Wissen über die verwendeten Algorithmen weiterentwickelt und immer mehr Rechenleistung immer günstiger zu haben ist kann man leider nicht davon ausgehen, dass man einen Schlüssel für immer verwenden kann. Irgendwann ist er schlichtweg überholt und kann nicht mehr als sicher gelten. Dafür sind vor allem drei Komponenten ausschlaggebend: Die Länge des eigentlichen Schlüssels, der bevorzugte Verschlüsselungsalgorithmus und der für Signaturen verwendete Hash-Algorithmus.
Da sich das Wissen über die verwendeten Algorithmen weiterentwickelt und immer mehr Rechenleistung immer günstiger zu haben ist kann man leider nicht davon ausgehen, dass man einen Schlüssel für immer verwenden kann. Irgendwann ist er schlichtweg überholt und kann nicht mehr als sicher gelten. Dafür sind vor allem drei Komponenten ausschlaggebend: Die Länge des eigentlichen Schlüssels, der bevorzugte Verschlüsselungsalgorithmus und der für Signaturen verwendete Hash-Algorithmus.
Bei der Länge wird man beim Erstellen des Schlüssels mit einer Auswahl konfrontiert, die eine minimale und eine maximale Länge angibt. Manchmal kann man diese Auswahl auch übersteuern, läuft dann aber Gefahr, einen Schlüssel zu haben, mit dem viele Kommunikationspartner gar nichts anfangen können oder der so lange für jede Aktion braucht, dass er alleine schon deshalb unbrauchbar ist. Unter einigen Umständen bringt ein extralanger Schlüssel überhaupt nichts, da z.B. damit nur eine weitere, einmalige, Passphrase gesichert wird, die eine fixe Länge hat. (Asymmetrische Verfahren für lange Texte zu verwenden ist auch heute noch zu rechenintensiv, weshalb meist ein symmetrisches Verfahren mit einer einmaligen Passphrase eingesetzt wird und nur die wird asymmetrisch verschlüsselt). Etwas mehr dazu findet man in einem älteren Post zu dem Thema.
Die für die Kommunikation bevorzugten Algorithmen kann man in den „Preferences“ des Schlüssels setzen. Mehr dazu im zuvor genannten Blogpost.
Signaturen jedoch werden einmalig erstellt und sollen dann gelten. Wer schon länger mit GnuPG arbeitet wird also noch einige Signaturen mit SHA1, so auch die Selbstsignatur, mit der der Schlüssel ursprünglich ausgestattet wurde. SHA1 gilt aber schon lange nicht mehr als sicher, weshalb man ihn auch nicht mehr benutzen sollte. (Ebenso MD5, mit dem auch früher Signaturen erstellt wurden). Wer einen DSA Schlüssel mit 1024bit Länge hat, sollte sich jetzt angesprochen fühlen.
Es gibt also mittlerweile mehrere Gründe, manche alte Schlüssel zu überdenken. Die Liste der bevorzugten Algorithmen lässt sich auch bei einem bestehenden Schlüssel einfach austauschen. Die Schlüssellänge liesse sich durch einen neuen Subkey realisieren, der aber auch einige extra Schritte beim Handling braucht. Signaturen auszutauschen wird aber ein aufwändiger Prozess, weil man mit allen, die den alten Schlüssel signiert haben, nochmal in Kontakt treten und sie um neue Signaturen auf dem neuen Schlüssel bitten muss. Und da wir ja hoffentlich alle sehr viele Signaturen auf unseren Schlüsseln haben, kann das schon recht aufwändig werden.
Um also möglichst alle Probleme, die ein alter Schlüssel mit sich bringt, auf einmal zu erschlagen, gehen viele User den Weg, einfach einen neuen Schlüssel anhand möglichst aktueller Best Practices (als Ausgangspunkt kann wieder der vorherige Blogpost dienen) zu erstellen und auf den umzusteigen.
Um einen neuen Schlüssel zu etablieren und einen alten dadurch zu ersetzen, kann man folgendermassen vorgehen:
- Einen neuen Schlüssel anhand aktueller Best Practices erstellen
- Den neuen Schlüssel mit dem alten Schlüssel signieren
- Ob man auch den alten Schlüssel mit dem neuen signieren soll, da gehen die Meinungen auseinander. (Ich hab’s jedenfalls immer gemacht)
- Den neuen Schlüssel (und ggf. den alten, aktualisierten) auf Schlüsselsever hochladen
- Den neuen Schlüssel bekanntmachen. Am besten über möglichst viele Kanäle, die man sonst auch nutzt, um mit der Welt zu kommunizieren. E-Mail, Soziale Medien, Blog, Website,…
- „Dinge“, die bestehen bleiben sollen, also Dokumente, Pakete, etc. die mit dem alten Schlüssel signiert wurden mit dem neuen Schlüssel signieren. Wenn mehrere Signaturen möglich sind, sollte die neue hinzukommen, sonst muss sie ersetzt werden. Vor diesem Schritt sollte man etwas warten, damit die Empfänger eine Chance haben, den neuen Schlüssel zu holen bzw. zu bemerken.
- Die Leute, die den alten Schlüssel signiert haben, sollten informiert und gebeten werden, den neuen Schlüssel ebenfalls zu signieren.
Für den letzten Punkt gibt es einige Vorlagen, die man verwenden kann. Es bietet sich an, ein Klartextdokument aufzusetzen, in dem über den Tausch informiert wird und gleich die nötigen Befehle mitzuliefern, mit der der neue Schlüssel geholt und signiert werden kann. Ein entsprechendes Beispiel habe ich für meine persönlichen Schlüssel verfasst. Dieses Dokument wurde auch gleich sowohl mit dem alten als auch dem neuen Schlüssel unterschrieben, um den Empfängern die Echtheit zu bestätigen.
gpg --digest-algo SHA512 --clearsign -u 6265BAE6 -u A84CB603 key-transition-2018-01-05.txt
Dieses Dokument sollte man möglichst öffentlich machen und an die Leute schicken, die den alten Schlüssel signiert haben.
Verwendet man den Schlüssel auch zum Signieren von Paketen, ist der Umstieg etwas schwieriger. Man kann leider nicht erwarten, dass jeder User, der die Software einsetzt, auch regelmässig ein Blog oder andere Neuigkeiten liest, weshalb ein einfaches Ersetzen des Schlüssels dazu führen würde, dass die User neue Pakete nicht mehr installieren können. Um den Umstieg einfacher zu machen sollte bereits im Vorfeld ein „release“-Paket bereitgestellt werden, also eines das das eigene Repository in den Packagemanager der User konfiguriert und den entsprechenden Schlüssel ablegt. In diesem Paket kann man in einem neuen Release dann auch den neuen Schlüssel hinterlegen, sodass beide, der neue und der alte in den Packagemanager kommen. Stellt man später um, mit welchem Schlüssel man Pakete signiert, werden sie automatisch als valide signiert erkannt. (Da sich verschiedene Packagemanager unterschiedlich verhalten, sollte man das unbedingt vorher testen!)
Nicht abgedeckt sind jene User, die das Repository „von Hand“ angelegt und den Schlüssel manuell importiert haben. Klar könnte man in eine Version der Software selbst den neuen Schlüssel-Import ins Paket verbauen, aber das würden einem die User (zu recht) um die Ohren hauen, da das Software Paket nur die Software installieren soll und nichts am Paketmanager verändern. Beim Release-Paket ist das was anderes, da das ja genau für solche Aufgaben gebaut wurde. Hier heisst es, im Vorfeld umso mehr über diverse Kanäle zu kommunizieren und es auch möglichst in alle fertigen Module, Cookbooks, Playbooks, etc. zu integrieren, dass für kurze Zeit zwei Schlüssel vorhanden sind und wann umgestiegen wird. Besonders geeignet ist natürlich der Release einer grösseren neuen Version, wo vielleicht sowieso ein neues Repository gebaut wird.
Einige Zeit, nachdem der Umstieg vollzogen wurde, sollte man den alten Schlüssel „revoken“, damit er nicht mehr benutzt wird. Auch könnte man das Release-Paket dazu bringen, den alten Schlüssel aus den Packagemanagern zu entfernen. Sollte tatsächlich jemand den alten Schlüssel knacken, ist man so auf der sicheren Seite und genau dafür hat man den Umstieg ja gemacht. Alte Informationen, die mit dem alten Schlüssel verschlüsselt wurden, kann man übrigens auch mit einem revoked key noch immer entschlüsseln. Jedenfalls kenne ich keine Software, die das nicht mehr erlauben würde. Nur verschlüsseln geht dann eben nicht nicht mehr.
Etwas mehr zum Nachlesen zum Thema gibt’s unter anderem auf den Debian Seiten.

Thomas Widhalm
Manager Operations
Pronomina: er/ihm. Anrede: "Hey, Du" oder wenn's ganz förmlich sein muss "Herr". Thomas war Systemadministrator an einer österreichischen Universität und da besonders für Linux und Unix zuständig. Seit 2013 ist er bei der NETWAYS. Zuerst als Consultant, jetzt als Leiter vom Operations Team der NETWAYS Professional Services, das unter anderem zuständig ist für Support und Betriebsunterstützung. Nebenbei hat er sich noch auf alles mögliche rund um den Elastic Stack spezialisiert, schreibt und hält Schulungen und macht auch noch das eine oder andere Consulting zum Thema. Privat begeistert er sich für Outdoorausrüstung und Tarnmuster, was ihm schon mal schiefe Blicke einbringt...
Secure Elasticsearch and Kibana with an Nginx HTTP Proxy
 Elasticsearch provides a great HTTP API where applications can write to and read from in high performance environments. One of our customers sponsored a feature for Icinga 2 which writes events and performance data metrics to Elasticsearch. This will hit v2.8 later this year.
We’re also concerned about security, and have been looking into security mechanisms such as basic auth or TLS. Unfortunately this isn’t included in the Open Source stack.
Why should you care about securing Elasticsearch and Kibana?
Modern infrastructure deployments commonly require Elasticsearch listening on an external interface and answering HTTP requests. Earlier this year we’ve learned about ransomware attacks on MongoDB and Elasticsearch too.
During development I’ve found this API call – just clear everything inside the database.
[root@icinga2-elastic ~]# curl -X DELETE http://localhost:9200/_all
{"acknowledged":true}
I don’t want any user to run this command from anywhere. You can disable this by setting „action.destructive_requires_name“ to „true“ inside the configuration, but it is not the default.
A similar thing is that you can read and write anything without any access rules in place, no matter if querying Elasticsearch or Kibana directly.
Firewall and Network Segments
A possible solution is to limit the network transport to only allowed hosts via firewall rules and so on. If your Elasticsearch cluster is running on a dedicated VLAN, you would need to allow the Icinga 2 monitoring host to write data into – anyone on that machine could still read/write without any security mechanism in place.
HTTP Proxy with Nginx
Start with the plain proxy pass configuration and forward http://localhosT:9200 to your external interface (192.168.33.7 in this example).
# MANAGED BY PUPPET
server {
  listen       192.168.33.7:9200;
  server_name  elasticsearch.vagrant-demo.icinga.com;
  index  index.html index.htm index.php;
  access_log            /var/log/nginx/ssl-elasticsearch.vagrant-demo.icinga.com.access.log combined;
  error_log             /var/log/nginx/ssl-elasticsearch.vagrant-demo.icinga.com.error.log;
  location / {
    proxy_pass            http://localhost:9200;
    proxy_read_timeout    90;
    proxy_connect_timeout 90;
    proxy_set_header      Host $host;
    proxy_set_header      X-Real-IP $remote_addr;
    proxy_set_header      X-Forwarded-For $proxy_add_x_forwarded_for;
    proxy_set_header      Proxy "";
  }
}
Restart Nginx and test the connection from the external interface.
# systemctl restart nginx
# curl -v http://192.168.33.7:9200
Once this is working, proceed with adding basic auth and TLS.
HTTP Proxy with Basic Auth
This leverages the access level to authenticated users only. Best is to manage the basic auth users file with Puppet, Ansible, etc. – similar to how you manage your Nginx configuration. Our consultants use that method on a regular basis, and provided me with some examples for Nginx. You could do the same for Apache – I would guess that is a matter of taste and performance here.
Generate a username/password combination e.g. using the htpasswd CLI command.
htpasswd -c /etc/nginx/elasticsearch.passwd icinga
Specify the basic auth message and the file which contains the basic auth users.
    auth_basic                "Elasticsearch auth";
    auth_basic_user_file      "/etc/nginx/elasticsearch.passwd";
Restart Nginx and connect to the external interface.
# systemctl restart nginx
# curl -v -u icinga:icinga http://192.168.33.7:9200
HTTP Proxy with TLS
The Elasticsearch HTTP API does not support TLS out-of-the-box. You need to enforce HTTPS via HTTP Proxy, enable ssl and set up the required certificates.
Enforce the listen address to SSL only. That way http won’t work.
listen 192.168.33.7:9200 ssl;
Enable SSL, specify the certificate paths on disk, use TLSv1 and above and optionally secure the used ciphers.
  ssl on;
  ssl_certificate           /etc/nginx/certs/icinga2-elastic.crt;
  ssl_certificate_key       /etc/nginx/certs/icinga2-elastic.key;
  ssl_session_cache         shared:SSL:10m;
  ssl_session_timeout       5m;
  ssl_protocols             TLSv1 TLSv1.1 TLSv1.2;
  ssl_ciphers               ECDHE-ECDSA-CHACHA20-POLY1305:ECDHE-RSA-CHACHA20-POLY1305:ECDHE-ECDSA-AES128-GCM-SHA256:ECDHE-RSA-AES128-GCM-SHA256:ECDHE-ECDSA-AES256-GCM-SHA384:ECDHE-RSA-AES256-GCM-SHA384:DHE-RSA-AES128-GCM-SHA256:DHE-RSA-AES256-GCM-SHA384:ECDHE-ECDSA-AES128-SHA256:ECDHE-RSA-AES128-SHA256:ECDHE-ECDSA-AES128-SHA:ECDHE-RSA-AES256-SHA384:ECDHE-RSA-AES128-SHA:ECDHE-ECDSA-AES256-SHA384:ECDHE-ECDSA-AES256-SHA:ECDHE-RSA-AES256-SHA:DHE-RSA-AES128-SHA256:DHE-RSA-AES128-SHA:DHE-RSA-AES256-SHA256:DHE-RSA-AES256-SHA:ECDHE-ECDSA-DES-CBC3-SHA:ECDHE-RSA-DES-CBC3-SHA:EDH-RSA-DES-CBC3-SHA:AES128-GCM-SHA256:AES256-GCM-SHA384:AES128-SHA256:AES256-SHA256:AES128-SHA:AES256-SHA:DES-CBC3-SHA:!DSS;
  ssl_prefer_server_ciphers on;
  ssl_trusted_certificate   /etc/nginx/certs/ca.crt;
Restart Nginx and connect to the external interface on https. Note: Host verification is disabled in this example.
# systemctl restart nginx
# curl -v -k -u icinga:icinga https://192.168.33.7:9200
Combine HTTP Proxy, TLS and Basic Auth
A complete configuration example could look like this:
vim /etc/nginx/sites-enabled/elasticsearch.vagrant-demo.icinga.com.conf
# MANAGED BY PUPPET
server {
  listen       192.168.33.7:9200 ssl;
  server_name  elasticsearch.vagrant-demo.icinga.com;
  ssl on;
  ssl_certificate           /etc/nginx/certs/icinga2-elastic.crt;
  ssl_certificate_key       /etc/nginx/certs/icinga2-elastic.key;
  ssl_session_cache         shared:SSL:10m;
  ssl_session_timeout       5m;
  ssl_protocols             TLSv1 TLSv1.1 TLSv1.2;
  ssl_ciphers               ECDHE-ECDSA-CHACHA20-POLY1305:ECDHE-RSA-CHACHA20-POLY1305:ECDHE-ECDSA-AES128-GCM-SHA256:ECDHE-RSA-AES128-GCM-SHA256:ECDHE-ECDSA-AES256-GCM-SHA384:ECDHE-RSA-AES256-GCM-SHA384:DHE-RSA-AES128-GCM-SHA256:DHE-RSA-AES256-GCM-SHA384:ECDHE-ECDSA-AES128-SHA256:ECDHE-RSA-AES128-SHA256:ECDHE-ECDSA-AES128-SHA:ECDHE-RSA-AES256-SHA384:ECDHE-RSA-AES128-SHA:ECDHE-ECDSA-AES256-SHA384:ECDHE-ECDSA-AES256-SHA:ECDHE-RSA-AES256-SHA:DHE-RSA-AES128-SHA256:DHE-RSA-AES128-SHA:DHE-RSA-AES256-SHA256:DHE-RSA-AES256-SHA:ECDHE-ECDSA-DES-CBC3-SHA:ECDHE-RSA-DES-CBC3-SHA:EDH-RSA-DES-CBC3-SHA:AES128-GCM-SHA256:AES256-GCM-SHA384:AES128-SHA256:AES256-SHA256:AES128-SHA:AES256-SHA:DES-CBC3-SHA:!DSS;
  ssl_prefer_server_ciphers on;
  ssl_trusted_certificate   /etc/nginx/certs/ca.crt;
  uth_basic                "Elasticsearch auth";
  auth_basic_user_file      "/etc/nginx/elasticsearch.passwd";
  index  index.html index.htm index.php;
  access_log            /var/log/nginx/ssl-elasticsearch.vagrant-demo.icinga.com.access.log combined;
  error_log             /var/log/nginx/ssl-elasticsearch.vagrant-demo.icinga.com.error.log;
  location / {
    proxy_pass            http://localhost:9200;
    proxy_read_timeout    90;
    proxy_connect_timeout 90;
    proxy_set_header      Host $host;
    proxy_set_header      X-Real-IP $remote_addr;
    proxy_set_header      X-Forwarded-For $proxy_add_x_forwarded_for;
    proxy_set_header      Proxy "";
  }
}
The following example query does not verify the offered host certificate. In case you configure the ElasticWriter feature in Icinga 2 v2.8, you’ll find the options to specify certificates for TLS handshake verification.
$ curl -v -k -u icinga:icinga https://192.168.33.7:9200
* Rebuilt URL to: https://192.168.33.7:9200/
*   Trying 192.168.33.7...
* TCP_NODELAY set
* Connected to 192.168.33.7 (192.168.33.7) port 9200 (#0)
* WARNING: disabling hostname validation also disables SNI.
* TLS 1.2 connection using TLS_ECDHE_RSA_WITH_AES_128_GCM_SHA256
* Server certificate: icinga2-elastic
* Server auth using Basic with user 'icinga'
> GET / HTTP/1.1
> Host: 192.168.33.7:9200
> Authorization: Basic aWNpbmdhOmljaW5nYQ==
> User-Agent: curl/7.54.0
> Accept: */*
>
< HTTP/1.1 200 OK
< Server: nginx/1.12.1
< Date: Tue, 12 Sep 2017 13:52:31 GMT
< Content-Type: application/json; charset=UTF-8
< Content-Length: 340
< Connection: keep-alive
<
{
  "name" : "icinga2-elastic-elastic-es",
  "cluster_name" : "elastic",
  "cluster_uuid" : "axUBwxpFSpeFBmVRD6tTiw",
  "version" : {
    "number" : "5.5.2",
    "build_hash" : "b2f0c09",
    "build_date" : "2017-08-14T12:33:14.154Z",
    "build_snapshot" : false,
    "lucene_version" : "6.6.0"
  },
  "tagline" : "You Know, for Search"
}
* Connection #0 to host 192.168.33.7 left intact
Conclusion
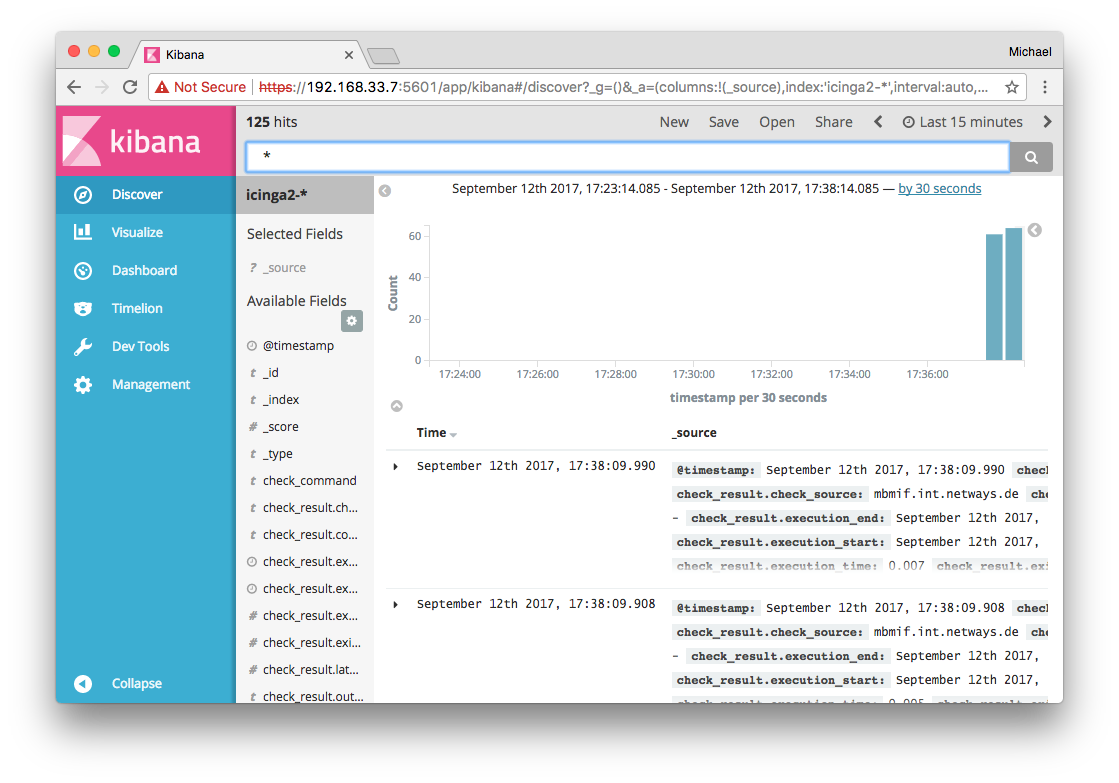
 Secure data transfer from your monitoring instances to Elasticsearch is mandatory. Basic access control via basic auth should also be implemented. All of this is possible with the help of a dedicated HTTP Proxy host. Fine granular access control for specific HTTP requests is available in the commercial Shield package or variants. While securing Elasticsearch, also look into Kibana which runs on port 5601.
Since we’ve used the Icinga Vagrant boxes as a development playground, I’ve added Nginx as HTTP Proxy inside the icinga2x-elastic box. This provisions the required basic auth and TLS settings and offers to write data on https://192.168.33.7:9200 (icinga/icinga). The same applies for Kibana. The examples above can be replayed too.
If you want to learn more on this topic, make sure to join our Elastic Stack training sessions or kindly invite one of our consultants for a hands-on workshop. Hint: There is an Elastic Stack workshop at OSMC too 🙂
SSH authentication with GnuPG and smart cards
 Most system administrators know how to use key-based authentication with SSH. Some of the more obvious benefits include agent forwarding (i.e. being able to use your SSH key on a remote system) and not having to remember passwords. There are, however, a few issues with having your SSH key on a general-purpose computer: Malware can obtain an unencrypted copy of your private SSH key fairly easily. Also, while migrating your key to another system is fairly easy it’s virtually impossible to securely use your SSH key on another untrusted system (e.g. at a customer).
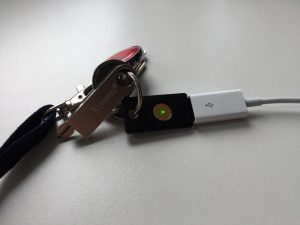
This is where smart cards come in. A smart card stores certificates (such as your SSH key) and provides functionality for operating on those certificates (e.g. using their private key to sign or decrypt data). Smart cards come in various form factors: credit cards, SIM cards, etc. – which commonly require a separate card reader in order to be usable. However, there are also USB devices which implement all the usual smart card features in addition to other security features (e.g. requiring the user to press a key on the device before an authentication request is signed).
One such device is the Yubikey 4 which I’m personally using for SSH authentication.
The first step towards using a new Yubikey for SSH authentication is enabling the OpenPGP applet on it:
$ ykpersonalize -m82
I already had a PGP key, however in order to use it for authentication I had to create an additional subkey for the key usage type „authentication“. Here’s how that can be done:
$ gpg --edit-key --expert info@example.org
gpg (GnuPG) 2.1.23; Copyright (C) 2017 Free Software Foundation, Inc.
This is free software: you are free to change and redistribute it.
There is NO WARRANTY, to the extent permitted by law.
Secret key is available.
sec rsa2048/42330DF1CA650A40
created: 2017-08-24 expires: never usage: SC
trust: ultimate validity: ultimate
ssb rsa2048/56D8D1BBE7E720DB
created: 2017-08-24 expires: never usage: E
[ultimate] (1). NETWAYS Blog <info@example.org>
gpg> addkey
Please select what kind of key you want:
(3) DSA (sign only)
(4) RSA (sign only)
(5) Elgamal (encrypt only)
(6) RSA (encrypt only)
(7) DSA (set your own capabilities)
(8) RSA (set your own capabilities)
(10) ECC (sign only)
(11) ECC (set your own capabilities)
(12) ECC (encrypt only)
(13) Existing key
Your selection? 8
Possible actions for a RSA key: Sign Encrypt Authenticate
Current allowed actions: Sign Encrypt
(S) Toggle the sign capability
(E) Toggle the encrypt capability
(A) Toggle the authenticate capability
(Q) Finished
Your selection? s
Possible actions for a RSA key: Sign Encrypt Authenticate
Current allowed actions: Encrypt
(S) Toggle the sign capability
(E) Toggle the encrypt capability
(A) Toggle the authenticate capability
(Q) Finished
Your selection? e
Possible actions for a RSA key: Sign Encrypt Authenticate
Current allowed actions:
(S) Toggle the sign capability
(E) Toggle the encrypt capability
(A) Toggle the authenticate capability
(Q) Finished
Your selection? a
Possible actions for a RSA key: Sign Encrypt Authenticate
Current allowed actions: Authenticate
(S) Toggle the sign capability
(E) Toggle the encrypt capability
(A) Toggle the authenticate capability
(Q) Finished
Your selection? q
RSA keys may be between 1024 and 4096 bits long.
What keysize do you want? (2048)
Requested keysize is 2048 bits
Please specify how long the key should be valid.
0 = key does not expire
= key expires in n days
w = key expires in n weeks
m = key expires in n months
y = key expires in n years
Key is valid for? (0)
Key does not expire at all
Is this correct? (y/N) y
Really create? (y/N) y
We need to generate a lot of random bytes. It is a good idea to perform
some other action (type on the keyboard, move the mouse, utilize the
disks) during the prime generation; this gives the random number
generator a better chance to gain enough entropy.
sec rsa2048/42330DF1CA650A40
created: 2017-08-24 expires: never usage: SC
trust: ultimate validity: ultimate
ssb rsa2048/56D8D1BBE7E720DB
created: 2017-08-24 expires: never usage: E
ssb rsa2048/5F43E49ED794BDEF
created: 2017-08-24 expires: never usage: A
[ultimate] (1). NETWAYS Blog <info@example.org>
gpg> save
Now that we’ve created a new subkey we can move its private key part to the smart card:
$ gpg --edit-key --expert info@example.org
gpg (GnuPG) 2.1.23; Copyright (C) 2017 Free Software Foundation, Inc.
This is free software: you are free to change and redistribute it.
There is NO WARRANTY, to the extent permitted by law.
Secret key is available.
sec rsa2048/42330DF1CA650A40
created: 2017-08-24 expires: never usage: SC
trust: ultimate validity: ultimate
ssb rsa2048/56D8D1BBE7E720DB
created: 2017-08-24 expires: never usage: E
ssb rsa2048/5F43E49ED794BDEF
created: 2017-08-24 expires: never usage: A
[ultimate] (1). NETWAYS Blog <info@example.org>
gpg> toggle
sec rsa2048/42330DF1CA650A40
created: 2017-08-24 expires: never usage: SC
trust: ultimate validity: ultimate
ssb rsa2048/56D8D1BBE7E720DB
created: 2017-08-24 expires: never usage: E
ssb rsa2048/5F43E49ED794BDEF
created: 2017-08-24 expires: never usage: A
[ultimate] (1). NETWAYS Blog <info@example.org>
gpg> key 2
sec rsa2048/42330DF1CA650A40
created: 2017-08-24 expires: never usage: SC
trust: ultimate validity: ultimate
ssb rsa2048/56D8D1BBE7E720DB
created: 2017-08-24 expires: never usage: E
ssb* rsa2048/5F43E49ED794BDEF
created: 2017-08-24 expires: never usage: A
[ultimate] (1). NETWAYS Blog <info@example.org>
gpg> keytocard
Please select where to store the key:
(3) Authentication key
Your selection? 3
gpg> quit
Save changes? (y/N) y
The Yubikey 4 has three key slots which can be used for storing RSA keys with up to 4096 bits each. This might be an excellent opportunity to also move your signing and encryption key to your smart card – assuming you have an encrypted backup somewhere in case you lose access to your Yubikey.
The last step involves replacing ssh-agent with gpg-agent. This allows your SSH client to use your PGP certificates (including the authentication subkey we just created). In addition to that gpg-agent also supports regular SSH keys which might be useful if you have more than one SSH key and only plan to migrate one of them to your Yubikey:
I had to add the following snippet to my .profile file to start gpg-agent instead of ssh-agent:
[ -f ~/.gpg-agent-info ] && source ~/.gpg-agent-info
if [ -S "${GPG_AGENT_INFO%%:*}" ]; then
  export GPG_AGENT_INFO
  export SSH_AUTH_SOCK
  export SSH_AGENT_PID
else
  eval $(gpg-agent --daemon --write-env-file ~/.gpg-agent-info)
fi
And here’s OpenSSH prompting me for my smart card and PIN:

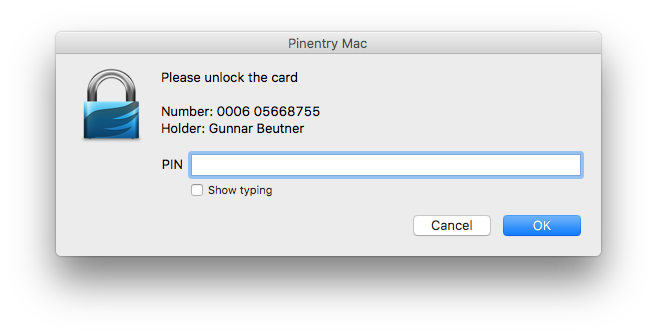
And that’s how you can literally put your PGP key on your keychain. 🙂
Request Tracker 4.4 Security Update and UTF8 issues with Perl’s DBD::Mysql 4.042
 Last week, Best Practical announced that there are critical security fixes available for Request Tracker. We’ve therefore immediately pulled the patches from 4.4.2rc2 into our test stages and rolled them out in production.
Update == Broken Umlauts
One thing we did notice too late: German umlauts were broken on new ticket creation. Text was simply cut off and rendered subjects and ticket body fairly unreadable.
![]()
Encoding issues are not nice, and hard to track down. We rolled back the security fix upgrade, and hoped it would simply fix the issue. It did not, even our production version 4.4.1 now led into this error.
Our first idea was that our Docker image build somehow changes the locale, but that would have at least rendered „strange“ text, not entirely cut off. Same goes for the Apache webserver encoding. We’ve then started comparing the database schema, but was not touched in these regards too.
DBD::Mysql UTF8 Encoding Changes
During our research we learned that there is a patch available which avoids Perl’s DBD::mysql in version 4.042. The description says something about changed behaviour with utf8 encoding. Moving from RT to DBD::Mysql’s Changelog there is a clear indication that they’ve fixed a long standing bug with utf8 encoding, but that probably renders all other workarounds in RT and other applications unusable.
2016-12-12 Patrick Galbraith, Michiel Beijen, DBI/DBD community (4.041_1)
* Unicode fixes: when using mysql_enable_utf8 or mysql_enable_utf8mb4,
previous versions of DBD::mysql did not properly encode input statements
to UTF-8 and retrieved columns were always UTF-8 decoded regardless of the
column charset.
Fix by Pali Rohár.
Reported and feedback on fix by Marc Lehmann
(https://rt.cpan.org/Public/Bug/Display.html?id=87428)
Also, the UTF-8 flag was not set for decoded data:
(https://rt.cpan.org/Public/Bug/Display.html?id=53130)
Solution
Our build system for the RT container pulls in all required Perl dependencies by a cpanfile configuration. Instead of always pulling the latest version for DBD::Mysql, we’ve now pinned it to the last known working version 4.0.41.
 # MySQL
-requires 'DBD::mysql', '2.1018';
+# Avoid bug with utf8 encoding: https://issues.bestpractical.com/Ticket/Display.html?id=32670
+requires 'DBD::mysql', '== 4.041';
Voilá, NETWAYS and Icinga RT production instances fixed.
![]()
Conclusion
RT 4.4.2 will fix that by explicitly avoiding the DBD::Mysql version in its dependency checks, but older installations may suffer from that problem in local source builds. Keep that in mind when updating your production instances. Hopefully a proper fix can be found to allow a smooth upgrade to newer library dependencies.
If you need assistance with building your own Request Tracker setup, or having trouble fixing this exact issue, just contact us 🙂


