Seite wählen

NETWAYS Blog

A personal Linux backup solution

Having personal backups is a must, but what can you do if you don’t have a mac that runs timemachine?
My first instinct was using the tool of choice of a friend: duplicity. It’s free software, does encryption and incremental backups, what more could you want? But duplicity does not offer a very user experience. The docs are work in progress, the –help is a bit of a mess and the man page is too verbose for a quick start. Obviously I have little problem reading and learning before using a tool, which is why I gave up and looked for a different one.
Restic does all what I want and duplicity can, but it has a good documentation, bash completion and other optional bonuses for making usage and, in turn, my life much easier.  It makes sense to think about what to backup before thinking about the right tool. I only want to backup from ~, I don’t care about `/etc` or other places with config or data, it would be no use to me when someone was to throw this laptop down a bridge. So just how much is lying around in my home directory?

$ du -h -d1 /home/jflach | grep "G"
1.9G	/home/jflach/i2
4.3G	/home/jflach/.ccache
20G	/home/jflach/git
108G	/home/jflach/vmware
6.6G	/home/jflach/.cache
20G	/home/jflach/Documents
1.2G	/home/jflach/.thunderbird
3.3G	/home/jflach/Downloads
5.6G	/home/jflach/.vagrant.d
171G	/home/jflach

Luckily I have no folder with an upper case „G“ in the name and I can see that over 50% are used up by vmare/. I don’t really need to backup my virtual machines, it’d be annoying to lose them but no reason to panic. `.ccache/`, `.cache/` and `Downloads` are completely irrelevant, bringing the total down to just above 50GB.
Back to restic. Creating a new local backup repository is easy:

$ restic init --repo /tmp/backup
enter password for new backend:
enter password again:
created restic backend 929fc4f740 at /tmp/backup
Please note that knowledge of your password is required to access
the repository. Losing your password means that your data is
irrecoverably lost.

Now the for the actual backup, I have a file containing the excluded directories:

$ cat ~/.config/restic.exclude
Downloads
vmware
.ccache
.cache

And the command is simply:

$ restic -r /tmp/backup backup ~ --exclude-file=.config/restic.exclude
enter password for repository:
password is correct
scan [/home/jflach]
scanned 10123 directories, 64039 files in 0:00
[11:07] 100.00%  76.166 MiB/s  49.612 GiB / 49.612 GiB  74162 / 74162 items  0 errors  ETA 0:00
duration: 11:07, 76.12MiB/s
snapshot dd45c515 saved

It took eleven minutes on my machine to encrypt and compress about 50GiB of data. Restic starts a few threads and voraciously consumes CPU time and memory as it runs. Get yourself a fresh cup of coffee, working is no fun while the tool runs.
All that’s now left to do is to copy the directory to some external server or hard drive. Restic offers support for common sync tools like sftp, google cloud or rclone, whatever you use it will be your job to automate and define its behavior.

The quest for su on Windows

„How to run cmd as different user?“ I type into Google. When I search for full sentences instead of just keywords I must be very desperate. Violet links everywhere, I feel like I have tried everything and nothing works. What I want is something like „su“, temporarily changing the current user sounds like a very important thing to be able to do when one administrates Windows. So why is it not that simple?
There is a command called „RunAs“, sounds good, right? Just give the user and command you want to use and you are set! Just make sure you have the right permissions. But problems start with the username since Windows is localized. Sometimes English names work, sometimes you need to use „NT-AUTORITÄT\Netzwekdienst“ instead of „NT AUTHORITY\Network Service“. RunAs is one of the latter. Except all of this does not matter since you need a password and system accounts tend to not have one. Bummer.

Notice the differences in the output between the English and German username


Without knowledge of Windows inner workings, I blame the lack of quality free material on the topic, I’m left to googling around until I find a 10 year old blog post or forum entry which solves the exact problem I’m having. And I did find something, it’s not even that old. PsExec is a tool which does exactly what I want! So I install the package, edit my path, run the program… and it just works! With English usernames even. (After I used the -accepteula flag, because for some reason it would not work without when running the first time).

It just works!


Working with Windows often feels to me like piloting a military submarine, not because it’s so advanced, but because I often have no idea what I am doing, the manual is in Russian and clicking the wrong button may or may not make a large strip of land uninhabitable for decades. Trial and error seems to be the way to go for most problems and that’s frustrating. So I hope if somebody else finds themselves in the unknown waters of the Windows user system, this blog post can help.

Flapping in Icinga 2.8.0

The author viewing the code for the first time


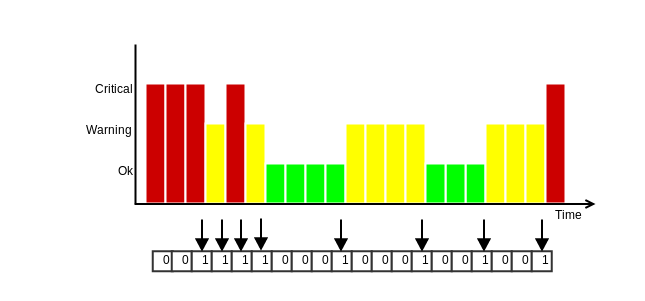
Flapping detection is a feature many monitoring suites offer. It is mainly used to detect unfortunately chosen thresholds, but can also help in detecting network issues or similar. In most cases two thresholds are used, high and low. If the flapping value, which is the percentage of state changes over a set time, gets higher than the high threshold, it is considered flapping. It will then stay flapping until the value drops below the low threshold.
Naturally Icinga 2 had such a feature, just that it implemented a different approach and didn’t work. For 2.8.0 we decided it was time to finally fix flapping, so I went to investigate. As I said the flapping was working differently from Icinga 1, Shinken, etc. Instead of two thresholds there was just one, instead of one flapping value there were two and they change based on the time since the last check. Broken down it looks like this:

positive; //value for state changes
negate; //value for stable changes
FLAPPING_INTERVAL; //Compile time constant to smoothen the values
OnCheckResult() {
  if (positive + negative > FLAPPING_INTERVAL) {
    pct = (positive + negative - FLAPPING_INTERVAL) / FLAPPING_INTERVAL;
    positive -= pct * positive;
    negative -= pct * negative;
  }
  weight = now - timeOfLastCheck;
  if (stateChange)
    positive += weight;
  else
    negative += weight;
}
IsFlapping() {
  return 100 * positive / (negative + positive);
}

The idea was to have the two flapping values (positive & negative) increase one or the other with every checkresult. Positive for state changes and negative for results which were not state changes, by the time since the last check result. The first problem which arises here, while in most cases the check interval is relatively stable, after a prolonged Icinga outage one of the values could be extremely inflated. Another problem is the degradation of the result, in my tests it took 17 consecutive stable results for a flapping value to calm down.
After some tweaking here and there, I decided it would be wisest to go with the old and proven style Icinga 1 was using. Save the last 20 checkresults, count the state changes and divide them by 20. I took inspiration in the way Shinken handles flapping and added weight to the sate changes, with the most recent one having a value of 1.2 and the 20th (oldest) one of 0.8. The issue of possibly wasting memory on saving the state changes could be resolved by using one integer as a bit array. This way we are actually using slightly less memory now \o/

The above example would then have a value of 39.1%, flapping in the case of default thresholds. More details on the usage and calculation of flapping in Icinga 2 can be found in the documentation once version 2.8.0 is released.

A naturally grown .vimrc

Vim is pretty great, honestly. But since I started using vim after growing tired of nano, a lot in my .vimrc changed… To the point where colleagues who use vim on their machine rather use nano on mine before trying to wrap their head around my workflow. Every .vimrc is different and a lot of them exist out there, over twelve thousand repositories of shared vim configurations on GitHub alone and many more on private laptops and computers.
Generally creating a .vimrc works like creating a Makefile: Copy and paste from different sources with small changes until you have an approximation of the desired result and then need to decide whether you want to go the extra mile of dealing with your configurations‘ and Vims‘ quirks to get it working properly or you just leave it be. This is followed by years of incremental tweaking until you have a Vim environment which works perfectly but you don’t know why. At least that’s how I do it ¯\_(ツ)_/¯
So I took a dive into my own to see what kind of madness lurks down there…

set nocompatible
set t_Co=16
set shiftwidth=4
set tabstop=4
set autoindent
set smartindent
filetype plugin on
filetype indent on

So far, so good. Nothing special. Other than that indentation is set and overwritten three times, this has not lead to any problems (yet). The next lines are a bit more interesting:

call pathogen#infect()
call pathogen#helptags()
syntax on
set background=dark " dark | light "
colorscheme solarized

 
pathogen is a runtime manipulator which allows you to add additional plugins to Vim easier, in my case these are vim-solarized, a popular colourscheme, and vim-fugitive, a plugin that adds git commands within Vim. #infect() loads these plugins and #helptags() generates documentation. The following lines make use of solarized and add syntax highlighting.

set nu
set listchars=eol:$,tab:>-,trail:.,extends:>,precedes:<,nbsp:_
set list
let &colorcolumn="121"
set splitbelow
set splitright
set viminfo='20,<1000

This controls numbering and control characters, colorcolumn adds a ugly line over the 121’st char to keep up with coding styles. split tells vim where to add new views when splitting (I rarely use these) and viminfo sets the copy buffer to up to 1000 lines.
Now we get to the really interesting bits, key remaps!

Artist rendition of the authors .vimrc

"See :help map-commands
"n        = Normal only
"v        = Visual only
"i        = Insert only
"         = Normal+Insert+Select only
" nore    = disable recusiveness
"     map = Recursive map
"split window switching
nnoremap <C-J> <C-W><C-J>
nnoremap <C-K> <C-W><C-K>
nnoremap <C-L> <C-W><C-L>
nnoremap <C-H> <C-W><C-H>
"Make Up and Down Arrows move half a screen
"instead of 1 line
noremap <Up> <C-U>
noremap <Down> <C-D>
"BUFFERS Used to be F6,F7. Now used by flake
set hidden
noremap :bprevious
noremap :bnext
"Because buffers change Flake to use F3 instead of F7
"autocmd FileType python map :call Flake8()
" DOES NOT WORK DAMN
"Smart Home key
noremap <expr> <Home> (col('.') == matchend(getline('.'), '^\s*')+1 ? '0' : '^')
imap <Home> <C-o><Home>

Switching windows can be hassle without the first four remaps, but again, I rarely use split windows. Mapping the up and down arrows to jump half a screen instead just one line I added to stop myself from using them instead of j and k, I have grown quite used to it, so it gets to stay ^_^
Buffer remaps are a must! Because I do use them a lot. There have been problems with Flake, a python lint tool, which I tried to avoid by remapping flakes key… Didn’t work out, so I got rid of Flake and call pylint when required instead.
The smart home key makes the <home>-key jump to the first non-whitespace char in a line instead of the begining of the line, quite handy!

"Access commandwindow with ctrl+f or :cedit
"For dorks
map q: :q
command Wsudo w !sudo tee % > /dev/null
"Jump to next line > 120 chars
command Warnl :/\%>120v./+
"For easy copy-paste
command Cpm :set nonu paste cc=  nolist
"Catch regular caps failure
command WQ :wq

These are just a few quality of life improvements, I tend to mistype :q as q: and :wq as :WQ. The :Wsudo command lets me edit read-only files and :Cpm is for easy mouse copy and paste. :Warnl jumps to the next line with more than 120 chars, this again is to check for style problems.
Alright, that’s it. My current .vimrc. There were a few commented out lines I omitted because I have no clue what I was thinking at the time anymore, but I hope there were a few little bits someone else might find useful to feed their own beast of a .vimrc with.
Image sources:
Vim logo from vim.sexy
Shoggoth by twitter.com/nottsuo

Redis vs MongoDB as message queue and config proxy

Benchmarks and comparisons for these two NoSQL databases exist a plenty. But in all the blogs and whitepapers I found the use-case was quite different from ours, we were trying to find a tool to queue Icinga 2 events and speed up config updates. The queue would use Redis Pub/Sub or MongoDBs capped collections + tailable cursors. From an implementation standpoint MongoDB looks better, it offers good libraries for most programming languages and the document-based approach allows for filtering based on individual attributes while values in Redis are just opaque blobs. Redis Pub/Sub model also has the problem that it loses its queued items when restarted.
From these naive benchmarks (PHP scripts run with time), it looks like MongoDB likes to take their time with creating objects.
Inserting 250.000 objects:

  • Redis: 11.1s
  • MongoDB: InsertOne: 53.3s
  • MongoDB: InsertMany: 25.4s

Inserting 250.000 objects into list capped to 50.000

  • Redis: 12s
  • MongoDB: InsertOne: 57.6s

Redis speed advantage comes from keeping created objects in memory, while MongoDB writes them to the hard drive right away. This is a huge advantage for Redis, as we rotate our events from the queue, writing them to disk would be a waste of io time. But sadly MongoDB does not offer the possibility of keeping the data volatile in memory.
Another concern of ours is security, Redis does not offer any security features and for many application this is not a problem, but in our case, this means we have to finds ways to make it secure. There have been many attempts to do so, e.g using tools like stunnel, but it’s still an additional topic that would need to be tackled. MongoDB on the other hand offers ACLs on document level and native SSL, which is great! Yet is has been rightfully criticized for its insecure default configurations, which resulted in a flood of hacked MongoDB instances earlier this year.
Conclusion: We will have to investigate further. Especially integration and security will need a closer look. MongoDBs performance seems lackluster, but may just be enough as our tests may have been much bigger than what we will be met with in a real setup.