This article will cover how to automate the monitoring of your windows infrastructure with Ansible and Icinga for Windows. For that, I developed a new Ansible role which you can find here: https://github.com/DanOPT/ansible-role-ifw
The role will allow you to manage your infrastructure dynamically with an Inventory and group_vars file. It’s also possible to define PKI Tickets in the inventory and the support of the Self-Service API is coming soon. The parent as well as the zone of each host will be defined with the group name and their associated group variables.
The following topics will be covered:
- How to organize your Windows infrastructure with an Inventory and group_vars file dynamically
- Setup with On-Demand CSR Signing on the master
- Setup with PKI Tickets for the client (agent or satellite) generated on the master
- Coming soon
Prerequisites
This guide will not cover how to configure your Ansible host for WinRM connections. For that, there are already enough Blog Posts about that topic and the Ansible Documentation also covers it in detail (https://docs.ansible.com/ansible/latest/user_guide/windows.html).
What we will need:
- Icinga2 master instance
You will need an Icinga2 master instance. I will use Ubuntu 20.04 and the Icinga Installer (https://github.com/NETWAYS/icinga-installer) to deploy the instance. - Windows host
For that, I will use a Windows Server 2012. - Ansible host
Ansible host with remote access to the Windows hosts.
How to deploy your Icinga2 master instance
Configure the Netways extra repository:
echo “deb https://packages.netways.de/extras/ubuntu focal main” | sudo tee /etc/apt/sources.list.d/netways-extras-release.list
Icinga Installer requires the Puppet repository. So we will also need to configure the repository with the following commands:
echo “deb http://apt.puppetlabs.com focal puppet7” | sudo tee /etc/apt/sources.list.d/puppet7.list
Install Icinga2 master instance (including IcingaWeb2 and Director):
sudo apt install icinga-installer
sudo icinga-installer -S server-ido-mysql
Do not forget to write down your Password and Username.
How to organize the Windows hosts of your infrastructure with an Inventory and group_vars file dynamically
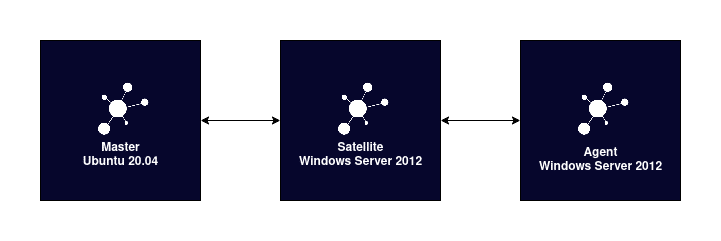
For the organization of your Windows hosts, you will need an Inventory file and a group_vars/<zone-name> file. In the group variables file, we will define the parent node name(s) as well as the parent address(es). In the Inventory it is possible to define a PKI ticket as a host variable.
So if we have a simple setup like this:
The Inventory file would look like this:
windows-2012 ansible_host=10.77.14.229
[satellite]
windows-2012-2 ansible_host=10.77.14.230
The group name will be used to define the zone name of the parent. The parent node name and address will be defined in group_vars/master and group_vars/satellite. Here is an example of the master file:
ifw_parent_nodes:
  - 'i2-master'
  #- 'i2-master-2'
ifw_parent_address:
  - '10.77.14.171'
  #- '10.77.14.172'
The variables always have to be a list, even if only one master needs to be specified.
Setup with On-Demand CSR Signing on the master
For simplification I will only use one host in my Inventory and the group_vars/masters file I already described:
windows-2012 ansible_host=10.77.14.229
The most simple way to connect agents is to sign the certificates on the master. To achieve this the agent has to be connected and after that, we can sign them. The role has already all variables required, so we just need to run the Playbook:
---
- hosts: all
  roles:
    - ansible-role-ifw
Run the playbook with the following command:
$ ansible-playbook playbook.yml -i hosts
PLAY [all] ****************************************************************************************************************************************************************************************************************************************************************

TASK [Gathering Facts] ****************************************************************************************************************************************************************************************************************************************************
ok: [windows-2012]

TASK [ansible-role-ifw : Create icinga-install.ps1 using Jinja2] **********************************************************************************************************************************************************************************************************
ok: [windows-2012]

TASK [ansible-role-ifw : Execute icinga-install.ps1] **********************************************************************************************************************************************************************************************************************
skipping: [windows-2012]

PLAY RECAP ****************************************************************************************************************************************************************************************************************************************************************
windows-2012 : ok=2 changed=0 unreachable=0 failed=0 skipped=1 rescued=0 ignored=0
After that, we can verify if a request has been made on the master with this command:
Fingerprint | Timestamp | Signed | Subject
—————————————————————–|————————–|——–|——–
*****************************************************************| Nov 2 04:57:32 2022 GMT | | CN = windows-2012
Setup with PKI Tickets for the client (agent or satellite) generated on the master
It’s also possible to define a PKI ticket as a hosts variable in the Inventory (replace <pki-ticket>):
windows-2012 ansible_host=10.77.14.229 pki_ticket=<pki-ticket>
After that we need to set the variable ‘ifw_certificate_creation’ to 1 in the Playbook:
---
- hosts: all
  vars:
    ifw_certificate_creation: 1
  roles:
    - ansible-role-ifw
Just run the Playbook and the agent should be connected to your master.
Coming soon
- Self-Service API for Director
- JEA Profile
- Local ca.crt
- Custom repository


0 Kommentare