Select Page

NETWAYS Blog

NWS – because web services don’t have to be complicated

Web services platforms are a common way nowadays, to run your services without the need of your own infrastructure. No matter if you need a safe place for your data, an app to communicate with people or just a place to run your own services. But what do you know about the platform of your choice?

  • Do you know how your data is stored?
  • Do you know where the servers are located in detail?
  • Do you know the people which are giving you support?
  • Do you know what happens in case of a critical issue?

Do you know how your #data is stored? Do you know where the #servers are located? And why should you join #NWS ? https://t.co/LnWt4HlZUD – because #webservices don't have to be complicated. #SaaS #IaaS pic.twitter.com/Xh5KB7RRy2

— NETWAYS Web Services (@NetwaysCloud) June 19, 2019

I bet, most of you, or at least some of you, don’t. But that’s the point where we start. We want to be different. We want to be transparent and uncomplicated.

Our servers are located in Nuremberg – Germany. We are running them in two different datacenters to ensure high security.

Working with our apps is pretty simple. Just start them! There is no complicated registration process, just fill in the form and you are good to go. The best thing is: you don’t even need a domain or some know how of SSL. It’s already configured for you! Of course you can use your own domain and certificates if you want, but you don’t have to.
If you are curious about how our apps are working in detail or what features are available in our apps, just have a look at our FAQs
Still can’t find what you are looking for? Contact us via live chat! If there is no live chat agent available, an automated ticket will be created, so we can get in touch with you.

But whats so special about our support? Well, it’s quick, it’s professional, it’s individual and most important of all: Our developers and administrators are your support team.

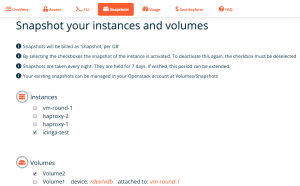
We also want to create our bills as transparent as possible. In case of our OpenStack cloud, you won’t just get a bill with an amount. You will get a detailed report of all resources you used in the past month. Which IP was used how long? How many CPUs were used how long and which VM did use them? But thats still not all. We want to give you the possibility to check at a various day of the month, how much money you spent on our cloud so far and how much you will spent till the end of the month.

Our „Cost Explorer“ tells you the amount of your current usage and the expected amount at the end of month. Full cost control! ? #CloudComputing #SaaS #IaaS #OpenSource
> https://t.co/iDInYc1pxj < pic.twitter.com/GAEkP4nCxY

— NETWAYS Web Services (@NetwaysCloud) October 18, 2018

Keep track of whats going on! And even if you have your applications running on a different platform – we will help you migrating your data with almost no downtime. Because we take care.

Most features we released for our apps and the platform itself, were not features “we wanted” to release. Don’t get me wrong here, we also wanted to release them, but most of them were features our customers requested and needed.

And we got one more thing. If you don’t know if you can trust us, you can just give it a try. Ask us anything or just try our services – 30 days for free (OpenStack is excluded here – but just get in touch with us. We will find a solution that fit your needs.).

NWS Cloud and Terraform – does this work?

A few months ago we launched our OpenStack project within our NWS platform. The NWS Cloud was born.
Since then we are trying to increase the performance and the possibilities of the cloud. And nowadays there is no way around Terraform.

So i had a look at the possibilities and had to try them out. One of my first runs should create a virtual machine, create some security rules, attach a public IP to the virtual machine and install a webserver with a customized index.html

And how this works, i want to show now.


But first of all, i have to save my credentials in my config file

variables.tf

variable "openstack_user_name" { description = "The username for the Tenant." default = "my-nws-user" } variable "openstack_tenant_name" { description = "The name of the Tenant." default = "my-nws-project" } variable "openstack_password" { description = "The password for the Tenant." default = "my-password" } variable "openstack_auth_url" { description = "The endpoint url to connect to OpenStack." default = "nws-cloud" } variable "openstack_keypair" { description = "The keypair to be used." default = "mgebert" } variable "tenant_network" { description = "The network to be used." default = "my-nws-project" }

With this variables i can now start writing the rest of my files. I had to configure the provider

provider.tf

provider "openstack" { user_name = "${var.openstack_user_name}" tenant_name = "${var.openstack_tenant_name}" password = "${var.openstack_password}" auth_url = "${var.openstack_auth_url}" }

And the “script” which should run on the new virtual machine

bootstrapweb.sh

#!/bin/bash apt update apt install -y apache2 cat <<EOF > /var/www/html/index.html <html> <body> <p>hostname is: $(hostname)</p> </body> </html> EOF chown -R www-data:www-data /var/www/html systemctl apache2 start

But there is still no server right? So i have to write my deploy file.

deploy.tf

resource "openstack_networking_secgroup_v2" "secgroup1" { name = "ALLOW SSH AND HTTP" } resource "openstack_networking_secgroup_rule_v2" "secgroup_rule_1" { direction = "ingress" ethertype = "IPv4" protocol = "tcp" port_range_min = 22 port_range_max = 22 remote_ip_prefix = "0.0.0.0/0" security_group_id = "${openstack_networking_secgroup_v2.secgroup1.id}" } resource "openstack_networking_secgroup_rule_v2" "secgroup_rule_2" { direction = "ingress" ethertype = "IPv4" protocol = "tcp" port_range_min = 80 port_range_max = 80 remote_ip_prefix = "0.0.0.0/0" security_group_id = "${openstack_networking_secgroup_v2.secgroup1.id}" } resource "openstack_networking_secgroup_rule_v2" "secgroup_rule_3" { direction = "ingress" ethertype = "IPv4" protocol = "icmp" remote_ip_prefix = "0.0.0.0/0" security_group_id = "${openstack_networking_secgroup_v2.secgroup1.id}" } resource "openstack_compute_instance_v2" "web" { name = "web01" image_name = "Ubuntu Xenial" availability_zone = "HetznerNBG4" flavor_name = "s2.small" key_pair = "${var.openstack_keypair}" security_groups = ["default","ALLOW SSH AND HTTP"] network { name = "${var.tenant_network}" } user_data = "${file("bootstrapweb.sh")}" } resource "openstack_networking_floatingip_v2" "floating" { pool = "public-network" } resource "openstack_compute_floatingip_associate_v2" "floating" { floating_ip = "${openstack_networking_floatingip_v2.floating.address}" instance_id = "${openstack_compute_instance_v2.web.id}" }


In this file i configure first of all the new security group and afterwards 3 rules to allow ICMP, HTTP and SSH. Then we can start the virtual machine with a name, image_name, a flavor_name, security_groups and so on. I could configure more, like a loop which creates me 10 web-servers with the name web-01 to web-10 . But for now, thats fine. When the server is up and running, the deploy will attach a floating IP to it, so i can access it without a VPN.

And thats it, basically. When it is installed, the bootstrapweb.sh will install the apache2 webserver and replace the default index.html with my custom one.

There is almost no setup which can’t be build up with terraform in combination with the NWS Cloud – so just try it yourself

If you want to see the code above in action, have a look at this video!

NETWAYS Web Services Raffle

We wanted to do a big raffle. A very special one. You can win 3 amazing prices and how this works will be described below. But first of all, what are the prices?

  • First place: Our incredible @gethash for one day at your office*
  • Second place: One NWS app for free. A whole year! **
  • Third place: One big box of Dragee Keksi

The requirements will be explained in detail in the tweet of the NWS Twitter Account. Basically you have to follow the NWS Twitter account and retweet the tweet, where this blogpost is published. It will be pinned to the account till the end of May. We will draw 3 winners from all participants.

The great colleagues of Netways are excluded from this raffle cause Bernd is afraid of their crazy ideas.

The winners will be announced on May 31st 2019 and will be published on the NWS Twitter account.

We wish good luck to all of you!

*Restriction: it has to be within Germany!
**You decide which app. OpenStack is excluded here


FM Empfänger mit dem Raspberry Pi 3

Es gibt viele Projekte für Einsteiger, um mit einem Raspberry Pi kleineres zu realisieren. Unter anderem ein FM Empfänger, wofür die folgende Anleitung genutzt werden kann.

Materialien: 

  1. Raspberry Pi 3
  2. Female Female Jumper
  3. Tea5767 Modul
  4. Lautsprecher (Beispiel)
  5. AUX Kabel

Vorgehen: 

1) Die mitgelieferte SD Karte enthält bereits ein Noob OS, womit Raspian installiert werden kann. Sollte ein anderes Kit ohne Karte bestellt werden, braucht man natürlich auch eine SD Karte. Noob OS dann einfach herunterladen, entpacken und auf die Karte kopieren

2) I2C aktivieren via: sudo raspi-config
-> Interfacing Options
-> I2C
-> YES

3) Der Raspberry Pi muss natürlich auch mit dem Modul verbunden werden. Hierzu werden die Female-Female Jumper benutzt.
Raspberry Pi    Tea5767
5V              5V
SDA.1           SDA
SCL.1           SCL
GND             GND

Auf welche Pins nun genau gesteckt werden muss, kann mittels gpio readall herausgefunden werden. Falls SDA.1 und SCL.1 bereits in Verwendung sind, kann auch auf 0 oder 2 ausgewichen werden.

4) Ob das Modul auch erkannt wurde, wird folgendermaßen überprüft:
i2cdetect -y 1
0 1 2 3 4 5 6 7 8 9 a b c d e f
00: -- -- -- -- -- -- -- -- -- -- -- -- --
10: -- -- -- -- -- -- -- -- -- -- -- -- -- -- -- --
20: -- -- -- -- -- -- -- -- -- -- -- -- -- -- -- --
30: -- -- -- -- -- -- -- -- -- -- -- -- -- -- -- --
40: -- -- -- -- -- -- -- -- -- -- -- -- -- -- -- --
50: -- -- -- -- -- -- -- -- -- -- -- -- -- -- -- --
60: 60 -- -- -- -- -- -- -- -- -- -- -- -- -- -- --
70: -- -- -- -- -- -- -- --

Die “1” steht hier für SCl.1 und SDA.1 – sollte SDA.0 und SCL.0 verwendet worden sein, muss der Command entsprechend angepasst werden.  Wenn in der angezeigten Tabelle keine Zahl erscheint, wird das Modul nicht erkannt. Dies liegt meist an einer falschen Verkabelung oder einem defekten Modul.

5) Aus einer anderen Anleitung haben wir uns eines Links zum Code bedient, das den Tea5767 steuert. Es kann hier natürlich selbst auch ein Skript geschrieben werden, wenn tiefere Einblicke gewünscht sind. Hierfür wird python3 benötigt sowie verschiedene Module. Beim ersten Aufruf des Skriptes wird aber mitgeteilt, ob etwas nachinstalliert werden muss, oder nicht. Falls das der Fall ist, kann mit pip3 install $modul entsprechend nachjustiert werden.
Unter /home/pi ein neues Verzeichnis (z.B.: PiFM) erstellen und das Skript dort ablegen.

6) Mit python3 radio.py kann nun der eigentliche Radio gestartet werden. Es empfiehlt sich, das Skript kurz durchzulesen, da der Radio über Tasten gesteuert wird. So wird mit “W” die Frequenz um +1 verändert, mit “E” um +0.1

Alles in allem ist das ein schönes Projekt um erste Eindrücke in die Funktionsweise eines Raspberry Pis zu bekommen und wie bestimmte Module funktionieren, verbunden und genutzt werden. Interessant wird das auch, wenn man parallel dazu mit einem 2. Pi einen FM Transmitter aufbaut. Hierzu gibt es in einem späteren Blogpost aber mehr.

NWS OpenStack – automatisierte Snapshots

Unser Ziel war und ist es, eine Plattform zu schaffen, die sehr hohe Flexibilität, Sicherheit und Komfort bietet. Unsere Kunden sollen in eigenen, isolierten Projekten ihrer Kreativität freien Lauf lassen und nahezu uneingeschränkt sein, ohne sich um essenzielle Dinge Gedanken machen zu müssen.

In genau diesem Zuge, haben wir diese Woche ein neues Feature für unsere OpenStack Cloud veröffentlicht – automatisierte Snapshots für virtuelle Maschinen und Volumes! Mit diesem neuen Feature können sich unsere “IaaS” (Infrastructure as a Service) Kunden zurücklehnen, entspannen und die Verantwortung der zuverlässigen Sicherung an uns abgeben. Wir stellen sicher, dass ausgewählte Instanzen ordnungsgemäß gesichert werden und dieser Prozess überwacht wird.

Doch wie genau funktioniert das nun? Wir haben in unserer Plattform einen Menüpunkt eingebaut, der als Schaltzentrale fungiert. Eingesehen werden kann dieser von jedem Nutzer in der Übersicht seiner OpenStack Instanz. Es werden hier alle VMs sowie Volumes aufgelistet und gegebenenfalls mit Notizen versehen. Beispielsweise in welcher VM ein Volume unter welchem Pfad eingehängt ist.

In dieser Liste kann nach belieben, durch setzen eines Hakens, der Sicherungsprozess aktiviert oder deaktiviert werden.
Neben dem Erstellen von Backups werden nach einer gewissen Retention, Snapshots natürlich auch vollkommen automatisch wieder gelöscht. Per Default alle Sicherungen, welche älter als 7 Tage sind.

Eine Übersicht über die aktuellen Sicherungen gibt es im OpenStack selbst:
Compute -> Images / Volumes -> Snapshots 

Erweiterungen zu dieser Sicht sind geplant. Ebenso weitere neue spannende Features, welche aktuell noch in der Entwicklung sind.
Wir haben zum Snapshot/Backup Release auf unserem Twitter Account ein kurzes Video mit einer Live Demo dazu für euch vorbereitet. Lasst uns auf Twitter gerne wissen, was ihr davon haltet!

Noch kein NWS IaaS Kunde? – Hier geht’s zu unserer Platform

New feature for our @OpenStack NWS released today! You can now configure your backups for volumes and instances – just by checking them in your NWS interface! Check this out! For more informations stay tuned #IaaS #SaaS #devops #backup

>> https://t.co/iDInYc1pxj << pic.twitter.com/nZrg8B5x55

— NETWAYS Web Services (@NetwaysCloud) January 28, 2019