Select Page

NETWAYS Blog

NWS at OpenInfra Summit

About the OpenInfra Summit 2022

This year’s OpenInfra Summit takes place in Berlin. After two long years it is now possible again to take part in person and meet other developers, users and many people involved in the community.
The summit features talks about a wide variety of topics related to open source infrastructure technologies, ranging from OpenStack and container orchestration like Kubernetes to many other interesting topics like Machine Learning, CI/CD, Hardware Enablement, Edge Computing and NFV.


Who is going?

Since OpenStack and Kubernetes are already part of the NWS product portfolio, our Web Services team members are always interested in news around those topics!
Therefore some of our team members will be present at the summit. This year will also be the first time that NETWAYS Web Services joins the OpenInfra Summit as a Supporting Sponsor!

Will you be at #OpenInfra Summit Berlin next week, too?
NWS is attending as a sponsor and excited to meet lots of #infrastructure enthusiasts interested in #OpenStack, #Kubernetes and other #OpenSource #technologies.
Hope to see you around at @openinfradev! pic.twitter.com/IroBxTLdjh

— NETWAYS Web Services (@NetwaysCloud) June 2, 2022

As members of the NETWAYS Web Services team, Sebastian Saemann, Achim Ledermüller and me, Gabriel Hartmann will be on site. On top of that also Bernd Erk, the CEO of NETWAYS will partake.


What to expect?

There will be people from all over the world joining the summit. It will be an opportunity to meet like-minded, interesting people and to exchange opinions, discuss experiences or just to enjoy a chat with them.
The schedule already reveals that there will be many top engineers, CTOs and developers from all sorts of companies giving insights into their experiences, some best practices and also showing off the latest improvements and advancements that have been recently made on the projects. A lot of interesting topics will be covered – there is surely something for everyone!

I’m already excited to go there and can’t wait to learn many new things regarding OpenStack, Kubernetes, CI/CD and much more.
Me and my colleagues are also thrilled that we can join the summit in person! Having the chance to meet other people face to face is just something different and also watching keynotes and demos live on site is always exciting. Will you be there, too?
Follow us on twitter to get some first hand impressions of our experience at the OpenInfra Summit 2022!
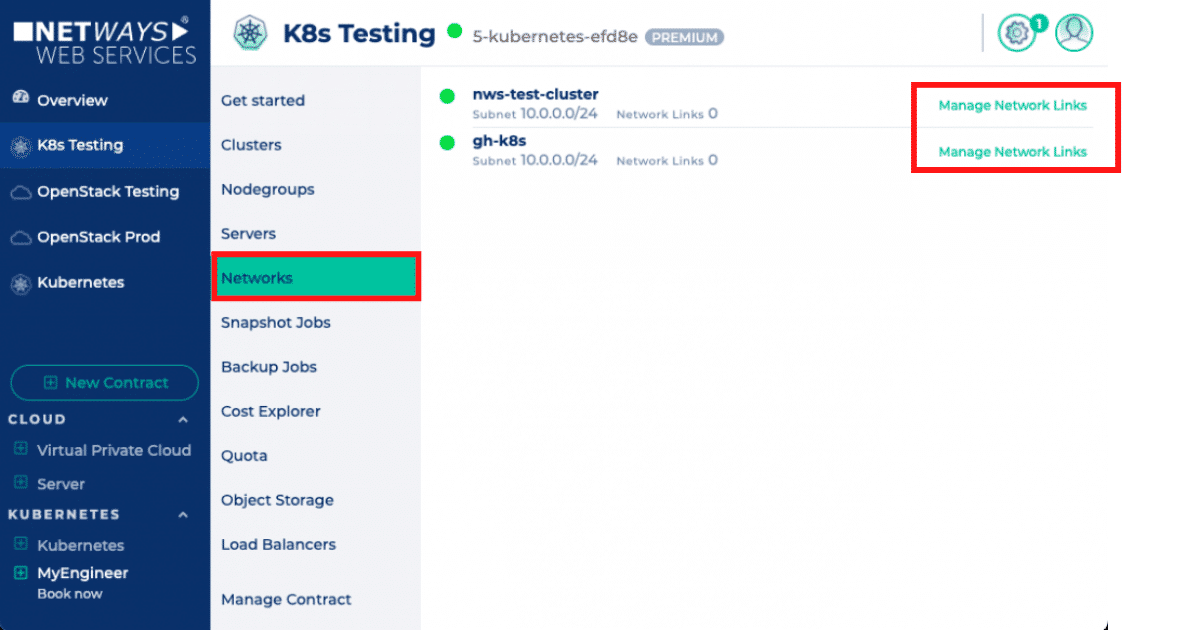
Gabriel Hartmann
Gabriel Hartmann
Senior Systems Engineer

Gabriel hat 2016 als Auszubildender Fachinformatiker für Systemintegrator bei NETWAYS angefangen und 2019 die Ausbildung abgeschlossen. Als Mitglied des Web Services Teams kümmert er sich seither um viele technische Themen, die mit den NETWAYS Web Services und der Weiterentwicklung der Plattform zu tun haben. Aber auch im Support engagiert er sich, um den Kunden von NWS bei Fragen und Problemen zur Seite zu stehen.

Network Links between OpenStack and Kubernetes Projects

We are happy to introduce cross-project network links between OpenStack and Kubernetes!
This feature provides an easy and free solution for our customers to share one or multiple networks between their OpenStack and Kubernetes projects.
We employ the native OpenStack RBAC feature to make this possible.
As a result, our customers can now establish local connections between their OpenStack servers and Kubernetes clusters.


How you can use it

You will need to have at least one OpenStack project and one Kubernetes project with at least one cluster. Alternatively, two OpenStack projects or two Kubernetes projects with different subnets will also work.

Once you are logged in to your NWS account, just navigate to either one of your OpenStack projects or one of your Kubernetes projects.
Next, click on “Networks” – this is a new section we added to the menu of the projects.
A list with all of the networks of the project will show up. Next to each of the networks you will find an action called “Manage network links“.
If you click on “Manage network links”, a popup window will show up containing a list of all the other networks that you have in your other Kubernetes and OpenStack projects.


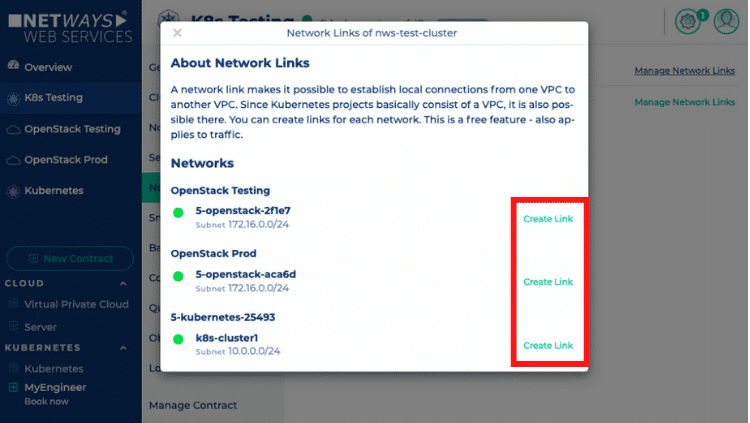
The networks are grouped by the projects they belong to. For each network you now have an option to create a link, as seen in the screenshot. If you have chosen a network, which you would like to link to the current network, you just have to click on the “Create Link” button next to it.


Doing so will trigger a job which will be processed in the background. As one of the first steps, the job will check, if the selected networks are compatible with each other. Two networks are compatible, if they contain subnets with different subnet addresses. Furthermore, there must be a router in each of the projects, which has an interface on each of the networks.


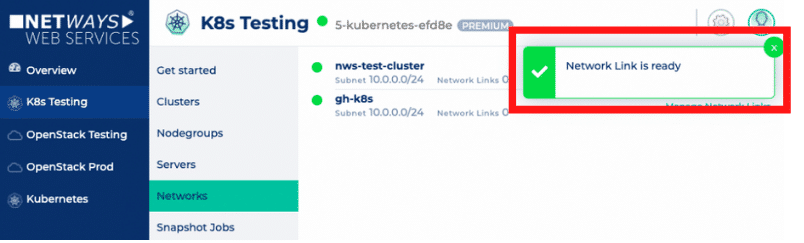
Only, if both of those requirements are met, it will be possible to route between the networks and the job will start. Once it’s finished, you’ll get notified.


In case the requirements are not met you will get a notification telling you that the subnets are incompatible.


By default, our OpenStack and Kubernetes networks are compatible with each other. If you want to link Kubernetes with Kubernetes, then the only way to ensure compatibility is to supply a custom subnet address on creation to one of the clusters. For OpenStack to OpenStack you do not have the option (yet) to supply a custom subnet address to your default network on creation of the project. However, you can create your own custom networks with any subnet addresses and ensure compatibility that way.


Why should you use it?

Some might ask, why should one want to use this feature? Here is an example:
Let’s say, you have your application running on your Kubernetes cluster and you need to connect it to a database, which is running on a server in your OpenStack project. In that case you want to have a secure connection – a VPN comes to mind. Another approach would be a Database with a floating IP and security group rules.
But both of those options come with some tradeoffs: in case of the VPN, you have another point of failure and additional network overhead. And with a floating IP on your database you might not sleep so well, because of security concerns.
This new feature comes in handy, as the connections are not leaving our internal network infrastructure and traffic can flow locally between the projects and networks without additional overhead!

We already had some customers who were using this feature before the launch of the integration into NWS. In those cases one of our MyEngineers would configure the cross-connection manually for the customer.
But now it comes at no additional costs, because it does not require any action of one of our MyEngineers. Feel free to try it. Should you have any questions, don’t hesitate to send us a message or use our LiveChat on our website, which can be found in the bottom right corner.


Gabriel Hartmann
Gabriel Hartmann
Senior Systems Engineer

Gabriel hat 2016 als Auszubildender Fachinformatiker für Systemintegrator bei NETWAYS angefangen und 2019 die Ausbildung abgeschlossen. Als Mitglied des Web Services Teams kümmert er sich seither um viele technische Themen, die mit den NETWAYS Web Services und der Weiterentwicklung der Plattform zu tun haben. Aber auch im Support engagiert er sich, um den Kunden von NWS bei Fragen und Problemen zur Seite zu stehen.

Migration von GitLab mit Upgrade auf EE

Wer GitLab CE produktiv im Einsatz hat und mit den zusätzlichen Features der EE Version liebäugelt, der wird sich beim Umstieg zwangsläufig mit den Migrationsschritten auseinandersetzen, sofern der GitLab Server nicht von einem Hoster betreut wird. In diesem Post zeige ich, wie der Wechsel inklusive Migration auf einen anderen Server gelingen kann und beziehe mich dabei auf die Omnibus Version basierend auf Ubuntu 18.04. Der Ablauf ist gar nicht so kompliziert. Bügelt man die EE-Version einfach über die aktuelle CE Version, dann hat man nur zwei Schritte zu beachten. 
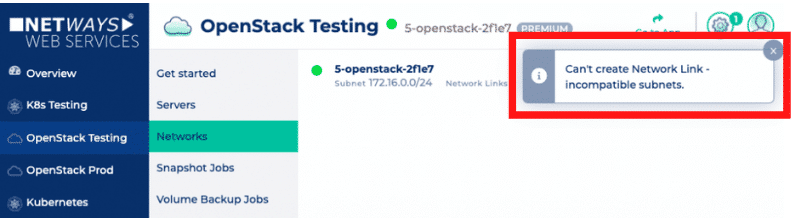
Wenn man allerdings einen EE Server parallel hochzieht, um dann auf diesen zu migrieren, so kommen ein paar mehr Schritte hinzu.
Deshalb zeige ich im Folgenden wie man per Backup und Restore auch zum Ziel kommt. Die ersten Schritte sind ziemlich identisch mit dem, was GitLab vorgibt.

  1. Zuerst erstellt man sich ein Backup:
    gitlab-rake gitlab:backup:create STRATEGY=copy

    Einfach um sich den aktuellen Stand vor der Migration zu sichern.
    Hier kann nicht viel schief gehen. Man sollte aber darauf achten, dass genügend Speicherplatz unter /var/opt/gitlab/backups zur Verfügung steht. Es sollten mindestens noch zwei Drittel des Speicherplatzes frei sein. Das resultierende Tar-Archiv sollte man sich anschließend weg kopieren, da im weiteren Verlauf ein weitere Backup erstellt wird.

  2.  Nun führt man das Script von GitLab aus, das die apt-Sourcen hinzufügt und ein paar benötigte Pakete vorinstalliert:
    curl https://packages.gitlab.com/install/repositories/gitlab/gitlab-ee/script.deb.sh | sudo bash
  3. Jetzt checkt man noch kurz welche Versionsnummer von GitLab CE momentan installiert ist:
    dpkg -l |grep gitlab-ce
  4. Danach installiert man die GitLab EE Version. Dabei wird die CE Version gelöscht und eine Migration durchgeführt. Um den Versionsstand kompatibel zu halten, verwendet man die gleiche Versionsnummer wie aus dem vorherigen Schritt. Lediglich der teil ‘ce’ wird zu ‘ee’ abgeändert:
    apt-get update && sudo apt-get install gitlab-ee=12.1.6-ee.0
  5. Nun erstellt man erneut ein Backup:
    gitlab-rake gitlab:backup:create STRATEGY=copy
  6. Das neu erstellte Backup transferiert man einschließlich der Dateien /etc/gitlab/gitlab-secrets.json und /etc/gitlab/gitlab.rb auf den EE Server. Das lässt sich z.B. per scp bewerkstelligen:
    scp /var/opt/gitlab/backups/*ee_gitlab_backup.tar ziel-server:./
    scp /etc/gitlab/gitlab-secrets.json ziel-server:./
    scp /etc/gitlab/gitlab.rb ziel-server:./
  7. Auf dem Zielserver sollte man natürlich GitLab EE in der entsprechenden Version installieren. Hier hält man sich am besten an die offizielle Anleitung. Nicht vergessen bei der Installation die Versionsnummer anzugeben.
  8. Jetzt verschiebt man die Dateien die man per scp transferiert hat und setzt die Dateiberechtigungen:
    mv ~/*ee_gitlab_backup.tar /var/opt/gitlab/backups
    mv ~/gitlab-secrets.json ~/gitlab.rb /etc/gitlab/
    chown root:root /etc/gitlab/gitlab-secrets.json /etc/gitlab/gitlab.rb
    chown git:git /var/opt/gitlab/backups/*ee_gitlab_backup.tar
  9. Dann startet man den Restore:
    gitlab-rake gitlab:backup:restore

    Man quittiert die einzelnen Abfragen mit ‘yes’. Hat sich die URL für den neuen EE Server geändert, dann sollte man das in der /etc/gitlab.rb anpassen. In diesem Fall sind auch Änderungen an den GitLab Runnern vorzunehmen. Es reicht dann allerdings wenn man auf dem jeweiligen Runner in der Datei config.toml die URL in der [[runners]] Sektion anpasst, da der Token gleich bleibt.

Troubleshooting:

Es ist allerdings auch möglich, dass es zu Problemen mit den Runnern kommt. Dies zeigt sich z.B. dadurch, dass der Runner in seinen Logs 500er-Fehler beim Verbindungsversuch zum GitLab meldet. In diesem Fall sollte man zuerst versuchen den Runner neu zu registrieren. Falls die Fehler bestehen bleiben, ist es möglich, dass diese durch einen CI-Job verursacht werden, der während der Migration noch lief. So war es zumindest bei mir der Fall. Mit Hilfe der Anleitung zum Troubleshooting und den Infos aus diesem Issue kam ich dann zum Ziel:

gitlab-rails dbconsole
UPDATE ci_builds SET token_encrypted = NULL WHERE status in ('created', 'pending');

Wenn man sich das alles sparen möchte, dann lohnt es sich einen Blick auf unsere GitLab EE Angebote der NETWAYS Web Services zu werfen.

Gabriel Hartmann
Gabriel Hartmann
Senior Systems Engineer

Gabriel hat 2016 als Auszubildender Fachinformatiker für Systemintegrator bei NETWAYS angefangen und 2019 die Ausbildung abgeschlossen. Als Mitglied des Web Services Teams kümmert er sich seither um viele technische Themen, die mit den NETWAYS Web Services und der Weiterentwicklung der Plattform zu tun haben. Aber auch im Support engagiert er sich, um den Kunden von NWS bei Fragen und Problemen zur Seite zu stehen.

Quick and Dirty: OpenStack + CoreOS + GitLab Runner

Wer in GitLab die CI/CD-Features nutzen möchte und nicht zufällig einen ungenutzten Kubernetes-Cluster übrig hat, mit dem man GitLab’s Auto DevOps Funktion einrichten kann, der benötigt zumindest einen GitLab Runner, um Build-Jobs und Tests zum Laufen zu bekommen.
Der GitLab Runner ist eine zusätzliche Anwendung, welche sich ausschließlich darum kümmert, bei einer GitLab-CE/-EE Instanz die CI/CD-Aufträge abzuholen und diese abzuarbeiten. Der Runner muss dabei nicht zwingend auf dem selben System wie das GitLab installiert sein und kann somit auch extern auf einem anderen Host laufen. Der Hintergrund, weshalb man das auch so umsetzen sollte, ist eigentlich recht klar: ein GitLab Runner steht bei einer aktiven CI/CD-Pipeline oftmals unter hoher Last und würde er auf dem gleichen Host wie das GitLab selbst laufen, so könnte er dessen Performance stark beeinträchtigen. Deshalb macht es Sinn, den GitLab Runner z.B. auf eine VM in OpenStack auszulagern.
In diesem Blogpost werde ich kurz darauf eingehen, wie man schnell und einfach eine GitLab Runner VM per CLI in OpenStack aufsetzen kann. Da ich den Runner als Docker-Container starten möchte, bietet sich CoreOS an. CoreOS kommt mit Docker vorinstalliert und es bietet die Möglichkeit per Ignition Config nach dem Start des Betriebssystems Container, oder auch andere Prozesse, automatisch starten zu lassen.

Sobald man sich bei seinem OpenStack-Anbieter in sein Projekt eingeloggt hat, kann man sich dort unter “API Zugriff” die OpenStack-RC-Datei herunterladen. Damit kann man sich dann recht einfach per CLI bei OpenStack authentifizieren. Voraussetzung für die Nutzung der CLI ist, dass man bei sich den OpenStack Command-Line Client installiert hat.
Sobald man beides hat, kann es auch schon losgehen:

    1. Runner Registration Token abholen
      Dazu loggt man sich als Admin in sein GitLab-CE/-EE ein und navigiert zu “Admin Area” -> “Overview” -> “Runners”. Hier findet man den aktuellen Registration Token.
    2. CoreOS Ignition Config
      Die Konfigurationsdatei für CoreOS nennt man z.B. config.ign. Diese legt man sich ebenfalls auf dem Rechner ab.
      Der Inhalt muss im nächsten Schritt geringfügig angepasst werden.

      config.ign

      { "ignition": { "version": "2.2.0", "config": {} }, "storage": { "filesystems": [{ "mount": { "device": "/dev/disk/by-label/ROOT", "format": "btrfs", "wipeFilesystem": true, "label": "ROOT" } }] }, "storage": { "files": [{ "filesystem": "root", "path": "/etc/hostname", "mode": 420, "contents": { "source": "data:,core1" } }, { "filesystem": "root", "path": "/home/core/config.toml", "mode": 644, "contents": { "source": "data:,concurrent=4" } } ] }, "systemd": { "units": [ { "name": "gitlab-runner.service", "enable": true, "contents": "[Service]\nType=simple\nRestart=always\nRestartSec=10\nExecStartPre=/sbin/rngd -r /dev/urandom\nExecStart=/usr/bin/docker run --rm --name gitlab-runner -e 'GIT_SSL_NO_VERIFY=true' -v /home/core:/etc/gitlab-runner -v /var/run/docker.sock:/var/run/docker.sock gitlab/gitlab-runner:v11.8.0 \n\n[Install]\nWantedBy=multi-user.target" }, { "name": "gitlab-runner-register.service", "enable": true, "contents": "[Unit]\nRequires=gitlab-runner.service\n[Service]\nType=simple\nRestart=on-failure\nRestartSec=20\nExecStart=/usr/bin/docker exec gitlab-runner gitlab-runner register -n --env 'GIT_SSL_NO_VERIFY=true' --url https://$URL -r $TOKEN --description myOpenStackRunner--locked=false --executor docker --docker-volumes /var/run/docker.sock:/var/run/docker.sock --docker-image ruby:2.5 \n\n[Install]\nWantedBy=multi-user.target" } ] }, "networkd": {}, "passwd": { "users": [ { "name": "core", "sshAuthorizedKeys": [ "$your-ssh-pub-key" ] } ] } }
    3. Ignition Config anpassen
      Beim Systemd-Unit “gitlab-runner-register.service” setzt man im Content bei den Variablen “$URL” den FQDN der eigenen GitLab-Instanz und bei “$TOKEN” den in Schritt 1 kopierten Registration Token ein.
      Außerdem kann man gleich noch seinen SSH-Key mitgeben, damit man später auch per SSH auf die VM zugreifen kann. Diesen hinterlegt man unter dem Abschnitt “passwd” im Platzhalter “$your-ssh-pub-key”.
    4. CLI Commands
      Nun kann man sich auch schon das Kommando zum anlegen der VM zusammenbauen.
      Als erstes muss man sich bei OpenStack authentifizieren, indem man die Datei sourced, die man sich eingangs aus seinem OpenStack Projekt geladen hat und dabei sein OpenStack Passwort angibt:

      source projectname-openrc.sh

      Man sollte außerdem sicherstellen, dass in dem Projekt ein CoreOS Image zur Verfügung steht.
      Anschließend kann man nach folgendem Schema die Runner-VM anlegen:

      openstack server create --network 1826-openstack-7f8d2 --user-data config.ign --flavor s1.medium --image CoreOS_Live "GitLab Runner"

      Network, Flavor und Image sollten aber individuell noch angepasst werden.

    Nach ca. zwei Minuten sollte dann der Runner auch schon zur Verfügung stehen. Überprüfen lässt sich das, indem man sich als Admin in seine GitLab-Instanz einloggt und im Bereich unter “Admin Area” -> “Overview” -> “Runners” nach einem Runner mit dem Namen “myOpenStackRunner” nachsieht.

    Wer noch auf der Suche nach einem OpenStack-Provider ist, der wird bei den NETWAYS Web Services fündig. Mit nur wenigen Clicks hat man sein eigenes OpenStack-Projekt und kann sofort loslegen.

Gabriel Hartmann
Gabriel Hartmann
Senior Systems Engineer

Gabriel hat 2016 als Auszubildender Fachinformatiker für Systemintegrator bei NETWAYS angefangen und 2019 die Ausbildung abgeschlossen. Als Mitglied des Web Services Teams kümmert er sich seither um viele technische Themen, die mit den NETWAYS Web Services und der Weiterentwicklung der Plattform zu tun haben. Aber auch im Support engagiert er sich, um den Kunden von NWS bei Fragen und Problemen zur Seite zu stehen.

Rocket.Chat vs Slack

Team oriented Instant-Messaging has become quite popular in recent years with Slack. Its success is undeniable: more than 6 million people use Slack every day.
The name Slack is an acronym for “Searchable Log of All Conversation and Knowledge” and might be an understatement to its todays capabilities.
But nevertheless searching through all conversations, files, and users is where it still shines.
Next to that, the main functionality is the team/group orientated messaging and the ability to integrate it with variety of other online services like Dropbox, Google Drive, GitHub etc. Some other cool features are (group) video calls and screen-sharing.
But Slack also comes with some limitations. You can use it for free, but you will be limited to access only the last 10000 messages.
Also the number of apps and integrations is limited and you can video chat only with one other user at a time.
To unlock those limitations you will have to choose one of the payment plans. And that’s where it can get expensive if you want to provide your growing company or a team with full featured accounts. For a team of 50 users you’ll have to spend at least 312 Euro per month.
One competitor of Slack is Rocket.Chat which is a open-source project that has been in very active development over the past years.
In this post I will briefly highlight the differences and the benefits of this chat solution in comparison to Slack.
Open Source
The first difference that I already mentioned is that Rocket.Chat is open source while Slack is not. Therefore you can access all its features for free and everyone can contribute to the development and implement new features. I have been watching the project on GitHub over the past year and there have been some great UI changes in the last couple of releases that gave it a more modern look and feel than before.
Self-Hosted
The fact that it is open-source makes it possible that you can download the software for free and install and run it on your own server. You are completely in control of where your chat data is stored. This can be an advantage if you know how to properly secure your server but it also can be of danger if you don’t. When it comes to security even Slack had some issues in the past with their service. In 2015 Slack was hacked – the hackers were able to access the main database for four days, giving them the chance to steal all user-profiles.
Customization
In Rocket.Chat you can personalize the whole design. You can even replace the Rocket.Chat icons with your own logos or add your own CSS styles, fonts and scripts.
Slack also provides some options to customize the look but not in the extend of what is possible with Rocket.Chat.
Roles and Permissions
With Slack you can specify which user-role a user should have in the Slack-Workspaces. Those are predefinded role-sets from Slack with different permissions.
Rocket.Chat takes it a step further. You have more presets and you even have the option to create you own role-presets.
Workspaces, Channels and OTR
In comparison to Slack, Rocket.Chat does not have anything similar like the Workspaces in Slack. But it has channels, private channels, direct messaging and even OTR (Off-the-Record) chats.
The last one is something that is currently not available in Slack. If you start a Off-the-Record session in Rocket.Chat with another user, all messages will be end-to-end encrypted and will be deleted after the session. This is perfect if you want to exchange some sensitive information with someone else.
Integrations, Bots and Apps
Slack features hundreds of apps that you can simply add with a few clicks. Some of them act as bots for other external services like for example Jira and Bitbucket.
This is something that Rocket.chat currently has not built in. But the Roadmap concerning Rocket.Chat bots looks very promising.
What you can do is install a Hubot on your server, hook it up to your Rocket.Chat and feed it with some scripts to achieve similar functionality.
There are already many hubot scripts on GitHub but it is just not as convenient to set up as installing an app in Slack.
Something else that both Slack and Rocket.Chat can do is Zapier integrations with other web services.
Rocket.Chat still has to catch up when it comes to the number of available Zapier integrations (10 for Rocket.Chat vs 100 for Slack) but there are already some useful integrations like Twitter, Github and Gmail. Another feature that Rocket.Chat has built in is a helpdesk chat called Livechat. This is a great feature if you have a WebShop or something similar where you would like to provide some additional support for your customers. You just have to enable it in Rocket.Chat and copy the Livechat script to your website. To learn more about it you should read Georgs blog post about that.
Summary
The benefits of Rocket.Chat are:
– the fact that it is open source and therefore free
– you can host it on your own server or on a server of the hosting provider you trust
– you have some additional freedom and control when it comes to visual customization and configuring user-roles
The downsides are:
– you will have to set it up on your own and manage stuff like backups, security and getting it fixed in case of a failure
– you don’t get the variety of apps and integration services as with Slack
If you are looking for a great managed Rocket.Chat solution you should have a look at our Netways Web Services and try Rocket.Chat 30 days for free.
And in case you didn’t know:
If you start both Rocket.chat and Icinga 2 Master a NWS integration job will kick in and configure both your apps so that your Icinga 2 Master will send monitoring alerts to a channel of your Rocket.Chat.
We also support Slack-Notifications in our Icinga 2 Master apps to send monitoring alerts directly to a provided Slack channel.

Gabriel Hartmann
Gabriel Hartmann
Senior Systems Engineer

Gabriel hat 2016 als Auszubildender Fachinformatiker für Systemintegrator bei NETWAYS angefangen und 2019 die Ausbildung abgeschlossen. Als Mitglied des Web Services Teams kümmert er sich seither um viele technische Themen, die mit den NETWAYS Web Services und der Weiterentwicklung der Plattform zu tun haben. Aber auch im Support engagiert er sich, um den Kunden von NWS bei Fragen und Problemen zur Seite zu stehen.