Select Page

NETWAYS Blog

Setting up a TURN Server for Nextcloud Video Calls

We recently had an support inquiry from one of our Nextcloud customers at Netways Web Services. He told us that he had installed the Nextcloud Video Calls app from the Nextcloud Appstore but was not able to make any video calls. He and the person on the other end always got a black video screen when attempting to call each other.
After some research I identified the potential cause of the problem. It turned out that a TURN server was required (pardon the pun).

TURN – what is that?

The Nextcloud Video Calls app contains a WebRTC-based server called spreed. WebRTC uses the ICE (Interactive Connectivity Establishment) framework to overcome networking complexities (like NATs) where connecting the participating clients directly isn’t possible. But it will need at least a STUN server to accomplish that. STUN standing for “Session Traversal Utilities for NAT” will enable the clients to discover their public IP addresses and the NAT where they are behind. Note that this server is only used to initially establish the connection. Once the connection is set up the media will stream directly between the clients. The Nextcloud Video Calls app is preconfigured with “stun.nextcloud.com:443” as STUN server. But this doesn’t always work – just like our customer experienced it, for some clients a STUN server won’t be enough to establish the connection. That might be the case if one or multiple participants are behind a symmetric NAT where UDP hole punching does not work. And that’s where the TURN server comes in. “Traversal Using Relay NAT” (TURN) extends STUN capabilities to make media traversal possible even if the clients are behind symmetric NATs. But that means that the whole traffic will flow through the TURN server since it is acting as a relay. Therefore most TURN servers use credential or shared secret mechanisms to authenticate the clients. So after all you end up having two options: either you find a TURN server provider that you can trust and who is willing to grant you access to his service or you set up your own TURN server.

How to set up a TURN Server

We decided to set up our own TURN. Like most of the tutorials recommend we installed Coturn. Our “TURN-VM” is running Ubuntu 16.04 and has a public IP address – this is actually quite important since the TURN server needs at least one dedicated public IP address to work properly. In order to have full STUN/TURN server functionality it’s even required to have two public IP addresses.
Now let’s start – first install coturn:

apt-get install coturn

Next enable coturn as service (use the editor of your choice):

vim /etc/default/coturn

Now uncomment the last line, save and close the file:

#
# Uncomment it if you want to have the turnserver running as
# an automatic system service daemon
#
TURNSERVER_ENABLED=1

We will have a look at the config file of Coturn. It has a lot of lines so I will only go over settings that are relevant in conjunction with Nextcloud’s spreed video calls. Open the turnserver.conf with an editor

vim /etc/turnserver.conf

and have a look at the following lines

#listening-port=3478
#tls-listening-port=5349

Those are the default listening ports coturn will use. In my case I changed them to

listening-port=80
tls-listening-port=443

because I don’t have a webserver running on the VM and I already had the ports open in the firewall. This is important – make sure that the server is reachable on these ports and no firewall is blocking them.
Note that the tls-listening-port is only relevant if you plan on using TLS-encrypted connections.
You’ll find the following line a couple of lines below the tls-listening-port:

#listening-ip=172.17.19.101

If you leave it as a comment then Coturn will listen on all the IP addresses available for this host. I uncommented it and changed it to the actual public IP address of this server

listening-ip=185.XX.XXX.XXX

Further down I did the same for the relay-ip:

relay-ip=185.XX.XXX.XXX

Now look for “fingerprint” and “lt-cred-mech” and uncomment:

fingerprint
lt-cred-mech

A couple of lines below you’ll find

#use-auth-secret

and

#static-auth-secret=north

uncomment both, then open up another shell window and generate a secret for example with

openssl rand -hex 32
751c45cae60a2839711a94c8d6bf0089e78b2149ca602fdXXXXXXXXXXXXXXXXX

copy the generated secret string and paste it into the turnserver.conf

use-auth-secret
static-auth-secret=751c45cae60a2839711a94c8d6bf0089e78b2149ca602fdXXXXXXXXXXXXXXXXX

Enabling “use-auth-secret” and setting a “static-auth-secret” will prevent unauthorized usage of your TURN server and is highly recommended!
Head further down and look for

#realm=mycompany.org

then uncomment and change it to the FQDN of the TURN server

realm=xxxxx.netways.de

The next line to uncomment and change is

total-quota=100

then uncomment

stale-nonce

If you want to use TLS then you should get a SSL certificate and key for example via Letsencrypt and then set the following lines of the turnserver.conf to the path where those files are located, in my case:

cert=/ssl/nws.crt
pkey=/ssl/nws.pem

also set cipher-list to

cipher-list="ECDH+AESGCM:DH+AESGCM:ECDH+AES256:DH+AES256:ECDH+AES128:DH+AES:ECDH+3DES:DH+3DES:RSA+AES:RSA+3DES:!ADH:!AECDH:!MD5"

If you don’t plan on using this TURN server as STUN then you can uncomment

no-stun

Now some last uncommenting

no-loopback-peers
no-multicast-peers

and you should be ready to start your coturn server. Save the file and close the editor.
Start/restart coturn for example with

service coturn restart

or

/etc/init.d/coturn restart

You may want to watch the logfile to see if everthing is fine

tail -f /var/log/turn_YYYY-MM-DD.log
0: log file opened: /var/log/turn_2017-08-15.log
0: pid file created: /var/run/turnserver.pid
0: IO method (main listener thread): epoll (with changelist)
0: WARNING: I cannot support STUN CHANGE_REQUEST functionality because only one IP address is provided
0: Wait for relay ports initialization...
0:   relay 185.XX.XXX.XXX initialization...
0:   relay 185.XX.XXX.XXX initialization done
0: Relay ports initialization done
0: IO method (general relay thread): epoll (with changelist)
0: turn server id=0 created
0: turn server id=2 created
0: IPv4. TLS/SCTP listener opened on : 185.XX.XXX.XXX:80
0: IPv4. TLS/TCP listener opened on : 185.XX.XXX.XXX:80
0: IO method (general relay thread): epoll (with changelist)
0: IPv4. TLS/SCTP listener opened on : 185.XX.XXX.XXX:443
0: IPv4. TLS/TCP listener opened on : 185.XX.XXX.XXX:443
..
.

So now we are ready to test if it is working.

How to test my TURN Server

Visit this page and see if you can get a proper response from your Coturn server.
The field for “STUN or TURN URI” should look something like this:

turn:xxxxx.netways.de:443?transport=tcp

but you can also use the IP:

turn:185.XX.XXX.XXX:443?transport=tcp

adding the part “?transport=tcp” is important as I was not able to get my TURN server to respond without TCP only.
Next click on “Gather candidates”.
What you would want as a result should look similar to this:

Time Component  Type Foundation Protocol    Address	 Port	         Priority
0.006	1	host	0	 UDP	10.0.10.144	60925	126 | 32512 | 255
0.009	1	host	1	 TCP	10.0.10.144	63376	125 | 32640 | 255
0.010	1	host	1	 TCP	10.0.10.144	9	125 | 32704 | 255
0.015	2	host	0	 UDP	10.0.10.144	47302	126 | 32512 | 254
0.016	2	host	1	 TCP	10.0.10.144	64892	125 | 32640 | 254
0.016	2	host	1	 TCP	10.0.10.144	9	125 | 32704 | 254
0.031	1	srflx	2	 TCP	XXX.XX.XX.XX	3362	 99 | 32607 | 255
0.051	2	srflx	2	 TCP	XXX.XX.XX.XX	3364	 99 | 32607 | 254
0.069	                                                                     Done

If you get a timeout with “Not reachable?” then probably a firewall is blocking the connection. Check again if the ports for the TURN server are open and if you can reach it externally via Telnet or something similar.

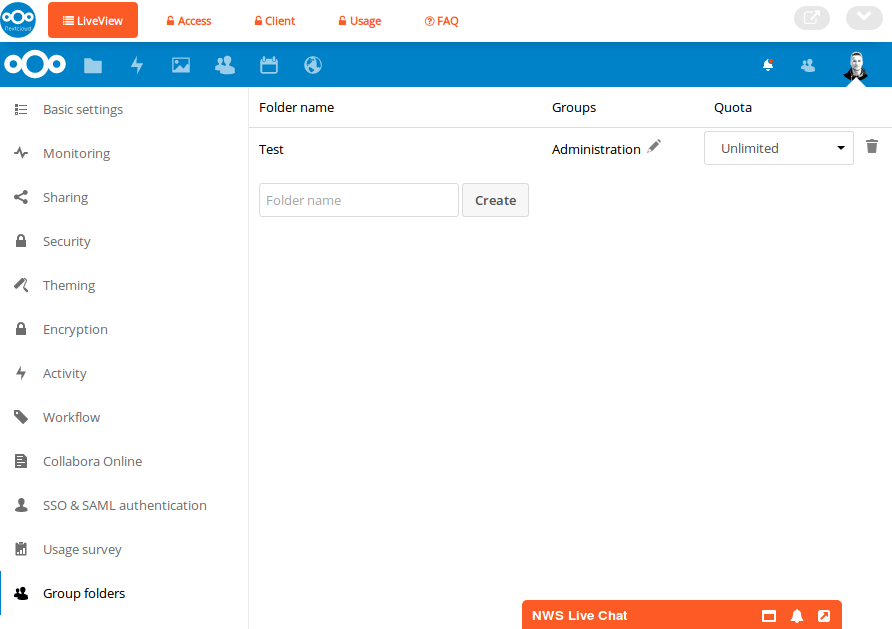
If everything works as expected you can continue and enter FQDN, port and shared secret in the video calls settings of your Nextcloud:

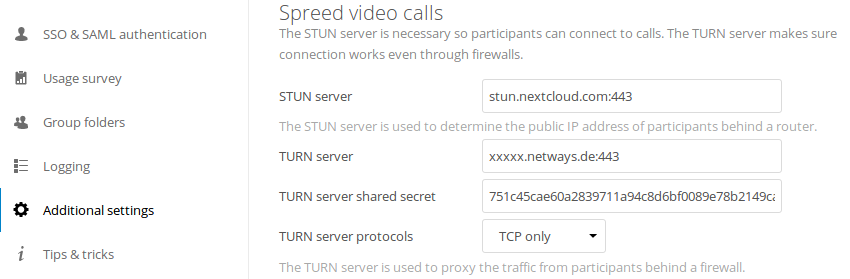
Also make sure that “TURN server protocols” is set to “TCP only”.
Finally test if video calls work with participants from different networks, through NAT’s and firewalls.

Well, that’s at least how I got it working and our NWS Nextcloud customer confirmed that he was able to make video calls without black screens as soon as he added in the TURN server details that I sent him.
Feel free to check out our Software as a Service platform NWS where you can test Nextcloud 30 days for free.

Gabriel Hartmann
Gabriel Hartmann
Senior Systems Engineer

Gabriel hat 2016 als Auszubildender Fachinformatiker für Systemintegrator bei NETWAYS angefangen und 2019 die Ausbildung abgeschlossen. Als Mitglied des Web Services Teams kümmert er sich seither um viele technische Themen, die mit den NETWAYS Web Services und der Weiterentwicklung der Plattform zu tun haben. Aber auch im Support engagiert er sich, um den Kunden von NWS bei Fragen und Problemen zur Seite zu stehen.

Nextcloud with Collabora Online

Nextcloud offers plenty of different useful apps. Many of them work straight away with no further configuration, but some of them require you to complete additional setup steps or even to have extra services running. One of them is Collabora Online. In this post I won’t go into detail about the setup steps and the problems you might experience. Instead I’ll show how well Collabora Online integrates into Nextcloud.


How to Collaborate

So how do you get started if you have Nextcloud and Collabora up and running? First you need some additional users to share your files with. I would recommend to create some groups if you plan on sharing files with multiple users at once. Then add users to these groups. Create some folders for different purposes and share them with the groups. The folders will appear on the other users accounts as soon as they log in to Nextcloud or reload the page.
So now you’ll be able to collaborate on editing the files located inside the shared folders. You can create new spreadsheet (.ods), text document (.odt) and presentation files (.odp) right from your Nextcloud or you can also upload and edit existing files in all kinds of different office file formats. In the following short video I documented the steps of sharing and collaborative editing.

Another way of sharing files in groups is to enable the “Group folders” module in the Nextcloud Appstore and then create some folders from the Admin-Panel in the “Group folders” section. It simplifies the process of sharing folders in groups and you can even set quota limits for the shared folders.


Group folders

Something to note: if your Nextcloud is reachable from multiple domains and you want to use collaborative editing, then you and the person with whom you want to edit a document with should access Nextcloud from the same domain. If you try to use collaborative editing by accessing from different domains or sub-domains, it wont work, you won’t see the changes made by the other person inside the document in real-time.
What if you want to collaborate with a person who has no user account on your Nextcloud? You can share files via link, set optionally an expiration date and a password and then start collaborating with anyone. Just provide them with the shared link (and password if set) and they will be able to use Collabora aswell.

CODE and alternatives

Collabora itself is based on LibreOffice and has a lot of features built-in that you may know from other office applications. But there are some limitations in terms of concurrent open documents and simultaneous connections. In the free version CODE (Collabora Online Development Edition) it is limited to 10 documents and 20 connections at once. There is another online office suite that you can use with Nextcloud, it’s called Onlyoffice. For Nextcloud you would set up a Onlyoffice Document Server and then get the Onlyoffice App from the Nextcloud Appstore. In comparison to CODE it requires more hardware resources. At least 1 CPU core (with 2 GHz), 2 GB of RAM and 40 GB of disk space. Collabora on the other hand will be fine with 1 CPU Core, 512 MB of RAM and 1.5 GB disk space.

Try Nextcloud with CODE for free

If you want to try it yourself you can quickly spin up a Nextcloud app using our Netways Web Services and test Nextcloud with Collabora Online for 30 days for free. We now include Collabora preconfigured in all our Nextcloud plans.

Gabriel Hartmann
Gabriel Hartmann
Senior Systems Engineer

Gabriel hat 2016 als Auszubildender Fachinformatiker für Systemintegrator bei NETWAYS angefangen und 2019 die Ausbildung abgeschlossen. Als Mitglied des Web Services Teams kümmert er sich seither um viele technische Themen, die mit den NETWAYS Web Services und der Weiterentwicklung der Plattform zu tun haben. Aber auch im Support engagiert er sich, um den Kunden von NWS bei Fragen und Problemen zur Seite zu stehen.

How To Administrate Nextcloud Using CLI

With Nextcloud you can configure almost everything using the Webinterface.
But you may do updates and configuration also via CLI.
In this How To I’ll go over some common use-cases for the Nextcloud CLI.

Update / Upgrade

Let’s start with upgrading to the newest version. Go to the directory where your nextcloud is located – there should be a folder called ‘updater’.

[root@nc-vm ~]# cd /var/www/nextcloud/updater
[root@nc-vm ~]# ls
index.php  updater.phar

Inside the updater folder is a file called updater.phar.
Now execute the following command.

[root@nc-vm ~]# sudo -u www-data php updater.phar
Current version is 11.0.3.
Update to Nextcloud 12.0.0 available. (channel: "stable")
Following file will be downloaded automatically: https://download.nextcloud.com/server/releases/nextcloud-12.0.0.zip
Steps that will be executed:
[ ] Check for expected files
[ ] Check for write permissions
[ ] Enable maintenance mode
[ ] Create backup
[ ] Downloading
[ ] Extracting
[ ] Replace entry points
[ ] Delete old files
[ ] Move new files in place
[ ] Done
Start update? [y/N] y

Confirm with ‘y’ to start the update.

Info: Pressing Ctrl-C will finish the currently running step and then stops the updater.
[✔] Check for expected files
[✔] Check for write permissions
[✔] Enable maintenance mode
[✔] Create backup
[✔] Downloading
[✔] Extracting
[✔] Replace entry points
[✔] Delete old files
[✔] Move new files in place
[✔] Done
Update of code successful.
Should the "occ upgrade" command be executed? [Y/n] Y

After the new files have been moved in place you’ll have to confirm to execute the “occ upgrade” command.

Nextcloud or one of the apps require upgrade - only a limited number of commands are available
You may use your browser or the occ upgrade command to do the upgrade
Set log level to debug
Updating database schema
Updated database
Updating federatedfilesharing ...
Updated federatedfilesharing to 1.2.0
Updating files_pdfviewer ...
Updated files_pdfviewer to 1.1.1
Updating files_texteditor ...
..
..
Checking for update of app workflowengine in appstore
Checked for update of app "workflowengine" in appstore
Starting code integrity check...
Finished code integrity check
Update successful
Maintenance mode is kept active
Reset log level
Keep maintenance mode active? [y/N] N

And finally you enter ‘N’ to disable the maintenance mode

Maintenance mode is disabled

And that’s it. But note: even if it tells you that a lot of apps are be updated, you may find that not all of your apps have been updated.

OCC Command

Next we’ll explore the features of the occ command.

[root@nc-vm ~]# cd /var/www/nextcloud
[root@nc-vm ~]# sudo -u www-data php occ

You will get a long list of the available options and commands.

Nextcloud version 12.0.0
Usage:
  command [options] [arguments]
Options:
  -h, --help            Display this help message
  -q, --quiet           Do not output any message
  -V, --version         Display this application version
      --ansi            Force ANSI output
      --no-ansi         Disable ANSI output
  -n, --no-interaction  Do not ask any interactive question
      --no-warnings     Skip global warnings, show command output only
  -v|vv|vvv, --verbose  Increase the verbosity of messages: 1 for normal output, 2 for more verbose output and 3 for debug
Available commands:
  _completion                         BASH completion hook.
  check                               check dependencies of the server environment
  help                                Displays help for a command
  list                                Lists commands
  status                              show some status information
  ..
  ..
versions
  versions:cleanup                    Delete versions
  versions:expire                     Expires the users file versions

I won’t be able to cover all of them in this post. But I’ll go over a view of them in the following.

Reset Admin Password

This is pretty useful if you forgot your admin password and you find yourself locked out of your Nextcloud.

[root@nc-vm ~]# sudo -u www-data php /var/www/nextcloud/occ user:resetpassword admin
Enter a new password:
Confirm the new password:
Successfully reset password for admin


Change Log Level

Sometimes you to increase the log level to figure out what is wrong. By default the log level is set to ‘warning’ (level 2).
To get more information you’ll have to decrease the number. So 1 is level ‘info’ and 0 is for ‘debug’.
You may also set it to ‘error’ which is level 3 to get less information.

[root@nc-vm ~]# sudo -u www-data php occ log:manage --level 0
Enabled logging backend: file
Log level: Debug (0)
Log timezone: UTC


Encryption

For server side encryption it’s necessary to enable the encryption app first.
(In Nextcloud Version 12.0.0 and prior enryption does not work with S3 object store as primary storage.)

[root@nc-vm ~]# sudo -u www-data php occ app:enable encryption
encryption enabled

And then enable encryption

[root@nc-vm ~]# sudo -u www-data php occ encryption:enable
Encryption enabled
Default module: OC_DEFAULT_MODULE

Note that only new uploaded files will be encrypted and not the existing ones.
In order to encrypt all existing files of all users you will have to issue the following command:

[root@nc-vm ~]# sudo -u www-data php occ encryption:encrypt-all
You are about to encrypt all files stored in your Nextcloud installation.
Depending on the number of available files, and their size, this may take quite some time.
Please ensure that no user accesses their files during this time!
Note: The encryption module you use determines which files get encrypted.
Do you really want to continue? (y/n) y

Continue with ‘y’. You may notify the users by mail about their private key passwords.
But this only works if the users have provided their email-addresses.

Encrypt all files with the Default encryption module
====================================================
Create key-pair for every user
------------------------------
This module will encrypt all files in the users files folder initially.
Already existing versions and files in the trash bin will not be encrypted.
 Key-pair created for all users
 [============================]
Start to encrypt users files
----------------------------
 all files encrypted
 [>---------------------------]
Generated encryption key passwords
----------------------------------
+-----------+----------------------+
| Username  | Private key password |
+-----------+----------------------+
| admin     | BqaK1WtI             |
+-----------+----------------------+
A list of all newly created passwords was written to data/oneTimeEncryptionPasswords.csv
Each of these users need to login to the web interface, go to the
personal settings section "basic encryption module" and
update the private key password to match the login password again by
entering the one-time password into the "old log-in password" field
and their current login password
Do you want to send the passwords directly to the users by mail? (y/n) n


Configuration

Usually the config file for Nextcloud is located in /var/www/nextcloud/config.
So in order to change the configuration you may edit the file /var/www/nextcloud/config/config.php with a text editor.
But you can also import a custom config file in json format. In this example I imported a config to set Ceph S3 object store as primary storage for Nextcloud:

[root@nc-vm ~]# cat objectstore.json
{"system": {
        "objectstore": {
            "class": "OC\\\\Files\\\\ObjectStore\\\\S3",
            "arguments": {
                    "bucket": "$RGW_BUCKET",
                    "autocreate": true,
                    "key": "$RGW_KEY",
                    "secret": "$RGW_SECRET",
                    "hostname": "$RGW_HOSTNAME",
                    "use_ssl": true,
                    "use_path_style": true
            }
        }
}}
[root@nc-vm ~]# sudo -u www-data php occ config:import objectstore.json
Config successfully imported from: objectstore.json

It’s also possible to view only specific sections of the config:

[root@nc-vm ~]# sudo -u www-data php occ config:system:get objectstore
class: OC\\Files\\ObjectStore\\S3
arguments:
  bucket: $RGW_BUCKET
  autocreate: true
  key: $RGW_KEY
  secret: $RGW_SECRET
  hostname: $RGW_HOSTNAME
  use_ssl: true
  use_path_style: true


Apps

To get a list of all installed enabled and disabled apps:

[root@nc-vm ~]# sudo -u www-data php occ app:list
Enabled:
  - activity: 2.5.2
  - bruteforcesettings: 1.0.2
  - calendar: 1.5.3
  - comments: 1.2.0
  ..
  ..
  - workflowengine: 1.2.0
Disabled:
  - admin_audit
  - encryption
  - files_external
  - previewgenerator
  - user_external
  - user_ldap

To enable/disable apps:

[root@nc-vm ~]# sudo -u www-data php occ app:enable previewgenerator
previewgenerator enabled
[root@nc-vm ~]# sudo -u www-data php occ app:disable calendar
calendar disabled

Like I mentioned before, there are many more commands and the ones I picked are just a view of them.
But I hope they were useful at least for some of you.

Gabriel Hartmann
Gabriel Hartmann
Senior Systems Engineer

Gabriel hat 2016 als Auszubildender Fachinformatiker für Systemintegrator bei NETWAYS angefangen und 2019 die Ausbildung abgeschlossen. Als Mitglied des Web Services Teams kümmert er sich seither um viele technische Themen, die mit den NETWAYS Web Services und der Weiterentwicklung der Plattform zu tun haben. Aber auch im Support engagiert er sich, um den Kunden von NWS bei Fragen und Problemen zur Seite zu stehen.

Azubis erzählen: Mai 2017 Gabriel

This entry is part 6 of 17 in the series Azubis erzählen

Hallo zusammen,
um diese Blogserie “Azubis erzählen” mal wieder aufzufrischen, werde ich hier ein wenig über meine bisherigen Aufgaben erzählen.
Zu mir: mein Name ist Gabriel Hartmann, ich bin 28 Jahre alt und seit September 2016 als Azubi (Junior Systems Engineer) bei NETWAYS. Bevor ich bei NETWAYS als Azubi anfing, habe ich an der FAU Erlangen ein paar Semester Informatik studiert. Nur mit großer Mühe hangelte ich mich von Semester zu Semester durch die Klausuren. Letztendlich konnte ich das Studium nicht abschließen und entschied mich daraufhin für eine Ausbildung. Mit dem Vorwissen aus dem Studium konnte ich alledings durchaus was anfangen. Sebastian – mein Ausbilder – entschied, dass ich die ersten Monate im Architecture Team verbringen würde. Während dieser Zeit lernte ich sehr viel, vorallem über das Thema Docker Container.
Architecture Team
Die ersten Wochen beschäftigte ich mich damit, die Programmiersprache Ruby zu lernen und machte mich mit den Ruby-Frameworks Rails und Sinatra vertraut. Danach arbeitete ich dann an dem NWS SaaS (Software as a Service) Projekt mit. Dabei lernte ich nach und nach, was es mit Microservices und Docker Containern auf sich hat, wie man damit interagiert und wie man eigene Docker Images erstellt und deren Setup automatisert. Im Prinzip ist die Technologie dahinter ähnlich zu der von Virtuellen Maschinen. Kurz gesagt, bieten Container eine einfache Möglichkeit Prozesse oder Programme abgeschottet vom Betriebssystem des Rechners, resourceschonend und plattformunabhängig zu betreiben. Viele Softwareunternehmen verwenden Container um bei der Entwicklung ihrer Softwareprodukte diese mit verschiedenen Konfigurationen und Betriebssystemen automatisiert zu testen. Aber auch in Produktion werden Container oft betrieben.
Bei NWS laufen die Apps jeweils in einem eigenen Container. Um zu gewährleisten, dass die Apps auch dauerhaft laufen und online erreichbar sind, benötigt man eine Orchestrierungsumgebung für die Container, die sich darum kümmert, dass die Container automatisch neugestartet werden wenn sie ausfallen. Wenn das ganze noch hoch verfügbar in einem Rechenzentrum über mehrere Server verteilt laufen soll, dann benötigt man eine Art Kernel für Computer Cluster wie z.B. Mesos. Kurz gesagt kümmert sich Mesos darum, die Ressourcen (CPU, Arbeitsspeicher etc.) der zum Cluster gehörigen Server zu managen und an Frameworks anzubieten, damit diese ihre Tasks darauf laufen lassen können. Marathon ist ein Framework für Mesos, das dazu verwendet werden kann, um Docker Container dauerhaft aktiv zu halten. Wie das genau geht und welche Features Marathon bietet, darauf werde ich hier nicht weiter eingehen. Ich habe das alles auch erst nach ein paar Monaten im Detail kennen gelernt. Meine Aufgabe im Architecture war vorerst, neue Produkte wie z.B. Rocket.Chat und Nextcloud als vorkonfigurierte Apps mit in die NWS Platform aufzunehmen. Die Prozedur dafür sah folgendermaßen aus: man schreibt ein Dockerfile, aus dem dann ein Image gebaut werden kann. Dieses benötigt ein Setupskript, das beim Start des Containers ausgeführt wird und den Container dahingehend vorbereitet, dass der Kunde sich nicht selbst um die Konfiguration kümmern muss. Außerdem wird darin definiert, welche Schritte bei der Aktualisierung auf eine neue Version der App ausgeführt werden sollen. Wenn das dann (endlich) funktioniert, wird die NWS Webseite angepasst, damit das Produkt von dort aus gestartet und mit Kundenspezifischen Daten konfiguriert werden kann. Verschiedene Microservices der SaaS Plattform müssen ebenfalls angepasst werden. Außerdem überlegt man sich Texte, die das Produkt beschreiben, bewerben und häufig aufkommende Fragen von Kunden beantworten. Danach schreibt man Tests, beseitigt Bugs und optimiert. Wenn dann die Produktpläne festehen und alles funktioniert, kann die App als Produkt angeboten werden. Das alles hat mir ziemlich viel Spaß gemacht. Mit der Zeit wird man auch schneller, wenn man mit der Prozedur und der Umgebung vertraut ist.
Nach ca. 7 Monaten stellte ich mich dann einer neuen Herausforderung. Sebastian fragte mich, ob ich einen Workshop über das Thema “Docker Container Orchestration” anhand von Mesos Marathon halten möchte. Vermutlich etwas übereilt willigte ich ein. Als der Termin dann näher rückte, die Aufregung langsam stieg und ich mit der Ausarbeitung des Workshops beschäftigt war, wurde mir erst klar auf was ich mich da eingelassen hatte. Da es aber keinen Weg mehr zurück gab, hieß es Zähne zusammenbeissen und durch. Sebastian und meine Kollegen Achim und Tim unterstützten mich jedoch gut dabei und nachdem dann die Slides und die Handouts fertig waren hielt ich den Workshop auf der OSDC 2017 in Berlin. Auch wenn nicht alles komplett reibungslos ablief hoffe ich, dass die Teilnehmer doch das ein oder andere dabei gelernt haben. Damit endete dann meine Zeit im Architecture Team und ich wechselte in die Hosting Support Abteilung.
Hosting Support Team
Seit nicht ganz zwei Wochen bin ich nun im Hosting Support. Hier geht es hauptsächlich darum sich um Kundenanfragen bzw. Tickets zu kümmern. Da ich im Bereich Hosting bisher wenig Erfahrung habe, mache ich mich nach und nach mit den Tools und den Arbeitsabläufen vertraut. Das ein oder andere Ticket konnte ich jedoch schon bearbeiten. Vorallem Kundenanfragen zum Thema NWS fallen in meinen Aufgabenbereich, da ich mich hier bereits ganz gut auskenne. So bin ich auch im NWS Livechat als Ansprechpartner vertreten, das ist eine Art Helpdesk Chat auf der NWS Webseite der auf unserer NWS App Rocket.Chat basiert. Mit der wöchentlichen Serverwartung wurde ich auch schon vertraut gemacht. Dabei durchsucht man die Logs sämtlicher Kundenserver nach Fehlermeldungen und entscheidet ob für die jeweilig gefundenen Fehler Handlungsbedarf besteht oder nicht. Falls ja, eröffnet man Tickets und benachrichtigt gegebenefalls den Kunden darüber.
Berufsschule
Als Azubi besucht man bei NETWAYS natürlich auch die Berufsschule. Als Auszubildender Fachinformatiker für Systemintegration findet diese blockweise statt, was meiner Meinung nach auch Sinn macht, da man nicht täglich zwischen Schule und Betrieb wechseln muss. Nicole, die ebenfalls im September als Auszubildende Fachinformatikerin für Systemintegration bei NETWAYS angefangen hat, ist in der gleichen Klasse wie ich. Vom Studium ist mir einiges was an Stoff in der Berufsschule behandelt wird bereits bekannt und somit kam ich bisher ganz gut klar.
NETWAYS
Was mir hier besonders gut gefällt, ist das gute Arbeitsklima und dass man während der Arbeit stets nette und gutgelaunte Kollegen um sich hat. Getränke wie Kaffee, Säfte und Eistee sind kostenlos für alle verfügbar. Die Mitarbeiter organisieren untereinander LAN-Partys, die ab und an abends im Büro stattfinden. Außerdem finden jährlich Team Events der einzelnen Abteilungen und verschiedene Seminar-Wochenenden statt, bei denen der Spaß nicht zu kurz kommt und man die Möglichkeit hat, die anderen Kollegen besser kennenzulernen. Das Events Team von NETWAYS organisiert regelmäßig Konferenzen, wie z.B. die bereits erwähnte OSDC. Eine weitere Konferenz, an der ich letzten Jahr teilnehmen durfte, war die OSMC 2016 in Nürnberg, die sich mit dem Hauptgebiet von NETWAYS, dem Monitoring, beschäftigt. In den Talks der verschiedenen Konferenzen erfährt man viel über Open Source Themen und kann sich anschließend mit anderen Teilnehmern aus der ganzen Welt darüber austauschen.
Alles in Allem bin ich sehr happy bei NETWAYS zu sein und bin gespannt was mich künftig noch so erwartet. Ich hoffe ich konnte euch einen kleinen Einblick in meine Tätigkeiten als Azubi geben.

Gabriel Hartmann
Gabriel Hartmann
Senior Systems Engineer

Gabriel hat 2016 als Auszubildender Fachinformatiker für Systemintegrator bei NETWAYS angefangen und 2019 die Ausbildung abgeschlossen. Als Mitglied des Web Services Teams kümmert er sich seither um viele technische Themen, die mit den NETWAYS Web Services und der Weiterentwicklung der Plattform zu tun haben. Aber auch im Support engagiert er sich, um den Kunden von NWS bei Fragen und Problemen zur Seite zu stehen.

ownCloud oder Nextcloud: Wo liegen die Unterschiede?

Als wir vor Kurzem vor der Entscheidung standen, ob wir ownCloud oder doch lieber Nextcloud für unsere neue Software as a Service Platform NWS (Netways Web Services) als Produkt aufnehmen sollten, kamen wir recht schnell zu einem Ergebnis. Nachdem klar war, dass wir unseren Ceph S3 Object Store als Primary Storage für das Produkt nutzen möchten, stellten wir fest, dass dies aktuell nur in Nextcloud ab der Version 11 oder aber mit der Enterprise Edition von ownCloud möglich ist. Bei dieser Enterprise Edition handelt es sich um eine kostenpflichtige Version von ownCloud, die neben der Möglichkeit Support Subscription Modelle hinzu buchen zu können auch zusätzliche Features enthält.
Warum haben wir uns für Nextcloud entschieden?
Was die Installation und Einrichtung betrifft, so nehmen sich die beiden nicht viel, da Nextcloud als Fork von ownCloud auf diesem aufbaut. Dem entsprechend ähneln sich auch Design und Aufbau der Weboberfläche der beiden Cloud Versionen. Es ist allerdings so, dass viele der Features, die bei ownCloud nur in der Enterprise Edition verfügbar sind, bei Nextcloud bereits kostenlos dabei sind oder sich durch wenige Klicks über den Nextcloud App Store aktivieren lassen. Eine Gegenüberstellung der Features der Community Edition und der Enterprise Edition von ownCloud kann man übrigens hier finden. Ich habe ein paar der Features, die laut dieser Seite nur in der ownClouds Enterprise Version verfügbar sind herausgepickt und geprüft, ob diese in Nextcloud enthalten sind.

Nextcloud Webinterface

Nextcloud Webinterface


Das Feature “File Drop” ermöglicht es Gästen Dateien in einen Ordner der ownCloud hochzuladen, wobei der Gast aber nicht den Inhalt des Ordners angezeigt bekommt. In Nextcloud geht das auch – dazu müssen beim Teilen eines Links die Optionen “Hochladen und Bearbeiten erlauben” und “Dateien ablegen (nur Hochladen)” gesetzt sein. Die von ownCloud beschriebene “Datei-Firewall” lässt sich im Nextcloud App Store unter “File access control” aktivieren. Zusammen mit dem Workflow-Modul, das sich ebenfalls in den Nextcloud Administrator Einstellungen konfigurieren lässt, können bestimmte Regeln definiert und damit der Zugriff auf Dateien und Ordner eingeschränkt werden. Des Weiteren sind auch die bei ownCloud in der kostenpflichtigen Version erhältlichen Module für Auditing/Logging und SSO/SAML Authentifizierung bei Nextcloud über den App Store freischaltbar.
Und wie sieht es mit der Performance von Nextcloud aus?
Was die Performance angeht, so möchte ich hier auf andere Tests verweisen. Dort zeigt sich allerdings, dass Nextcloud minimal schneller ist. Dieser Vorsprung könnte sich in der aktuellen Nextcloud Version 11 durch eine geringere Anzahl an Datenbank-Abfragen noch etwas ausgebaut haben. Auch im Bezug auf Sicherheit hat sich bei Nextcloud vor Kurzem etwas getan. Und wer sich an der Integration der Online-Office Anwendung Collabroa-Online versucht, der dürfte mit Nextcloud durch umfangreichere Dokumentation zur Einrichtung und der im App Store verfügbaren Collabora Online App wohl schneller zum Ziel finden als mit ownCloud.
Alles in Allem sind die Unterschiede eher marginal. Eingesessene ownCloud Nutzer werden es sich wahrscheinlich zwei mal überlegen, ob sich der Umstieg auf Nextcloud für sie lohnt. Für diejenigen, die neu auf dem Gebiet sind und vor der Entscheidung zwischen ownCloud und Nextcloud stehen, könnte das ein oder andere Feature das bei ownCloud nur in der Enterprise Edition enthalten ist aber dennoch interessant sein.
Und wenn Sie Nextcloud testen und natürlich auch produktiv einsetzen wollen, empfehlen wir die Nutzung von Nextcloud von den NETWAYS Web Services.

Gabriel Hartmann
Gabriel Hartmann
Senior Systems Engineer

Gabriel hat 2016 als Auszubildender Fachinformatiker für Systemintegrator bei NETWAYS angefangen und 2019 die Ausbildung abgeschlossen. Als Mitglied des Web Services Teams kümmert er sich seither um viele technische Themen, die mit den NETWAYS Web Services und der Weiterentwicklung der Plattform zu tun haben. Aber auch im Support engagiert er sich, um den Kunden von NWS bei Fragen und Problemen zur Seite zu stehen.