Select Page

NETWAYS Blog

Wie Du Apps über Rocket.Chat Marketplace installierst

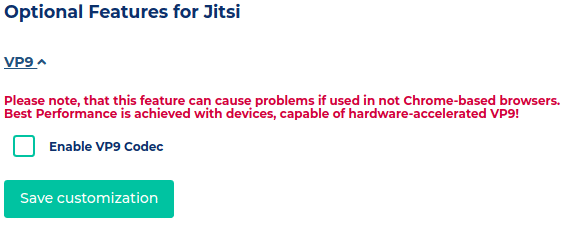
Nachdem Rocket.Chat von immer mehr Kunden möchte, ihren Cloud Service zu nutzen, ist es uns leider nicht mehr möglich, einige Features direkt beim Start Deiner App bereitzustellen. Nehmen wir als Beispiel mal die Jitsi App: um Jitsi nun nutzen zu können, musst Du die App über den Rocket.Chat Marketplace installieren. Da eventuell nicht alle darüber Bescheid wissen, habe ich nun eine kleine Anleitung für Dich vorbereitet, die Dir Schritt für Schritt zeigt, wie Du bei Deinem Rocket.Chat die Jitsi App installieren und aktivieren kannst! Los geht’s!


So gehst Du vor

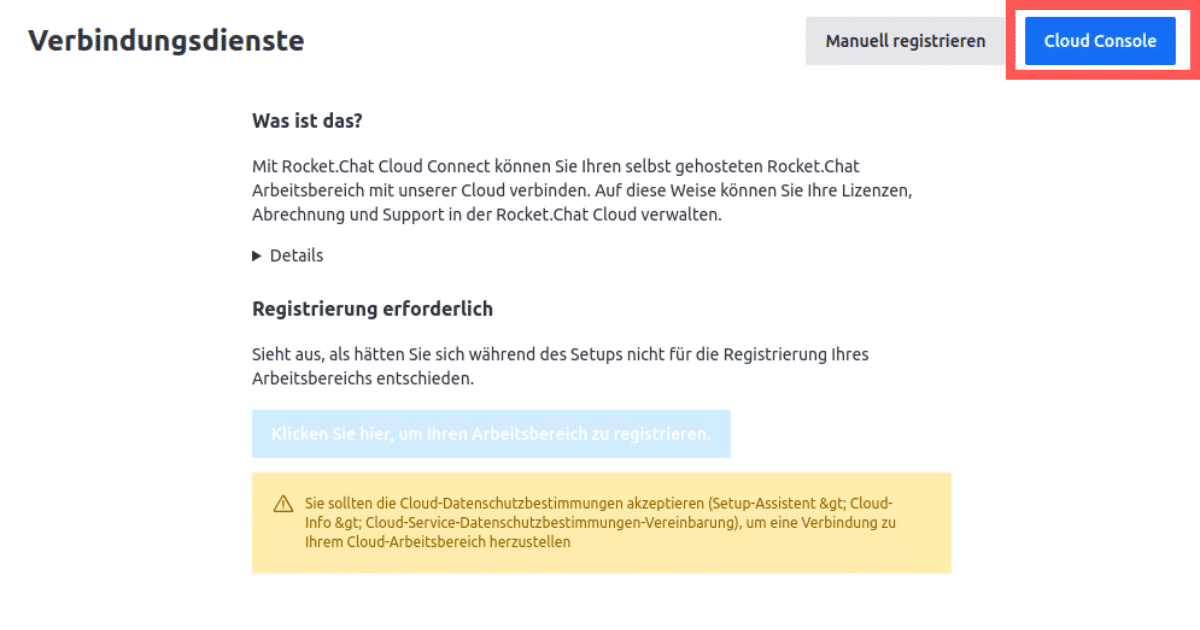
Dann fangen wir doch mal direkt an: zuerst navigierst Du zu Administration Connectivity Services und klickst auf “Cloud Console”. Das sollte dann so aussehen, wie auf dem Screenshot nebendran. Anschließend wirst Du zu cloud.rocketchat.chat weitergeleitet.


1. Erstelle ein Rocket.Chat Konto

Nun registrierst Du Dich bei Rocket.Chat.
Hierzu drückst Du einmal auf “Create account“: dann kannst Du Deinen Namen und Deine Email Adresse hinterlegen bzw. ein Passwort erstellen. Dann erhältst Du eine Bestätigungsmail – solltest Du keine in Deinem Postfach finden, prüfe bitte, ob diese eventuell im Spam-Ordner gelandet ist. Falls auch da nichts zu finden ist, probiere es bitte erneut oder kontaktiere ggf. unseren Support unter nws@netways.de – wir helfen gerne!

Nach Abschluss der Registrierung klickst Du unter Connectivity Services erneut auf “Cloud Console”. Nun kannst Du Dich mit dem gerade erstellten Konto bei Rocket.Chat anmelden!


2. Jetzt bist Du in der Rocket.Chat Cloud

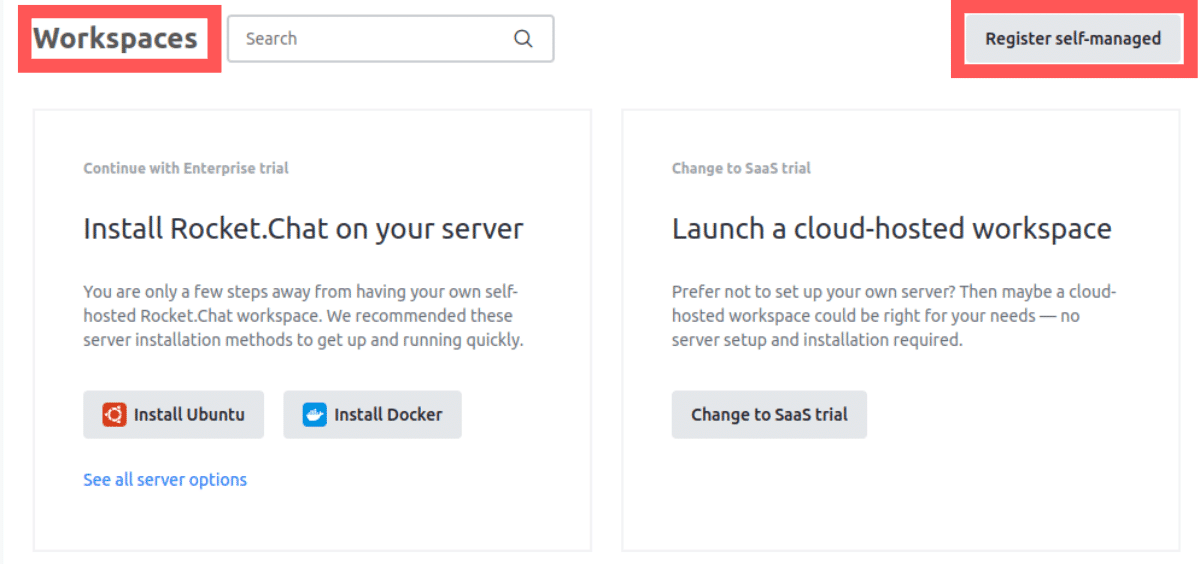
Nach der Anmeldung gelangst Du zur Rocket.Chat Cloud – navigiere dann zu Workspaces und drücke auf “Register self-managed”, so wie im Screenshot zu sehen. Danach wirst Du gefragt, wie Du Dein Rocket.Chat verbinden möchtest – hier wählst Du dann “Register Offline Workspace”.


3. Kopieren und einfügen

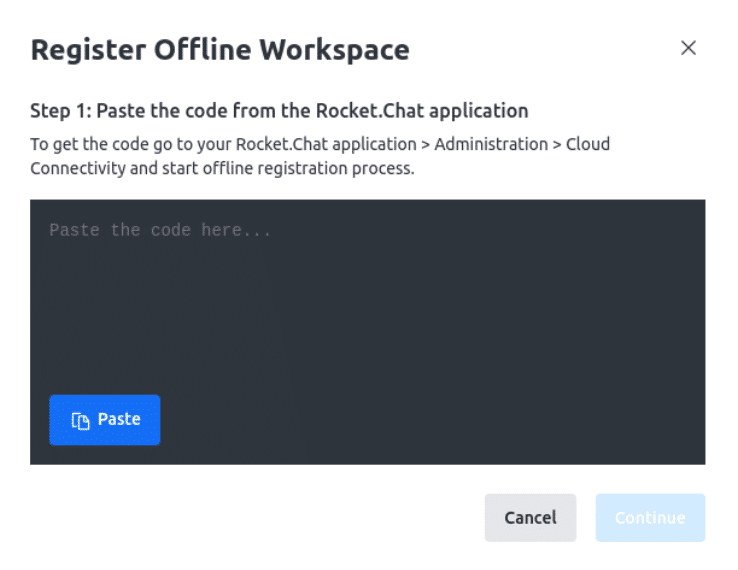
Es erscheint ein kleines Eingabefenster, welches wie hier nebendran aussieht. Hier kannst Du nun – unter Administration Connectivity Services → manual registration – den Token holen bzw. kopieren. Diesen fügst Du nun in das kleine Eingabefenster in der Rocket.Chat Cloud ein.


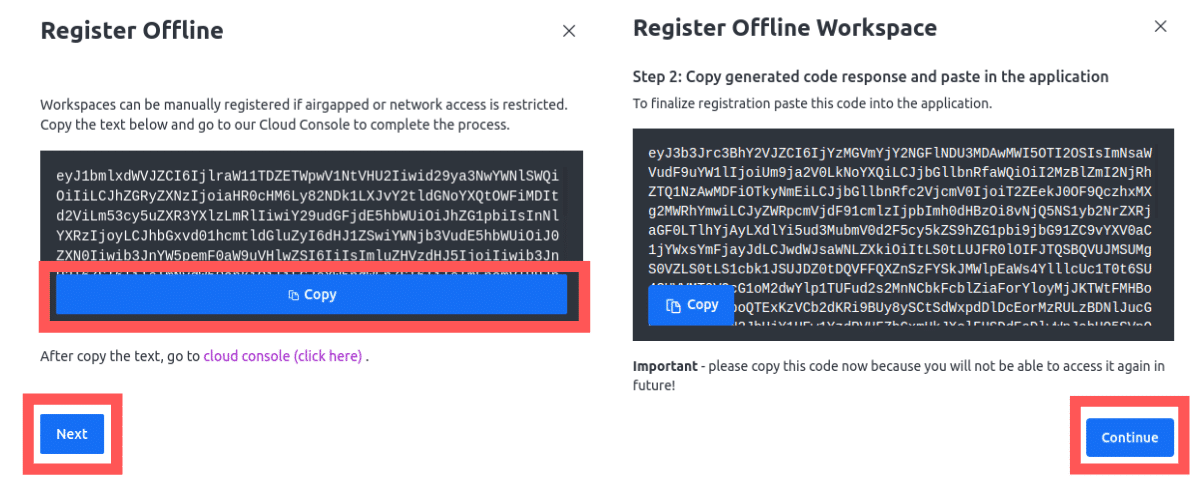
Anschließend drückst Du im Rocket.Chat auf “Next” und in der Rocket.Chat Cloud auf “Continue“. Nun kopierst Du den in der Rocket.Chat Cloud angezeigten Token in das Eingabefenster im Rocket.Chat.


4. Fast fertig!

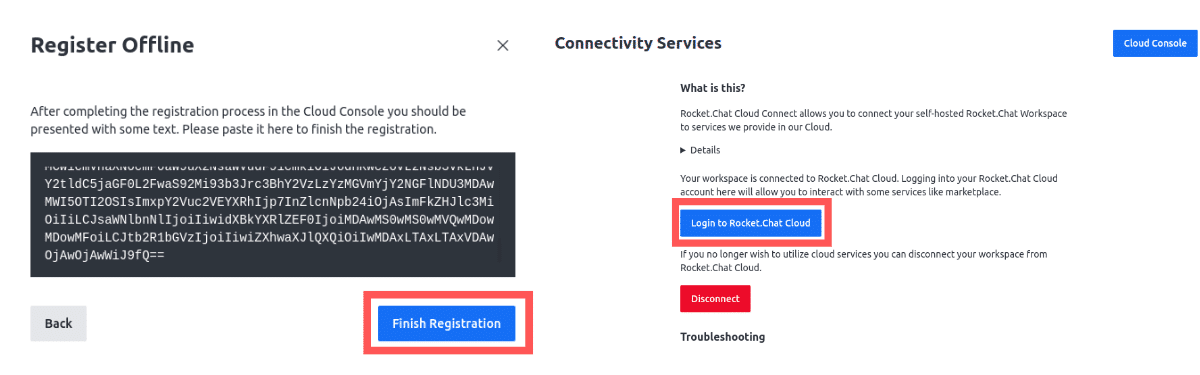
Nach dem Einfügen klickst Du auf “Finish Registration” und anschließend auf “Login to Rocket.Chat Cloud“.


Du hast es geschafft!

Wenn Du nun erfolgreich Dein Rocket.Chat mit der Cloud verbunden hast, kannst Du, wie gewohnt, die Jitsi App oder eine beliebig andere App aus dem Marketplace installieren! Ich hoffe, die Schritt-für-Schritt-Anleitung hat Dir geholfen.

Solltest Du dennoch weiterhin Fragen haben oder irgendwo nicht weiterkommen, dann schreibe uns gerne eine Nachricht – per Mail, über unseren Live Chat, den Du auf der NWS Website unten rechts in Form einer Sprechblase findest; oder rufe uns an unter +49 911 92885 0.

Joshua Hartmann
Joshua Hartmann
Systems Engineer

Joshua hat im Sommer 2023 seine Ausbildung zum Fachinformatiker für Systemintegration bei den NETWAYS Web Services erfolgreich abgeschlossen. Heute ist er ein wichtiger Teil des Teams, das sich mit großer Hingabe um die Kundenbetreuung und die kontinuierliche Weiterentwicklung der SaaS-Apps kümmert. Neben seinem musikalischen Talent am Klavier hat Joshua eine Leidenschaft für Wintersport und findet auch Freude im Gaming. Doch am allerliebsten verbringt er seine Zeit mit seiner besseren Hälfte, denn sie ist für ihn das größte Glück.

Jitsi Enable Breakout Rooms

New feature breakout rooms

Now that the new breakout rooms feature of Jitsi has finally been released, we can integrate it into our own Jitsi. If you would like to know more about the new breakout feature check out our new blogpost!
There are two ways to get the new feature. One way is to build a new Jitsi and use the latest version of Jitsi. However, not everyone wants to build a new Jitsi setup, they just want to enable the feature. The other option is you are already using a Jitsi and now you want to update and enable the new feature.
Today we will look at how to do the update and enable the new feature.

First check which Prosody version you have installed:

dpkg -l | grep prosody

It is important that you have a current Prosody version, preferably 0.11.10.
If your Prosody is still under version 11.7 you should update it.

Update Prosody

Add the repo to your sources.list:

echo deb http://packages.prosody.im/debian $(lsb_release -sc) main | sudo tee -a /etc/apt/sources.list

Get the packages key:

wget https://prosody.im/files/prosody-debian-packages.key -O- | sudo apt-key add -

Update repositories:

sudo apt update
sudo apt install prosody

If there was a conflict with your “cfg” while updating, you would have seen it during the install. You may have a backup file named prosody.cfg.lua.dpkg-old. If you had something special in there, you could move it back in place with:

sudo mv /etc/prosody/prosody.cfg.lua /etc/prosody/prosody.cfg.lua.new && sudo mv /etc/prosody/prosody.cfg.lua.dpkg-old /etc/prosody/prosody.cfg.lua

Make sure the last line in your prosody.cfg.lua is Include “conf.d/*.cfg.lua”

sudo vim /etc/prosody/prosody.cfg.lua
systemctl restart prosody.service jicofo.service

If you get Errors like this: OperationFailedException: Failed to join the room and Exception while trying to start the conference
You have to Edit your prosody config and change storage from “none” to “memory”:

vim /etc/prosody/conf.avail/meet.domain.com.cfg.lua

Replace: storage = “none” with storage = “memory”

Enable breakout rooms

If you now have a current version we can start with the update, if you have certain configs that are important, you should save them before the update.
When you are ready you can start:

Update repositories:

apt update

Install:

apt upgrade

After that you can check if the latest jicofo version is installed:

dpkg -l | grep jicofo

You should now get these versions displayed:

ii jicofo 1.0-830-1 all Jitsi Meet COnference FOcus

Same for the Jitsi Versions:

dpkg -l | grep jitsi
ii Jitsi-meet                 2.0.6689-1     all WebRTC JavaScript video conferences
ii Jitsi-meet-prosody         1.0.5638-1     all Prosody configuration for Jitsi Meet
ii Jitsi-meet-turnserver      1.0.5638-1     all Configures coturn to be used with Jitsi Meet
ii Jitsi-meet-web             1.0.5638-1     all WebRTC JavaScript video conferences
ii Jitsi-meet-web-config      1.0.5638-1     all Configuration for web serving of Jitsi Meet
ii Jitsi-videobridge2         2.1-592-g1e2879e0-1     all WebRTC compatible Selective Forwarding Unit (SFU)

If all versions match the versions shown above, you can proceed and activate the feature:

vim /etc/prosody/conf.avail/jitmeet.example.com.cfg.lua

Now add “muc_breakout_rooms”; to the modules_enabled section under your main virtual host:

VirtualHost "jitmeet.example.com"
    modules_enabled = {
        "muc_breakout_rooms";
    }

Below the modules_enabled block, insert these two lines:

breakout_rooms_muc = "breakout.jitmeet.example.com"
main_muc = "muc.jitmeet.example.com"

Next add another component block, this one should be after the first component block and should be located above —- internal muc component

Component "breakout.jitmeet.example.com" "muc"
    restrict_room_creation = true
    storage = "memory"
    admins = { "focusUser@auth.jitmeet.example.com" }
    muc_room_locking = false
    muc_room_default_public_jids = true

Example file:

Component "conference.jitmeet.example.com" "muc"
    restrict_room_creation = true
    storage = "memory"
    modules_enabled = {
        "muc_meeting_id";
        "muc_domain_mapper";
        "polls";
        --"token_verification";
}
admins = { "focus@auth.jitmeet.example.com" }
muc_room_locking = false
muc_room_default_public_jids = true

Component "breakout.jitmeet.example.com" "muc"
    restrict_room_creation = true
    storage = "memory"
    modules_enabled = {
        "muc_meeting_id";
        "muc_domain_mapper";
        --"token_verification";
        "muc_rate_limit";
}
admins = { "focus@auth.jitmeet.example.com" }
muc_room_locking = false
muc_room_default_public_jids = true

-- internal muc component

Restart the services once again and then you should be able to use the new feature directly

systemctl restart prosody.service jicofo.service

I hope this documentation helped you and you can now enjoy the new breakout room feature!

Joshua Hartmann
Joshua Hartmann
Systems Engineer

Joshua hat im Sommer 2023 seine Ausbildung zum Fachinformatiker für Systemintegration bei den NETWAYS Web Services erfolgreich abgeschlossen. Heute ist er ein wichtiger Teil des Teams, das sich mit großer Hingabe um die Kundenbetreuung und die kontinuierliche Weiterentwicklung der SaaS-Apps kümmert. Neben seinem musikalischen Talent am Klavier hat Joshua eine Leidenschaft für Wintersport und findet auch Freude im Gaming. Doch am allerliebsten verbringt er seine Zeit mit seiner besseren Hälfte, denn sie ist für ihn das größte Glück.

Jitsi VP9 Feature

What is VP9?

After a lot of preperations we are finally ready to offer our customers the possibility to activate VP9 as an option. After many setbacks due to bugs and other problems, we have managed to integrate VP9 into our Jitsi environment. VP9 is a videocodec such as H.246 or VP8 the main differences between those codecs are the CPU and bandwidth usage. VP9 uses about 50% less of your bandwidth compared to H.246, which is an enormous improvement. That makes it a great choice if you’re working with video at different sizes, or if you’re focusing specifically on HD. VP9 can use hardware decoding on Intel and ARM devices. Thanks to widespread hardware support, it gives you smoother playback on PCs in most scenarios. That makes it ideal for general use. It’s also the best codec choice for high-quality YouTube videos. If you want to watch 4K on YouTube, you need VP9.
There are still issues with browsers that are not chrome based, but with that said, VP9 is a feature that was much needed. The efficiency that comes with it takes video conferencing in Jitsi to the next level. However, it‘s also important to note that this works best if the device you’re using has VP9 hardware acceleration enabled. If not, your device may also quickly reach its limits. The best thing to do is to look on the Internet to see if your built-in CPU or GPU supports this acceleration. Also, this is not always enabled directly and may need to be enabled first.

Enable VP9 feature

To use VP9 you have to enable it in the NWS web interface. First select your Jitsi, then go to Settings in the optional Features section. There you will already see the VP9 option, click on the small dropdown window and check the box. After that you have to click on “Save customization” and after a short time your Jitsi is activated with VP9.


Please make sure that you are using the latest version of Chrome or your Chrome based browser, otherwise VP9 may not be available yet. If you join with another browser that does not support VP9, the session will automatically be reset to VP8. However, this can cause problems again, so we recommend using only Chrome or Chrome-based browsers in the latest version.

Apart from the VP9 feature, our Jitsi has also been updated to the latest version and here are a few of the new features.

Select background

You now have the possibility to cut out your video background and insert any image.
To do this you have to click on the three dots in the menu bar and then click on Select Background. Now you see different images, which are already available by default. However, if you then press “Add background“ you can search locally for your own image and select it. It is even possible to choose your screensharing as background.

Live reactions

Another feature is the possibility to react live with an emote. To do this, navigate back to the menu bar and select the arrow on the raise hand function. You will then see some new emotes which you can select. If one of these emotes is pressed, this emote will be shown to everyone in the session and will also be played with an audio playback. However, this audio playback can also be very annoying. If you want to deactivate it, you have to go to the settings. To do this, go back to the menu bar, on the three points, then settings and select sounds and uncheck Interactions.

Framerate for screen sharing

If you have a low frame rate for your screen sharing, you can also set it higher in the settings. To do so, navigate back to the settings and then select more. Now you will see the option Frame rate for screen sharing, this should be set to 5 FPS by default, but you can also select 15 or 30 FPS. Note that this setting will not be applied if you are already sharing your screen. You will need to start sharing again for these settings to be applied.

Joshua Hartmann
Joshua Hartmann
Systems Engineer

Joshua hat im Sommer 2023 seine Ausbildung zum Fachinformatiker für Systemintegration bei den NETWAYS Web Services erfolgreich abgeschlossen. Heute ist er ein wichtiger Teil des Teams, das sich mit großer Hingabe um die Kundenbetreuung und die kontinuierliche Weiterentwicklung der SaaS-Apps kümmert. Neben seinem musikalischen Talent am Klavier hat Joshua eine Leidenschaft für Wintersport und findet auch Freude im Gaming. Doch am allerliebsten verbringt er seine Zeit mit seiner besseren Hälfte, denn sie ist für ihn das größte Glück.

stackconf online 2021 | Stretching the Service Mesh Beyond the Clouds

This entry is part 6 of 27 in the series stackconf online 2021

stackconf online 2021 is over and was a full success. It was all about open source infrastructure solutions in the spectrum of continuous integration, container, hybrid and cloud technologies. We’re still excited about all of our experts sessions and the large number of participants who joined us from all over the world. In the following you get an insight about one of our talks.

At stackconf online 2021 Rosemary Wang was with us, and she had a great topic on how to extend a service network beyond clouds. At the beginning she told us about her work at an organization, where different environments were used. These environments were running applications, some in AWS, data centres, Kubernetes, virtual machines, or Azure. The last thing that is missing is a way to control everything from one point.

So, what is needed is an infrastructure layer and an automation that controls the infrastructure layer. The combination of these is a service mesh. She showed us a solution with a Consul cluster, which is used in the datacenter and in the cloud.

This means that everything that is service to service goes through the proxies first. For example, in the data centre, the UI goes through the proxies to communicate with the application. Consul takes care of the configuration of the proxies and controls the rules and placement of where traffic is allowed to go within the environment.

The UI can also use the proxies to reach the application in the cloud. This allows cross cloud access. But aren’t there more problems with a service mesh? The answer is yes, you do have certain issues that you need to address, but you need to consider whether or not to avoid the service mesh. If you do not use a service mesh you end up with little automation and multiple checkpoints for the environments.

Several Types of Topologies

To get back on topic, we won’t try to get the service mesh across all environments, but Rosmary would like to show us the several types of topologies you have.

First, the service mesh is deployed in the cloud and then a network automation piece is added to synchronize. The benefits in the service mesh are controlled retries and error handling to non-service mesh and progressive delivery techniques such as canary, A/B testing and feature flagging. On the other hand, we have the benefits in the non-service mesh like automated control and no change to existing applications.

Let’s move on. After deploying the service mesh in the cloud, you deploy an ingress gateway that helps control traffic from the ingress to the cluster. The information it receives is transmitted to a Consul Terraform Sync, which configures the application load balancer.

How Consul Terraform Sync Works

Here Rosmary explains the advantages and disadvantages as well as how Consul Terraform Sync works. Afterwards there was a demo of how everything works together.
On the whole, I can say that Rosmary’s talk was very successful. I was able to learn a lot about the topic myself, even though I didn’t know a lot about it before. I hope the talk can convince you as much as it convinced me.

I could go on explaining in detail what Rosmary mentioned in her talk, but I would like to leave you with this.
If you want to learn more about the talk you can watch it in full length, I really recommend it.

Full talk and more from and about stackconf

Watch the the whole talk by Rosemary Wang:

YouTube player


stackconf 2022 will take place in Berlin. The final date will be announced soon. If you want to learn more about infrastructure solutions in advance you have the possibility to take look at our archive where you can find all slides and videos from this year’s stackconf.

Stay tuned!

Joshua Hartmann
Joshua Hartmann
Systems Engineer

Joshua hat im Sommer 2023 seine Ausbildung zum Fachinformatiker für Systemintegration bei den NETWAYS Web Services erfolgreich abgeschlossen. Heute ist er ein wichtiger Teil des Teams, das sich mit großer Hingabe um die Kundenbetreuung und die kontinuierliche Weiterentwicklung der SaaS-Apps kümmert. Neben seinem musikalischen Talent am Klavier hat Joshua eine Leidenschaft für Wintersport und findet auch Freude im Gaming. Doch am allerliebsten verbringt er seine Zeit mit seiner besseren Hälfte, denn sie ist für ihn das größte Glück.

NETWAYS stellt sich vor – Joshua Hartmann

This entry is part 3 of 62 in the series NETWAYS stellt sich vor


Name: Joshua Hartmann

Alter: 19

Position bei NETWAYS: Junior Systems Engineer

Bei NETWAYS seit: Juli 2020


Wie bist du zu NETWAYS gekommen und was genau gehört zu Deinem Aufgabenbereich bei NETWAYS?

Ich habe schon in der Kindheit mit dem Computerspielen angefangen und hatte mir so ein gewisses Interesse zur IT aufgebaut. Nachdem ich als Aushilfe bei einem Elektriker auf der Baustelle gearbeitet habe, musste ich mich mit der Zeit auch nach einer Ausbildung erkundigen. Mein Bruder hatte bis dahin bereits seine Ausbildung bei NETWAYS abgeschlossen und so kam ich mit ihm ins Gespräch. Es stellte sich schnell heraus das auch mir diese Art von Arbeit Spaß bereiten würde und somit habe ich mich direkt beworben. Jetzt arbeite ich in der Abteilung NETWAYS Web Services und trete jeden Tag mit neuen Kunden in Kontakt und helfe diesen bei ihren technischen Problemen.


Was macht Dir an Deiner Arbeit am meisten Spaß?

NETWAYS ist wie eine große Familie, in die man aufgenommen wird. Man fühlt sich direkt sehr gut aufgehoben und hat sehr viel Spaß an der Arbeit. Ansonsten ist es immer wieder schön für Kunden Probleme lösen zu können und ein kleines Lob dafür zu erhalten.


Welche größeren, besonders interessanten Projekte stehen künftig an?

Aktuell steht ein größeres Update für Jitsi an, wofür zuerst eine Testumgebung aufgebaut werden musste. In dieser Umgebung werden neue Funktionen getestet aber auch der Updatevorgang, denn hier kann so einiges misslingen.


Was machst Du, wenn Du mal nicht bei NETWAYS bist?

Ich verbringe viel Zeit mit meiner Freundin, meinem Hund, und natürlich auch mit der Familie . Ansonsten bin ich auch gerne mal auf dem Fahrrad unterwegs oder entspanne vor dem Fernseher.


Wie geht es in Zukunft bei Dir weiter?

Da ich sehr neu in der IT bin und erst vor Kurzem meine Ausbildung begonnen habe, wird bei mir als erstes Ziel der Abschluss der Ausbildung anstehen. Und da die IT so weitreichend ist, werde ich auch in der Zukunft immer wieder neue Sachen lernen und mir Wissen aneignen.

Joshua Hartmann
Joshua Hartmann
Systems Engineer

Joshua hat im Sommer 2023 seine Ausbildung zum Fachinformatiker für Systemintegration bei den NETWAYS Web Services erfolgreich abgeschlossen. Heute ist er ein wichtiger Teil des Teams, das sich mit großer Hingabe um die Kundenbetreuung und die kontinuierliche Weiterentwicklung der SaaS-Apps kümmert. Neben seinem musikalischen Talent am Klavier hat Joshua eine Leidenschaft für Wintersport und findet auch Freude im Gaming. Doch am allerliebsten verbringt er seine Zeit mit seiner besseren Hälfte, denn sie ist für ihn das größte Glück.