
Ever tried to create a Dual Boot Ubuntu AFTER you encrypted your whole hard drive already?
Well don’t worry we got you covered!
My Problem:
I want to shrink my encrypted Ubuntu installation to make room for another OS, which I need for my video editing.
For that I have a SSD 512GB, which is encrypted with LUKS, uses LVM and ist partitioned in ext 4 fs.
But I also have an encrypted LUKS Swap called “vgubuntu-swap_1”, who also uses LVM and is formated in swap fs.
My partition had a size around 475 GiB before shrinking. The swap volume helps to demonstrate that shrinking may lead to gaps between logical LVM volumes.
The plan is to shrink the file system, its volume, the volume group and also the encrypted partition.
I used a Live Ubuntu System from a USB stick, since I could not just take the hard drive out. If you have just one computer available, use either a Live System from a USB stick or a DVD.
Disclaimer: PLEASE MAKE A BACKUP of the whole disk first.
Please read carefully through the steps first before you do anything.
If you are unsure about the commands and what they mean or what consequences they have, do some research on the Internet ahead. Likewise in case of trouble or error messages. It definitely helps to be familiar with partitioning, LVM, dm-crypt and LUKS.
My Solution:
Resizing was a sequence of 14 steps – following the disk layout in reverse order, I started resizing from the filesystem to the LVM structure down to the partition.
You open an encrypted partition with LVM on LUKS just as any dm-crypt/LUKS-partition by:
cryptsetup open /dev/Disk-MAPPING-Name cryptdisk
For the mapping name I used “cryptdisk“. Note that closing the encrypted device requires to deactivate the volume groups in the kernel first; in our case:
vgchange -a n vg1;

cryptsetup close cryptdisk
Otherwise you may not be able to close your device.
Step 1: Take a look at your Block Devices
With lsblk you take a look at you partitions
lsblk
For instance for me the disk appeared as “/dev/nvme0n1” – the encrypted partition was located on “/dev/nvme0n1p3”.
Step 2: Opening the encrypted partition
ubuntu@ubuntu:~$ cryptsetup open /dev/nvme0n1p3 cryptdisk
Review it so you know the mapping is done correctly by “ls -la /dev/mapper”
Take a look at the “cryptdisk”-device, but keep a close eye on the LVM-volumes inside the encrypted partition. They should appear automatically as distinct devices.
Step 3: Let’s take a look at the LVM Structure
Next up we have:
pvdisplay
vgdisplay
lvdisplay
Pvdisplay and vgdisplay show you the PV device: “/dev/mapper/cryptdisk” and the volume group, like in my case “vgubuntu”.
With lvdisplay you can take a look at the logical volumes, so the path to the devices and LV Size. In this case it was: “/dev/vgubuntu/root” and “/dev/vgubuntu/swap_1”
Step 4: Filesystem Integrity check
With fsck we can make sure the filesystem is clean:
ubuntu@ubuntu:~$ sudo fsck /dev/vgubuntu/root
fsck from util-linux 2.36.1
e2fsck 1.46.3 (27-Jul-2021)
/dev/mapper/vgubuntu-root: clean, 530426/13107200 files, 14946582/52428800 blocks
That seems fine, let’s move on!
Step 5: Review filesystem physical block size and used space
Since we need to take a look at the phyisical block size, we can use “fdisk -l”.
There were also a lot of loop devices in my case, but the last entry showed my encrypted drive.
ubuntu@ubuntu:~$ sudo fdisk -l
…
Disk /dev/mapper/cryptdisk: 475.71 GiB, 510787584000 bytes, 997632000 sectors
Units: sectors of 1 * 512 = 512 bytes
Sector size (logical/physical): 512 bytes / 512 bytes
I/O size (minimum/optimal): 512 bytes / 512 bytes
Inode count:              13107200
Block count:              52428800
Reserved block count:     2621439
Free blocks:              37482218
Free inodes:              12576774
Step 6: Reducing the Volume and filesystem size
For the reduced filesystem I went with 210G, since it should be about 200GiB size at the end.
With lvreduce we work with GiB, so the filesystem size should be 5-10% smaller than the logical volume size. Then we would get 200 * 1024 * 1024 * 1024 Bytes = 214.748.364.800 Bytes.
Step 7: Actually shrinking the filesystem
Please check first if the filesystem is mounted somewhere and then proceed with:
ubuntu@ubuntu:~$ sudo resize2fs /dev/mapper/vgubuntu-root 210G
resize2fs 1.46.3 (22-Dez-2021)
Resizing the filesystem on /dev/mapper/vgubuntu-root to <pre style="padding:8px;"> (4k) blocks.
The filesystem on /dev/mapper/vgubuntu-root is now 52428800 (4k) blocks long.
Step 8: Shrink the logical volume
With “lvreduce” we can resize the LVM volume, the option parameter “L” together with a “size” determines how big the volume will become.
ubuntu@ubuntu:~$  lvreduce -L 200G /dev/vgubuntu/root
WARNING: Reducing active logical volume to 200 GiB.
THIS MAY DESTROY YOUR DATA (filesystem etc.)
Do you really want to reduce vgubuntu/root? [y/n]: y
Size of logical volume vgubuntu/root changed from 210 GiB (20480 extents) to 200.00 GiB (15360 extents).
Logical volume vgubuntu/root successfully resized.
Since we got the confirmation that it worked, we can now proceed.
Step 9: Check for gaps between the volumes of your LVM volume group
That was the trickiest part for me at least since I had a swap with my Ubuntu. The first thing I did was to scan for the Swap, on which Blocks it was located.

I then used “pvmove” to get the swap from the last blocks to the ones after my root volume.
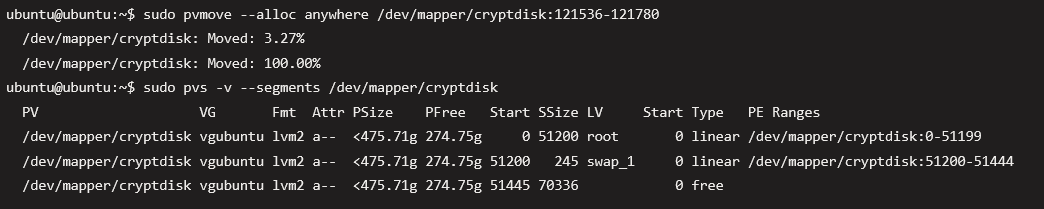
As you can see, my swap moved over and my free space had no further volumes in between.
Step 10: Resize/reduce the physical LVM
Next I had to resize and reduce the physical LVM to 200G
ubuntu@ubuntu:~$ sudo pvresize --setphysicalvolumesize 200.96G /dev/mapper/cryptdisk
/dev/mapper/cryptdisk: Requested size <200.96 GiB is less than real size <475.71 GiB. Proceed?  [y/n]: y
WARNING: /dev/mapper/cryptdisk: Pretending size is 421443665 not 997632000 sectors.
Physical volume "/dev/mapper/cryptdisk" changed
1 physical volume(s) resized or updated / 0 physical volume(s) not resized
Since the resize worked, I wanted to make sure everything was fine.
ubuntu@ubuntu:~$ sudo pvdisplay
--- Physical volume ---
PV Name               /dev/mapper/cryptdisk
VG Name               vgubuntu
PV Size               <200.96 GiB / not usable <2.04 MiB
Allocatable           yes (but full)
PE Size               4.00 MiB
Total PE              51445
Free PE               0
Allocated PE          51445
PV UUID               KpzZm…
Step 11: Setting up the encrypted regions size
First make sure which Block Size the current drive has:
ubuntu@ubuntu:~$ sudo cryptsetup status cryptdisk
/dev/mapper/cryptdisk is active and is in use.
type:    LUKS2
cipher:  aes-xts-plain64
keysize: 512 bits
key location: keyring
device:  /dev/nvme0n1p3
sector size:  512
offset:  32768 sectors
size:    997632000 sectors
mode:    read/write
Then I had to calculate the new blocksize for the encrypted disk, I used the formula on the Arch Wiki: NEW_LUKS_SECTOR_COUNT = PV_EXTENT_COUNT * PV_EXTENT_SIZE / LUKS_SECTOR_SIZE
From Step 10 (pvdisplay) and the cryptdisk status you can gather all the information needed to get:
(53880 extent + 1 unusable extent) * 4 MiB/extent /512 B/sector = 441393152 sectors
ubuntu@ubuntu:~$  sudo cryptsetup -b 441393152 resize cryptdisk
Enter passphrase for /dev/nvme0n1p3:
ubuntu@ubuntu:~$ sudo cryptsetup status cryptdisk
/dev/mapper/cryptdisk is active and is in use.
type:    LUKS2
cipher:  aes-xts-plain64
keysize: 512 bits
key location: keyring
device:  /dev/nvme0n1p3
sector size:  512
offset:  32768 sectors
size:    441393152 sectors
mode:    read/write
And now we have a smaller LUKS Partition. You came this far, now don’t stop!
Step 12: Reduce the size of the physical partition
Here I used parted to get an overview of my drives and resize it to the desired size:
ubuntu@ubuntu:~$ sudo parted /dev/nvme0n1
GNU Parted 3.4
Using /dev/nvme0n1
Welcome to GNU Parted! Type 'help' to view a list of commands.
(parted) print
Model: PM9A1 NVMe Samsung 512GB (nvme)
Disk /dev/nvme0n1: 512GB
Sector size (logical/physical): 512B/512B
Partition Table: gpt
Disk Flags:
Number  Start   End     Size   File system  Name                  Flags
1      1049kB  538MB   537MB  fat32        EFI System Partition  boot, esp
2      538MB   1305MB  768MB  ext4
3      1305MB  512GB   511GB

(parted) resizepart

Partition number? 3
End?  [512GB]? 211GB
Warning: Shrinking a partition can cause data loss, are you sure you want to continue?
Yes/No? y
(parted) print
Model: PM9A1 NVMe Samsung 512GB (nvme)
Disk /dev/nvme0n1: 512GB
Sector size (logical/physical): 512B/512B
Partition Table: gpt
Disk Flags:
Number  Start   End     Size   File system  Name                  Flags
1      1049kB  538MB   537MB  fat32        EFI System Partition  boot, esp
2      538MB   1305MB  768MB  ext4
3      1305MB  211GB   210GB

(parted) q

Information: You may need to update /etc/fstab.
I checked with print in between, to see if the parted resize worked.
Step 13: Set new size of the encrypted region
Now we just need to make sure we also have use the full partition size:
ubuntu@ubuntu:~$ sudo cryptsetup resize cryptdisk
ubuntu@ubuntu:~$ sudo cryptsetup status cryptdisk
/dev/mapper/cryptdisk is active.
type:    LUKS2
cipher:  aes-xts-plain64
keysize: 512 bits
key location: keyring

device:  /dev/nvme0n1p3
sector size:  512
offset:  32768 sectors
size:    409526848 sectors
mode:    read/write
Step 14: Reset the PV size to the full partition size
Next up we have to use pvresize so the cryptdisk gets also adjusted and then we can take a look at the volumes.
ubuntu@ubuntu:~$ pvresize  /dev/mapper/cryptdisk
Physical volume "/dev/mapper/cryptdisk" changed
1 physical volume(s) resized / 0 physical volume(s) not resized
ubuntu@ubuntu:~$ sudo pvdisplay
--- Physical volume ---
PV Name               /dev/mapper/cryptdisk
VG Name               vgubuntu
PV Size               210.47 GiB / not usable 2.00 MiB
Allocatable           yes
PE Size               4.00 MiB
Total PE              53880
Free PE               2435
Allocated PE          51445
PV UUID               Kpz...

ubuntu@ubuntu:~$ sudo vgdisplay
--- Volume group ---
VG Name               vgubuntu
System ID
Format                lvm2
...
VG Size               <210.47 GiB
PE Size               4.00 MiB
Total PE              53880
Alloc PE / Size       51445 / <200.96 GiB
Free  PE / Size       2435 / 9.51 GiB
VG UUID               dz0...
That’s it!
You can also do a checkup with gparted/disks, but apart from that I was just happy that I had more space for a second OS while also maintaining the encryption for Ubuntu!
(Now I will create another backup, just in case I break something with the new OS Installation.)


0 Comments