Select Page

NETWAYS Blog

Ansible – AWX|Tower State handling on Workflows

The Ansible Tower or its upstream AWX provides an easy to use GUI to handle Ansible tasks and schedules. Playbooks are configured as templates and as the name suggests, they can be modified to the needs, extended by variables, a survey or tags.

Furthermore those templates can be logically grouped, connected and visualised in Workflows.

The downside to those Workflows, all playbooks affected by this are executed separately and can’t access each others variables. On first glance we maybe only spot that we can define variables for the whole workflow but those are not changeable throughout the flow.

But there is a solution, which is the module set_stats. This module allows to save or accumulate variables and make them available for other playbooks within the workflow.

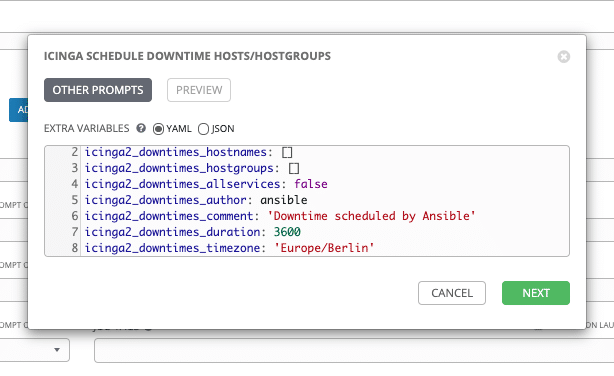
As an example we could use the monitoring environment when setting downtimes.

workflow

As a downtime is created before a maintenance and should be gone when the maintenance is done. This creates a dependency on the first task, which can be solved as we save the result of the first tasks with the set_stats module.


      - name: schedule downtimes
        icinga2_downtimes:
          state: "{{ downtime_icinga_state | default('present') }}"
          host: ***
          author: "{{ icinga2_downtimes_author | default('ansible_downtime') }}"
          comment: "{{ icinga2_downtimes_comment | default('Downtime scheduled by Ansible') }}"
          duration: "{{ icinga2_downtimes_duration | default(omit) }}"
        register: content
 
      - set_stats:
          data:
            downtime: "{{ content }}"

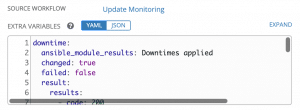
The content of the data will be now available to all playbooks included by the workflow. The variable is also shown as artefacts in the GUI.

artefacts

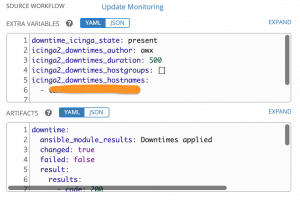
Keep in mind that the variable will be part of the extra variables for all other playbooks. As covered in the variable precedence it will overwrite any other variable named the same.

With this module you can reorganise your playbooks and connect them in workflows. This allows you to have a more flexible automation than before.

Check out our Blog for more awesome posts and if you need help with Ansible send us a message or sign up for one of our trainings!

Thilo Wening
Thilo Wening
Manager Consulting

Thilo hat bei NETWAYS mit der Ausbildung zum Fachinformatiker, Schwerpunkt Systemadministration begonnen und unterstützt nun nach erfolgreich bestandener Prüfung tatkräftig die Kollegen im Consulting. In seiner Freizeit ist er athletisch in der Senkrechten unterwegs und stählt seine Muskeln beim Bouldern. Als richtiger Profi macht er das natürlich am liebsten in der Natur und geht nur noch in Ausnahmefällen in die Kletterhalle.

Ansible – Loop over multiple tasks

ansible logo

The last time I wrote about Ansible and the possibility to use blocks to group multiple tasks. Which you can read here. Sadly this feature does not work with loop, so there is no clean way to loop over multiple tasks in a play without writing the same loop statement at tasks over and over.

But when we come across the need of tasks which depend on each other, for example, we execute a script with a certain parameter and its result is necessary for the upcoming tasks.

Let’s go through a common example, creating a site consists of a few steps. Creating the directory, creating the vhost and then enabling the site.


- name: "create {{ site }} directory"
  file:
    ensure: directory
    dest: "/var/www/{{ site }}"
    
- name: "create {{ site }}"
  template:
    src: vhost.j2
    dest: "/etc/apache2/sites-available/{{ site }}"
  register: vhost

- name: "enable {{ site }}"
  command: /usr/sbin/a2ensite "{{ site }}"
  register: result
  when: vhost.changed
  changed_when: "'Enabling site' in result.stdout"
  notify: apache_reload

We could use a loop for each tasks and afterwards find the right result for the next task to depend on. But the styleguide will warn you if you try to use Jinja2 syntax in when statements.

So the best solution to this is to use include_tasks, which can include a file with tasks. This task is allowed to have a loop directive and so we can include it multiple times.
Lets see how this would apply to our scenario:


- set_fact:
    sites:
      - default
      - icingaweb2

- name: create vhosts
  include_tasks: create-vhosts.yml
  loop: "{{ sites }}"
  loop_control:
    loop_var: site


In the Result we can see clearly that all tasks are applied for each element in the sites variable.


TASK [set_fact] *********************************************
ok: [localhost]

TASK [create vhosts] ****************************************
included: /Users/twening/Documents/netways/ansible_test20/create-vhosts.yml for localhost => (item=default)
included: /Users/twening/Documents/netways/ansible_test20/create-vhosts.yml for localhost => (item=icingaweb2)

TASK [create default directory] *****************************
ok: [localhost]

TASK [create default] ***************************************
ok: [localhost]

TASK [enable default] ***************************************
ok: [localhost]

TASK [create icingaweb2 directory] **************************
ok: [localhost]

TASK [create icingaweb2] ************************************
ok: [localhost]

TASK [enable icingaweb2] ************************************
ok: [localhost]

PLAY RECAP **************************************************
localhost                  : ok=10   changed=0    unreachable=0    failed=0    skipped=0    rescued=0    ignored=0


Check out our Blog for more awesome posts and if you need help with Ansible send us a message or sign up for one of our trainings!

Thilo Wening
Thilo Wening
Manager Consulting

Thilo hat bei NETWAYS mit der Ausbildung zum Fachinformatiker, Schwerpunkt Systemadministration begonnen und unterstützt nun nach erfolgreich bestandener Prüfung tatkräftig die Kollegen im Consulting. In seiner Freizeit ist er athletisch in der Senkrechten unterwegs und stählt seine Muskeln beim Bouldern. Als richtiger Profi macht er das natürlich am liebsten in der Natur und geht nur noch in Ausnahmefällen in die Kletterhalle.

Ansible Host-Gruppen: Wer gehört zu wem?

Immer wieder kommt es vor, dass ich in größeren Ansible-Umgebungen arbeite. Diese enthalten eine Vielzahl von verschiedenen Gruppen im Inventory, die sich auch mal aus anderen Host-Gruppen zusammen setzen. Da ist es nicht immer leicht den Überblick zu behalten.
Da kommt es schon mal vor, prüfen zu wollen oder zu müssen ob alle Gruppen richtig aufgebaut sind oder korrekt interpretiert werden.
Nach ein wenig Recherche war auch schnell mit einem einfachen Ein-Zeiler eine Lösung gefunden, um sich anzeigen zu lassen in welcher Gruppe die einzelnen Server einsortiert sind oder wie sich die Gruppe im Ansible-Inventory zusammen setzt

[code lang=”plain”]
ansible -i <inventory> localhost -m debug -a ‘var=groups’
[/code]

Dabei lässt sich entweder das Inventory-Verzeichnis oder eine konkrete Inventory-Hostdatei angeben.
Und weil es mit einem Beispiel immer besser ist:

[code lang=”bash”]
ansible -i hosts localhost -m debug -a ‘var=groups’
localhost | SUCCESS => {
"groups": {
"all": [
"maja42310",
"maja42444",
"willy1334",
"willy24242",
"koenigin_blau"
],
"drohnen": [
"willy1334",
"willy24242"
],
"honigbienen": [
"maja42310",
"maja42444"
],
"honigbienenvolk": [
"maja42310",
"maja42444",
"willy1334",
"willy24242",
"koenigin_blau"
],
"koenigin": [
"koenigin_blau"
],
"ungrouped": []
}
}
[/code]

Da ich mir das nun mehr als ein mal nicht merken konnte, dachte ich mir ich schreib das mal hier auf. Vielleicht hilft es ja dem ein oder anderen und ich kann es mir jetzt besser merken:)

Wenn Ihr noch mehr über Ansible erfahren wollt, dann besucht doch einfach eines unserer Trainings bei Netways Events. Sollte es schon etwas konkreter sein und Ihr benötigt gezielt Hilfe, fragt doch gerne unsere Kollegen vom Sales Team ob Ihr nicht Unterstützung von Netways Professional Service bekommt.

Daniel Neuberger
Daniel Neuberger
Senior Consultant

Nach seiner Ausbildung zum Fachinformatiker für Systemintegration und Tätigkeit als Systemadministrator kam er 2012 zum Consulting. Nach nun mehr als 4 Jahren Linux und Open Source Backup Consulting zieht es ihn in die Welt des Monitorings und System Management. Seit April 2017 verstärkt er das NETWAYS Professional Services Team im Consulting rund um die Themen Elastic, Icinga und Bareos. Wenn er gerade mal nicht um anderen zu Helfen durch die Welt tingelt geht er seiner Leidenschaft für die Natur beim Biken und der Imkerei nach und kassiert dabei schon mal einen Stich.

Ansible – Use Blocks and Rescue Errors

Ansible is a widely used and powerful open-source configuration and deployment management tool. It can be used for simple repetitive daily tasks or complex application deployments, therefore Ansible is able to cover mostly any situation.

Since version 2.0.0 Ansible introduced the usage of blocks, they provide the possibility to group or rescue failed tasks.
On blocks we can assign most directives which are available for any other task at block level, only loops aren’t available.

- name: Update Systems
  hosts: all
  tasks:
    - name: execute this block only for rhel family hosts
      block:
        - name: install epel repository
          yum:
            name: epel-release
            state: present

        - name: install updates
          yum:
            name: '*'
            state: latest
            exclude: kernel*

      when: ansible_os_family == 'RedHat'
      become: true

When we try to deploy applications, sometimes we need to test connections or if requirements are met. When those tasks fail caused by the negative test result, the playbook by default fails and therefore stops.
To force Ansible to execute all other tasks, we could use the directive ignore_failed: true and checking the return value for any other depending task.

With blocks this is easily solved, by using rescue to catch the error and force a particular tasks to run.
The always will make sure that the listed tasks get executed.


- name: rescue my errors
  hosts: localhost
  tasks:
    - name: Try to reach host
      block:
        - name: "[Try reach DNS] Check Connection over DNS"
          command: ping client01.demo.local -c 2
          register: output
      rescue:
        - name: "[Rescue failed DNS] Check Connection over IP"
          command: ping 192.168.33.1 -c 2
          register: output
      always:
        - debug:
            var: output

To handle more than one rescue statement, the block can be simply used in the rescue section, like in the following example.


  - name: Try to execute skript
    block:
      - name: Check Connection over DNS
        command: ping nclient01.demo.local -c 2
        register: output
    rescue:
      - name: "this will fail"
        block:
          - name: it will be false
            command: /bin/false
            register: output
        rescue:
          - name: "this works"
            command: ping 192.168.33.1 -c 2
            register: output

Try to reduce ignored tasks in failed state with rescue blocks, this reduces the confusion of users when inspecting the output.
As second advice try to reduce code duplication by grouping tasks with similar directives.

Check out our Blog for more awesome posts and if you need help with Ansible send us a message or sign up for one of our trainings!

Thilo Wening
Thilo Wening
Manager Consulting

Thilo hat bei NETWAYS mit der Ausbildung zum Fachinformatiker, Schwerpunkt Systemadministration begonnen und unterstützt nun nach erfolgreich bestandener Prüfung tatkräftig die Kollegen im Consulting. In seiner Freizeit ist er athletisch in der Senkrechten unterwegs und stählt seine Muskeln beim Bouldern. Als richtiger Profi macht er das natürlich am liebsten in der Natur und geht nur noch in Ausnahmefällen in die Kletterhalle.

Ansible – should I use omit filter?

When we talk about Ansible, we more and more talk about AWX or Tower. This Tool comes in handy when you work with Ansible in a environment shared with colleagues or multiple teams.
In AWX we can reuse the playbooks we developed and share them with our colleagues on a GUI Platform.

Often we need a bit of understanding how a playbook is designed or if a variable need to be defined for the particular play. This can be much more tricky when sharing templates to people unaware of your work.

This is where the omit filter can be used. The easiest way to explain this, if the variable has no content or isn’t defined, omit the parameter.

The following example is an extract from the documentation:


- name: touch files with an optional mode
  file:
    dest: "{{ item.path }}"
    state: touch
    mode: "{{ item.mode | default(omit) }}"
  loop:
    - path: /tmp/foo
    - path: /tmp/bar
    - path: /tmp/baz
      mode: "0444"

In AWX we can create surveys, those are great to ask a few questions and provide a guide on how to use the underlying play. But often we need to choose between two variables whether one or another action should happen. Defined by the variable in use. If we leave one of both empty, Ansible will see those empty as defined but “None” (Python null) as content.

With the omit filter we can remove the parameter from the play, so if the parameter is empty it won’t be used.

The following code is the usage of icinga2_downtimes module which can create downtimes for hosts or hostgroups but the parameters cannot be used at the same time. In this case I can show the variable for hostnames and hostgroups in the webinterface. The user will use one variable and the other variable will be removed and therefore no errors occur.


- name: schedule downtimes
  icinga2_downtimes:
    host: 
    username: icinga_downtime
    password: "{{ icinga_downtime_password }}"
    hostnames: "{{ icinga2_downtimes_hostnames | default(omit) }}"
    hostgroups: "{{ icinga2_downtimes_hostgroups | default(omit) }}"
    all_services: "{{ icinga2_downtimes_allservices | default(False) }}"

The variables shown in the AWX GUI on the template.

This filter can be used in various other locations to provide optional parameters to your users.

If you want to learn more about Ansible, checkout our Ansible Trainings or read more on our blogpost.

Thilo Wening
Thilo Wening
Manager Consulting

Thilo hat bei NETWAYS mit der Ausbildung zum Fachinformatiker, Schwerpunkt Systemadministration begonnen und unterstützt nun nach erfolgreich bestandener Prüfung tatkräftig die Kollegen im Consulting. In seiner Freizeit ist er athletisch in der Senkrechten unterwegs und stählt seine Muskeln beim Bouldern. Als richtiger Profi macht er das natürlich am liebsten in der Natur und geht nur noch in Ausnahmefällen in die Kletterhalle.