Seite wählen

NETWAYS Blog

Docker on OSX

DockerLogoRunning Docker on OSX can be made possible using different methods:

Docker containers require kernel features which are only available in modern Linux kernels. In order to run Docker on OSX for example, one needs a virtual machine with a smallish Linux running in it.

Docker for Mac Beta

Docker for Mac uses xhyve, a lightweight OS X virtualization solution built on top of Hypervisor.framework. This requires you to run OS X 10.10 Yosemite and higher. The VM is provisioned with Alpine Linux running Docker engine.
The Docker API is exposed in /var/run/docker.sock where the docker and docker-compose CLI commands may directly communicate with. This is one of the benefits compared to Docker machine, especially when you do not need to manage your docker VM, or set specific environment variables before running it. Docker for Mac is further installed as native OSX application and only provides symlinks to /usr/local/bin/{docker,docker-compose}.
After the app is installed, I only had to manually add the bash-completion provided by Homebrew.

cd /usr/local/etc/bash_completion.d
ln -s /Applications/Docker.app/Contents/Resources/etc/docker.bash-completion
ln -s /Applications/Docker.app/Contents/Resources/etc/docker-machine.bash-completion
ln -s /Applications/Docker.app/Contents/Resources/etc/docker-compose.bash-completion

I was granted a beta access key for Docker for Mac today 🙂 Even if this is still beta, it already feels much more integrated into my test and development workflow rather than using Docker machine. Awesome job! 🙂


Docker Machine

Docker machine will use Virtualbox as VM provider. In order to avoid manual interaction in each terminal I’m opening I’ve added an alias into my bashrc file.

vim $HOME/.bashrc
alias enable_docker=". '/Applications/Docker/Docker Quickstart Terminal.app/Contents/Resources/Scripts/start.sh'"

This script doesn’t do much except for starting the VM using the Virtualbox cli tools and then source the exported variables into your current shell environment. That way the docker client will be able to communicate with the docker daemon running inside the VM.

Parallels instead of Virtualbox

While Virtualbox works fine there are significant performance improvements when using Parallels on OSX. Furthermore it is reasonable to only use one application firing virtual machines (the Icinga Vagrant boxes also provide support for Parallels as Vagrant provider).
I was therefore looking for a native Parallels driver for Docker. Following this issue shed some light on the history of Docker drivers and their support as plugins. Parallels doesn’t seem to be officially supported by Docker themselves according to their documentation. Though there is an official driver plugin from Parallels themselves which works for Pro and Business subscriber editions only. The main reason seems to be the limited cli features in the Standard edition.

Requirements for Parallels

The main requirement is at least Docker 1.9.1 providing the Docker toolbox 0.5.1+.

Installation

I’m using Homebrew, the manual installation parts are described in the documentation. Brew tries to pull docker-machine as well – if you’re using the version from docker.com you can safely ignore the linking error.

brew install docker-machine-parallels

Create a docker machine

docker_machine_parallels_runUse the driver „parallels“ and add the name „docker-parallels“. This will create a new Parallels VM with 20GB HDD and 1GB RAM by default. In case you want to disable sharing the /User mounts, add –parallels-no-share.

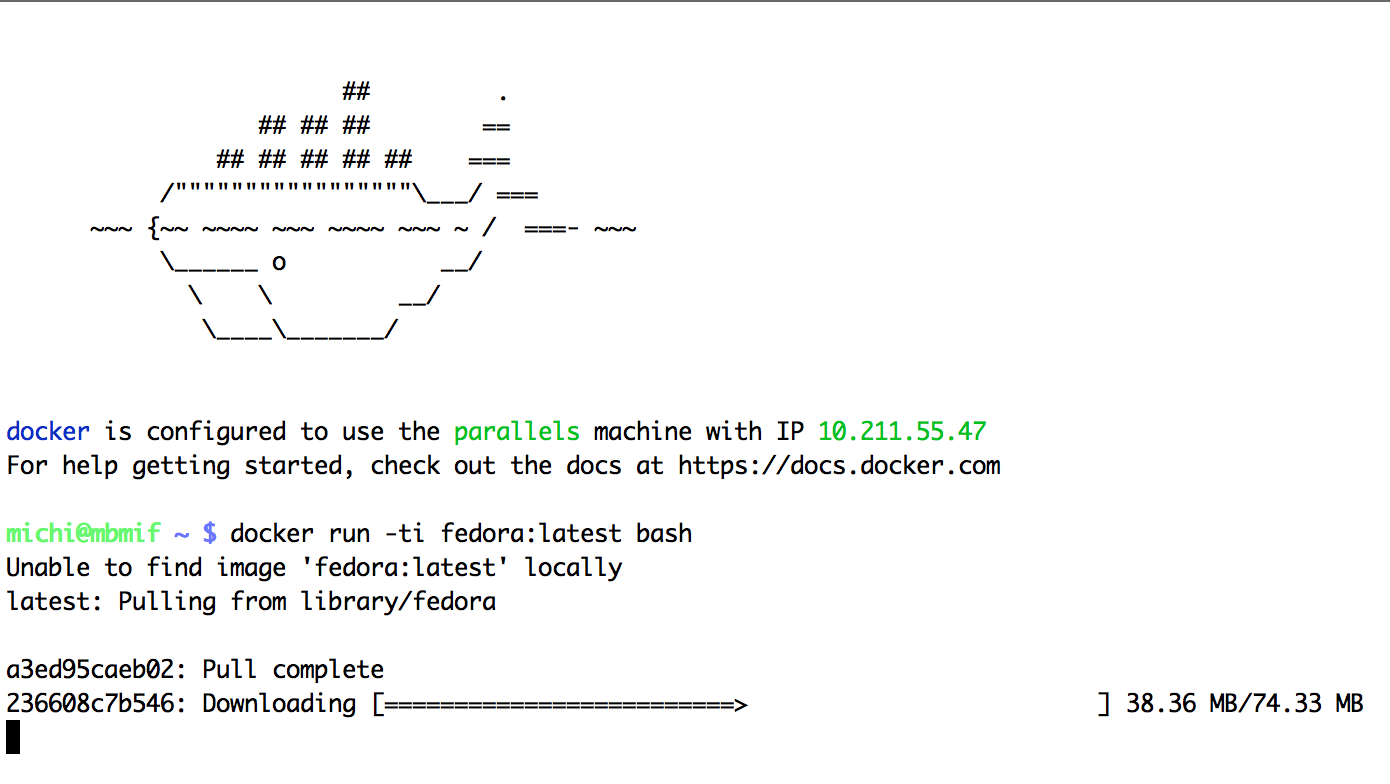
docker-machine create --driver=parallels docker-parallels

Add the environment variables to your shell and run docker pulling the latest Fedora container.

eval $(docker-machine env docker-parallels)
docker run -ti fedora:latest bash

Automate it

I’ve partially modified the Docker toolbox script in order to support Parallels.

wget https://raw.githubusercontent.com/dnsmichi/docker-tools/master/toolbox/scripts/osx/start.sh -O /usr/local/bin/enable_docker
chmod +x /usr/local/bin/enable_docker
enable_docker


Conclusion

While the Docker Machine integration allows room for improvement the Parallels driver works like a charm. Though I have to admit – while looking into the Parallels integration, Docker announced Docker for Mac and I was eagerly waiting for it.
Both methods are working, but the Docker for Mac application integrated natively into OSX is pretty slick. I like it a lot!
If you are looking for more Docker and its many possibilities – follow our blog closely and visit the Docker training sessions 🙂

Host-only network with virtual CentOS 7 instances

There are a bunch of guides out there on how to create a virtualbox network to work with about every client distribution there is. This is another one, for CentOS 7. All you will need to do this is a text editor and a minimal CentOS 7 installation, no networkmanager, no ifconfig.
If you want your box to be able to connect to the internet you will first need to add a NAT adapter, which is the default so you probably won’t have to do anything.
Now to the hard part:

1. Create a Host-Only network

Create Host-Only network
You can ignore the ipv6 part. But you should use an ipv4 address and network mask that make sense. A /24 should do the job in most cases. Also make sure disable the DHCP Server

2. Add a Host-Only network adapter to your machine

add network

3. Configure the vbox network

The following commands are to be run from the box itself and assume a standard CentOS 7 installation.
First you need to know the name of your Host-Only interface.

# ip a 

The right interface is the one without an ipv4 address, in my case enp0s8.
Now you will need to create an ifcfg for that interface.

# vim /etc/sysconfig/network/scripts/ifcfg-enp0s8 
TYPE="Ethernet"
BOOTPROTO="static"
IPADDR="192.168.24.10"
NETMASK="255.255.255.0"
NAME="enp0s8"
DEVICE="enp0s8"
ONBOOT="yes"

Now just restart the network service

# systemctl restart network.service 

To check whether everything worked check ip a and try to ping the new ip from the host machine.

Kleinere Images mit VirtualBox

Damit die Provisionierung unserer Schulungsnotebooks über Foreman zukünftig noch schneller wird habe ich mich vor Kurzem daran gemacht die Images für VirtualBox zu optimieren. Voraussetzung dafür war natürlich das die virtuellen Maschinen eine dynamische Speicherplatzbelegung benutzen und die Betriebssysteminstallationen so schlank wie möglich gehalten werden.
Sind die Grundvoraussetzungen erfüllt muss man (mal wieder) zwischen zwei Betriebssystemwelten unterscheiden. Bei Windows-Systemen ist vor dem nächsten Schritt nämlich noch etwas Vorarbeit zu leisten. Und zwar muss hier zuerst eine Defragmentierung durchgeführt werden. Dies lässt sich aber beispielsweise bereits mit Standardtools bewerkstelligen, die Windows von Haus aus mitbringt.
Jetzt befinden sich beide Betriebssysteme auf Gleichstand, daher können wir mit dem nächsten Schritt fortfahren. Dieser besteht darin nicht benötigten Speicherplatz freizugeben. Unter Windows geschieht das mit SDelete. Ist das Archiv herunter geladen und entpackt wird sdelete.exe auf der Kommandozeile wie folgt aufgerufen:

C:\PATH\TO\SDelete\sdelete.exe -z C:

Unter Linux gibt es dafür zerofree, das für die gängigsten Distributionen zur Verfügung stellt. Allerdings sieht der Aufruf natürlich entsprechend anders aus:

# zerofree /dev/sda1

Nachdem der freie Speicherplatz mit Nullen beschrieben wurde sollte die virtuelle Maschine herunter gefahren werden. Nun ist das Vorgehen für beide Betriebssystemwelten gleich, da wir ab jetzt auf Tools von VirtualBox zurückgreifen.
Im einfachsten Fall steht nur noch die eigentliche Verkleinerung der virtuellen Festplatte aus. Der Befehl dazu muss direkt auf dem Hostsystem aufgerufen werden:

# VBoxManage modifyhd --compact schulung-windows-disk1.vdi

Leider können nur VDI-Images „geshrinkt“ werden, was eine vorherige Konvertierung bei VMDK-Images unumgänglich macht:

# VBoxManage clonehd schulung-windows-disk1.vmdk schulung-windows-disk1.vdi --format vdi

Die Konvertierung zurück nach VMDK ist dann entsprechend umgekehrt:

# VBoxManage clonehd schulung-windows-disk1.vdi schulung-windows-disk1.vmdk --format vmdk

Durch die geringere Belegung des Speicherplatzes werden unsere Schulungsnotebooks nun innerhalb kürzester Zeit installiert, sodass wir noch mehr Teilnehmer zu unseren interessanten Trainings begrüßen können 😉

Markus Waldmüller
Markus Waldmüller
Head of Strategic Projects

Markus war bereits mehrere Jahre als Sysadmin in Neumarkt i.d.OPf. und Regensburg tätig. Nach Technikerschule und Selbständigkeit ist er nun Anfang 2013 bei NETWAYS als Senior Manager Services gelandet. Seit September 2023 kümmert er sich bei der NETWAYS Gruppe um strategische Projekte. Wenn er nicht gerade die Welt bereist, ist der sportbegeisterte Neumarkter mit an Sicherheit grenzender Wahrscheinlichkeit auf dem Mountainbike oder am Baggersee zu finden.

Virtuelle Entwicklungsumgebungen mit Vagrant

Mit Vagrant beschreibt und erstellt man virtuelle Entwicklungsumgebungen, was Entwicklern das Leben deutlich vereinfacht. Es läuft unter Linux, Windows und Mac OS X. Wenige Handgriffe reichen, um eine virtuelle Maschine in Betrieb zu nehmen und einzurichten.
Die Umgebung wird über ein Vagrantfile konfiguriert, welches u.a. port forwarding, mounts, Netzwerkkonfiguration und automatische Installation von Software steuert. Letzteres ist über Shellskripte, Ansible, Chef oder Puppet möglich.
Vagrant kann out of the box mit VirtualBox verwendet werden. VMWare ist auch möglich, aber kostenpflichtig. Weitere provider wie lxc findet man auf github.
Warum Vagrant?
Hauptgrund ist die klar definierte Umgebung. Jeder arbeitet mit den exakt gleichen Bibliotheken und identischen Versionen von Software. Infrastrukturkomponenten müssen nicht lokal installiert werden und die Umgebung ist reproduzierbar.
Zum Weiterlesen empfehle ich die Anleitung für Einsteiger.

Eric Lippmann
Eric Lippmann
CTO

Eric kam während seines ersten Lehrjahres zu NETWAYS und hat seine Ausbildung bereits 2011 sehr erfolgreich abgeschlossen. Seit Beginn arbeitet er in der Softwareentwicklung und dort an den unterschiedlichen NETWAYS Open Source Lösungen, insbesondere inGraph und im Icinga Team an Icinga Web. Darüber hinaus zeichnet er für viele Kundenentwicklungen in der Finanz- und Automobilbranche verantwortlich.

Weekly Snap: InGraph, Bonding on Ubuntu, FreeNAS 8 & OSDC 2013 CfP

weekly snap19 – 23 November presented our new look blog with tips on InGraph, bonding under Ubuntu and running Microsoft Cluster 2008 virtually, as well as calling out to interested speakers for our OSDC 2013.
Jannis contributed part 4 of the ultimate guide to InGraph by introducing the check_ingraph plugin that enables recent performance to be compared with past.
Meanwhile, Martin showed how to implement NIC bonding on Ubuntu 12.04.1 and Christoph gave us an illustrated guide to setting up Microsoft 2008 Cluster in Virtual Box with FreeNAS 8.
Lastly, Eva explained why James Bond is a good reason to submit a presentation idea to our OSDC 2013 Call for Papers before year’s end.