Seite wählen

NETWAYS Blog

Icinga 2 on Windows: Build Packages

Follow-up from the recent blog post on developing Icinga 2 on Windows:
Now that we’ve learned how to compile and develop Icinga 2 on Windows, it’s all about running it and also creating a setup package for installation.
 

Build Release Package

CMake uses CPack and NSIS to create the setup executable including all binaries and libraries in addition to setup dialogues and configuration. Therefore we’ll need to install NSIS first.
Once completed navigate to your Visual Studio project and tell CMake to build a release package.

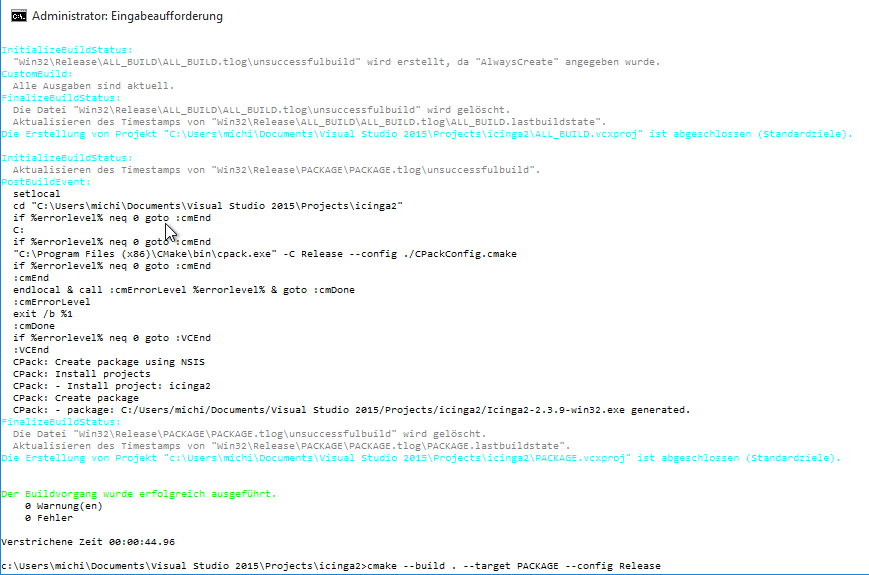
cd "c:\Users\michi\Documents\Visual Studio 2015\Projects\icinga2"
cmake --build . --target PACKAGE --config Release

icinga2_windows_cmake_build_exe
Note: This will still use the debug builds from the previous Visual Studio integration guide. A yet more clean approach is to run CMake with changed release parameters beforehand and then re-run the release package builder.

cd "c:\Users\michi\Documents\Visual Studio 2015\Projects\icinga2"
cmake . -DBOOST_ROOT=C:\boost_1_60_0 -DBISON_EXECUTABLE=C:\ProgramData\chocolatey\lib\winflexbison\tools\win_bison.exe -DFLEX_EXECUTABLE=C:\ProgramData\chocolatey\lib\winflexbison\tools\win_flex.exe -DICINGA2_WITH_MYSQL=OFF -DICINGA2_WITH_PGSQL=OFF -DICINGA2_UNITY_BUILD=ON
cmake --build . --target PACKAGE --config Release

The CMake instructions are defined inside the main icinga2 git repository in CMakeLists.txt (look for variables with prefix CPACK_).

Run Icinga 2

While you can run the icinga2 daemon in foreground, you should be well aware that the default mechanism is to install a Windows service and let it handle the start, stop and reload actions for Icinga 2.
Apart from that you may just use the icinga2 cli commands known from the documentation, such as „icinga2.exe daemon -C“ for validating the configuration on your Windows client.
Another example: „object list“
icinga2_windows_object_list

OSMC 2015: first Hackathon at OSMC!

Logo_DateFor the first time in OSMC history, we will give you the opportunity to stay for four days with us in Rostbratwurst* city. If you book one of our workshops on Monday the 16th, in addition to the conference package with talks on the 17th and 18th of November, you can now add the hackathon on November 19th to complete your excuse for staying in the capital of the best breweries of Bavaria even longer.
Developers like Gerhard Laußer, Michael Friedrich, Michael Medin and Thomas Gelf will be there (not at the brewery, but at the hackathon) to work with you on new projects. Then, when the hackathon is over, you will have the whole Friday and the weekend to find out what Schäuferles are!
Does that sound like a deal?
Get even more information about the hackathon here and don’t forget to register until June 30th for the discounted Early Bird rate!
thats-all-folks-porky-pig
And that’s all folks!

*very delicious small sausages – a Nuremberg specialty


Release packages for RPM repository configuration

While writing and updating training material for our Icinga 2 courseware, we are also re-evaluating the installation and configuration process by practical example and learning curve. Certain parts of the Icinga2 documentation are updated similar to the training material from training participants feedback and also by the trainers themselves.
In this special example, we found it tremendously hard to install the icinga rpm repository from packages.icinga.org inside the CentOS 7 training VM. By default you would just type a long string to fetch the yum repository information.

# wget https://packages.icinga.com -O /etc/yum.repos.d/ICINGA-release.repo
# yum makecache

training_install_icinga_repositoryWhile this works pretty well for release repositories, how about the snapshot repository for testing bleeding edge stuff? Similar to EPEL release package we’d just want that for Icinga as well.
The RPM package called ‚icinga-rpm-release‘ contains the repository’s GPG key as well as the yum configuration for the release repository which is enabled by default. The snapshot repository is installed, but disabled. You may use it with the „–enablerepo“ yum parameter.
Example for el7:

Name:           icinga-rpm-release
Version:        7
Release:        1%{?dist}
Summary:        Icinga Package Repository
Group:          System Environment/Base
License:        GPLv2
URL:            https://packages.icinga.com
Source0:        %{name}-%{version}.tar.gz
Source1:        https://packages.icinga.com
Source2:        https://packages.icinga.com
Source3:        https://packages.icinga.com
BuildRoot:      %{_tmppath}/%{name}-%{version}-%{release}-root-%(%{__id_u} -n)
BuildArch:      noarch
Requires:       redhat-release >=  %{version}
%description
This package contains the Icinga package repository GPG key
as well as configuration for yum.
%prep
%setup -q -c -T
install -pm 644 %{SOURCE0} .
%build
%install
rm -rf $RPM_BUILD_ROOT
#GPG key
install -Dpm 644 %{SOURCE1} $RPM_BUILD_ROOT%{_sysconfdir}/pki/rpm-gpg/RPM-GPG-KEY-ICINGA
#yum
install -dm 755 $RPM_BUILD_ROOT%{_sysconfdir}/yum.repos.d
install -pm 644 %{SOURCE2} %{SOURCE3} $RPM_BUILD_ROOT%{_sysconfdir}/yum.repos.d
%clean
rm -rf $RPM_BUILD_ROOT
%files
%defattr(-,root,root,-)
%config(noreplace) /etc/yum.repos.d/*
/etc/pki/rpm-gpg/*
%changelog

All distribution releases are organized in git branches, which keeps it fairly simply for Jenkins package builds.
Tip: Downloading the url-referenced sources („SourceX: Url“) works using spectool.

$ cd sources
$ spectool -g ../icinga-rpm-release.spec
modify, add, commit

In the end, you’ll get a nice rpm which installs just fine. No need to worry about the GPG key or where to store the configuration files.

# rpm -i https://packages.icinga.com
# yum search icinga2

See you in the icinga2 training sessions!