Seite wählen

NETWAYS Blog

GitLab CI Runners with Auto-scaling on OpenStack


With migrating our CI/CD pipelines from Jenkins to GitLab CI in the past months, we’ve also looked into possible performance enhancements for binary package builds. GitLab and its CI functionality is really really great in this regard, and many things hide under the hood. Did you know that „Auto DevOps“ is just an example template for your CI/CD pipeline running in the cloud or your own Kubernetes cluster? But there’s more, the GitLab CI runners can run jobs in different environments with using different hypervisors and the power of docker-machine.

One of them is OpenStack available at NWS and ready to use. The following examples are from the Icinga production environment and help us on a daily basis to build, test and release Icinga products.


Preparations

Install the GitLab Runner on the GitLab instance or in a dedicated VM. Follow along in the docs where this is explained in detail. Install the docker-machine binary and inspect its option for creating a new machine.

curl -L https://packages.gitlab.com/install/repositories/runner/gitlab-runner/script.deb.sh | sudo bash
apt-get install -y gitlab-runner
  
curl -L `uname -s`-`uname -m` -o /usr/local/bin/docker-machine
chmod +x /usr/local/bin/docker-machine
  
docker-machine create --driver openstack --help

Next, register the GitLab CI initially. Note: This is just to ensure that the runner is up and running in the GitLab admin interface. You’ll need to modify the configuration in a bit.

gitlab-runner register \
  --non-interactive \
  --url https://git.icinga.com/ \
  --tag-list docker \
  --registration-token SUPERSECRETKEKSI \
  --name "docker-machine on OpenStack" \
  --executor docker+machine \
  --docker-image alpine


Docker Machine with OpenStack Deployment

Edit „/etc/gitlab-runner/config.toml“ and add/modify the „[[runners]]“ section entry for OpenStack and Docker Machine. Ensure that the MachineDriver, MachineName and MachineOptions match the requirements. Within „MachineOptions“, add the credentials, flavors, network settings just as with other deployment providers. All available options are explained in the documentation.

vim /etc/gitlab-runner/config.toml

  [runners.machine]
    IdleCount = 4
    IdleTime = 3600
    MaxBuilds = 100
    MachineDriver = "openstack"
    MachineName = "customer-%s"
    MachineOptions = [
      "openstack-auth-url=https://cloud.netways.de:5000/v3/",
      "openstack-tenant-name=1234-openstack-customer",
      "openstack-username=customer-login",
      "openstack-password=sup3rS3cr3t4ndsup3rl0ng",
      "openstack-flavor-name=s1.large",
      "openstack-image-name=Debian 10.1",
      "openstack-domain-name=default",
      "openstack-net-name=customer-network",
      "openstack-sec-groups="mine",
      "openstack-ssh-user=debian",
      "openstack-user-data-file=/etc/gitlab-runner/user-data",
      "openstack-private-key-file=/etc/gitlab-runner/id_rsa",
      "openstack-keypair-name=GitLab Runner"
    ]

The runners cache can be put onto S3 granted that you have this service available. NWS luckily provides S3 compatible object storage.

  [runners.cache]
    Type = "s3"
    Shared = true
    [runners.cache.s3]
      ServerAddress = "s3provider.domain.localdomain"
      AccessKey = "supersecretaccesskey"
      SecretKey = "supersecretsecretkey"
      BucketName = "openstack-gitlab-runner"

Bootstrap Docker in the OpenStack VM

Last but not least, these VMs need to be bootstrapped with Docker inside a small script. Check the „–engine-install-url“ parameter in the help output:

root@icinga-gitlab:/etc/gitlab-runner# docker-machine create --help
  ...
  --engine-install-url "https://get.docker.com"							Custom URL to use for engine installation 

You can use the official way of doing this, but putting this into a small script also allows customizations like QEMU used for Raspbian builds. Ensure that the script is available via HTTP e.g. from a dedicated GitLab repository 😉

#!/bin/sh
#
# This script helps us to prepare a Docker host for the build system
#
# It is used with Docker Machine to install Docker, plus addons
#
# See --engine-install-url at docker-machine create --help

set -e

run() {
  (set -x; "$@")
}

echo "Installing Docker via get.docker.com"
run curl -LsS https://get.docker.com -o /tmp/get-docker.sh
run sh /tmp/get-docker.sh

echo "Installing QEMU and helpers"
run sudo apt-get update
run sudo apt-get install -y qemu-user-static binfmt-support

Once everything is up and running, the GitLab runners are ready to fire the jobs.


Auto-Scaling

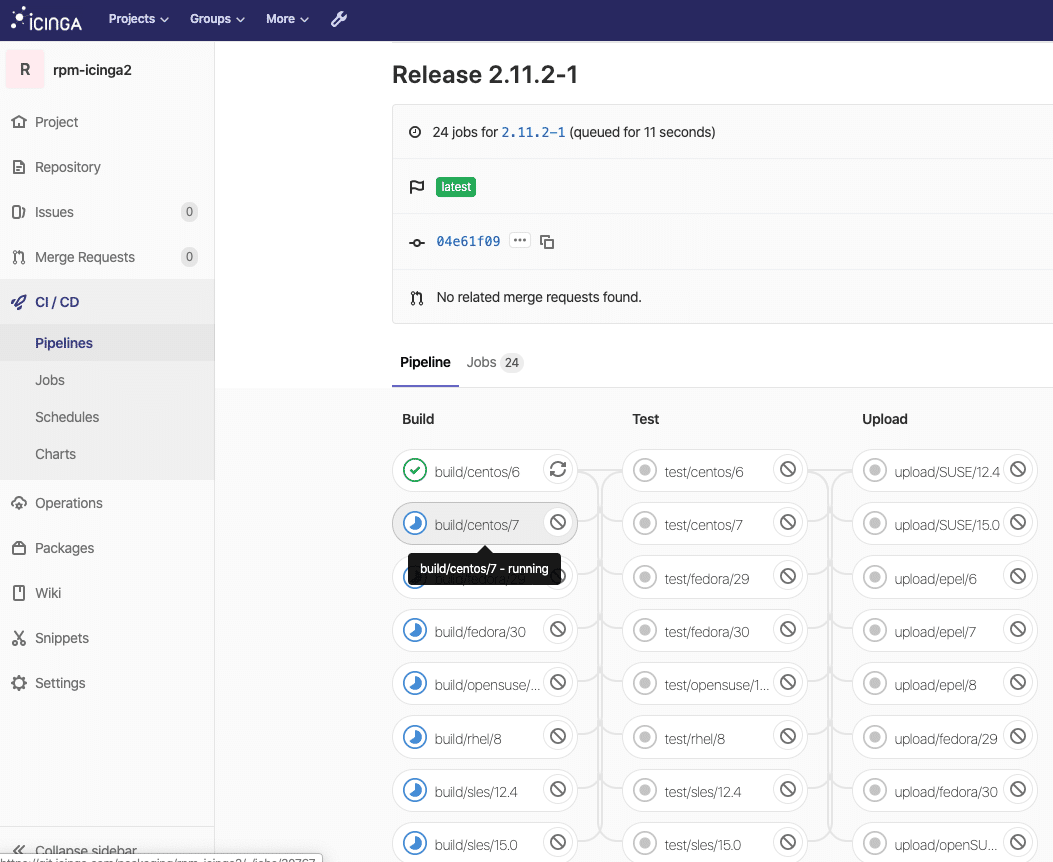
Jobs and builds are not run all the time, and especially with cloud resources, this should be a cost-efficient thing. When building Icinga 2 for example, the 20+ different distribution jobs generate a usage peak. With the same resources assigned all the time, this would tremendously slow down the build and release times. In that case, it is desirable to automatically spin up more VMs with Docker and let the GitLab runner take care of distributing the jobs. On the other hand, auto-scaling should also shut down resources in idle times.

By default, one has 4 VMs assigned to the GitLab runner. These builds run non-privileged in Docker, the example below also shows another runner which can run privileged builds. This is needed for Docker-in-Docker to create Docker images and push them to GitLab’s container registry.

root@icinga-gitlab:~# docker-machine ls
NAME                                               ACTIVE   DRIVER      STATE     URL                      SWARM   DOCKER     ERRORS
runner-privileged-icinga-1571900582-bed0b282       -        openstack   Running   tcp://10.10.27.10:2376           v19.03.4
runner-privileged-icinga-1571903235-379e0601       -        openstack   Running   tcp://10.10.27.11:2376           v19.03.4
runner-non-privileged-icinga-1571904408-5bb761b5   -        openstack   Running   tcp://10.10.27.20:2376           v19.03.4
runner-non-privileged-icinga-1571904408-52b9bcc4   -        openstack   Running   tcp://10.10.27.21:2376           v19.03.4
runner-non-privileged-icinga-1571904408-97bf8992   -        openstack   Running   tcp://10.10.27.22:2376           v19.03.4

Once it detects a peak in the pending job pipeline, the runner is allowed to start additional VMs in OpenStack.

root@icinga-gitlab:~# docker-machine ls
NAME                                               ACTIVE   DRIVER      STATE     URL                      SWARM   DOCKER     ERRORS
runner-privileged-icinga-1571900582-bed0b282       -        openstack   Running   tcp://10.10.27.10:2376           v19.03.4
runner-privileged-icinga-1571903235-379e0601       -        openstack   Running   tcp://10.10.27.11:2376           v19.03.4
runner-non-privileged-icinga-1571904408-5bb761b5   -        openstack   Running   tcp://10.10.27.20:2376           v19.03.4
runner-non-privileged-icinga-1571904408-52b9bcc4   -        openstack   Running   tcp://10.10.27.21:2376           v19.03.4
runner-non-privileged-icinga-1571904408-97bf8992   -        openstack   Running   tcp://10.10.27.22:2376           v19.03.4
runner-non-privileged-icinga-1571904408-97bf8992   -        openstack   Running   tcp://10.10.27.23:2376           v19.03.4

...

runner-non-privileged-icinga-1571904534-0661c396   -        openstack   Running   tcp://10.10.27.24:2376           v19.03.4
runner-non-privileged-icinga-1571904543-6e9622fd   -        openstack   Running   tcp://10.10.27.25:2376           v19.03.4
runner-non-privileged-icinga-1571904549-c456e119   -        openstack   Running   tcp://10.10.27.27:2376           v19.03.4
runner-non-privileged-icinga-1571904750-8f6b08c8   -        openstack   Running   tcp://10.10.27.29:2376           v19.03.4


In order to achieve this setting, modify the runner configuration and increase the limit.

vim /etc/gitlab-runner/config.toml

[[runners]]
  name = "docker-machine on OpenStack"
  limit = 24
  output_limit = 20480
  url = "https://git.icinga.com/"
  token = "supersecrettoken"
  executor = "docker+machine"

This would result in 24 OpenStack VMs after a while, and all are idle 24/7. In order to automatically decrease the deployed VMs, use the OffPeak settings. This also ensures that resources are available during workhours while spare time and weekend are considered „off peak“ with shutting down unneeded resources automatically.

    OffPeakTimezone = "Europe/Berlin"
    OffPeakIdleCount = 2
    OffPeakIdleTime = 1800
    OffPeakPeriods = [
      "* * 0-8,22-23 * * mon-fri *",
      "* * * * * sat,sun *"
    ]

Pretty neat functionality 🙂


Troubleshooting & Monitoring

„docker-machine ls“ provides the full overview and tells whenever e.g. a connection to OpenStack did not work, or if the VM is currently unavailable.

root@icinga-gitlab:~# docker-machine ls
NAME                                               ACTIVE   DRIVER      STATE     URL                      SWARM   DOCKER     ERRORS
runner-privileged-icinga-1571900582-bed0b282       -        openstack   Error                                      Unknown    Expected HTTP response code [200 203] when accessing [GET https://cloud.netways.de:8774/v2.1/servers/], but got 404 instead

In case you have deleted the running VMs to start fresh, provisioning might take a while and the above can be a false positive. Check the OpenStack management interface to see whether the VMs booted correctly. You can also remove a VM with „docker-machine rm <id>“ and run „gitlab-runner restart“ to automatically provision it again.

Whenever the VM provisioning fails, a gentle look into the syslog (or runner log) unveils what’s the problem. Lately we had used a wrong OpenStack flavor configuration which was fixed after investigating in the logs.

Oct 18 07:08:48 3 icinga-gitlab gitlab-runner[30988]:  #033[31;1mERROR: Error creating machine: Error in driver during machine creation: Unable to find flavor named 1234-customer-id-4-8#033[0;m  #033[31;1mdriver#033[0;m=openstack #033[31;1mname#033[0;m=runner-non-privilegued-icinga-1571375325-3f8176c3 #033[31;1moperation#033[0;m=create

Monitoring your GitLab CI runners is key, and with the help of the REST API, this becomes a breeze with Icinga checks. You can inspect the runner state and notify everyone on-call whenever CI pipelines are stuck.


Conclusion

Developers depend on fast CI feedback these days, speeding up their workflow – make them move fast again. Admins need to understand their requirements, and everyone needs a deep-dive into GitLab and its possibilities. Join our training sessions for more practical exercises or immediately start playing in NWS!

Cachet now available at NETWAYS Web Services

We think communication is crucial. Especially during downtimes. That’s why we release a new app today. An app, which allows you to share all necessary information about your services and servers with your users. Cachet is software that improves downtime.

Cachet is a status page, which is very simple to use, yet it offers many opportunities, to better communicate downtime and system outages to customers, teams and shareholders. You can display the status of your services, websites and servers. You can create and show metrics, plan maintenances or inform your users about current issues.


Cachet comes with a powerfull API. In the detailed documentation you can generate your calls for whatever you want to create or change. All information which can be created and edited in the admin panel, can also be created and changed with an API call. The interesting part about Cachet is that administrators have the opportunity to automate the updates. For example with data of your monitoring or some scripts on your hosts which check some services.

In the following command, you would create a new incident with the name „Down“ and the message „A server went down„.

  • It will be in the state „1„, which means „investigating
  • The component which is affected by this incident has the id 2, which is in this case „My Login
  • The component will be in state „4„, which means „Major Outage
  • Notify: true – so your user would receive an email with about this incident.

mgebert@MacBook-Pro ~ $ curl --request POST --url -H "Content-Type: application/json;" -H "X-Cachet-Token: j5t0mNvvh57ubO84TxJq" --data '{"name":"Down","message":"A server went down.","status":1,"visible":1,"component_id":2,"component_status":4,"notify":"true"}'

If you want to notify your users as soon as an incident was reported, you will have to configure the credentials for your mailserver and enable the „Subscribe“ button, which can be done in the settings quite simple.

But if you don’t want to use the API, you can create and manage your information just by changing the states of your components and incidents, as you can see in the screenshots below.


You can start your own Cachet app at the NWS platform now on our platform. First 30 days are for free and the app will be ready within 5 minutes – so what are you waiting for?

Last but not least, I want to share with you the link to a temporary available demo installation, so you can have a look at it right now. Check it out!

Cleanup your Docker Environment

Using Docker is pretty common meanwhile and a very good idea for development. Using many versions of your favourite language without messing up your host system, different types of deployments (e.g. web servers) or just testing production environment without operational support. The only drawback is that normally you don’t have a clue what’s going on behind the scenes. If you run out of disk space for the first time, you’re exactly at that point.

To apply first aid, you will be advised to use some curious cli hacks to clean up your system. Breaking fingers between grep, sed and awk works out well but is not very helpful – Especially if you want to remember what you did 3 months before 😉

Since Docker Api version 1.25 you have a couple of high level cli commands available doing exactly this job:

Minimal Cheat Sheet:

[bash light=“false“]
$ # Claimed disk space
$ docker system df
TYPE TOTAL ACTIVE SIZE RECLAIMABLE
Images 59 5 10.74GB 9.038GB (84%)
Containers 6 1 991kB 991kB (99%)
Local Volumes 216 1 5.876GB 5.876GB (100%)
Build Cache 0 0 0B 0B

$ # Cleanup disk space
$ docker system prune
WARNING! This will remove:
– all stopped containers
– all networks not used by at least one container
– all dangling images
– all dangling build cache
Are you sure you want to continue? [y/N] Y
Deleted Containers:
02401e1555e8e752d36198d982b5e4114d0999c7cca34a2353e8dc332faa4db5
997eac76d4a46515797027103967c61b46219ff8c70f6e0bb39bc2b975297fa5
23983ed8abaa60198b497e4b3788bb6de7d39d03f171f43e4ee865c0df318ab8
65bb90b9e7edcd2d13da3129664f8b74a72b011d56136cb28c687f1f8dd8e473
5218788bff77cc0c0cc03f79888ea61c3e27bf3ef0003e41fc231b8b6ecdcdc2

Deleted Images:
deleted: sha256:dccdc3cf7d581b80665bad309b66ba36d88219829e1ade951912dc122b657bfc
[…]
[/bash]

There is also an equivalent for images only:

[bash light=“false“]
$ docker image prune
[/bash]

You should definitely take a deeper look into the CLI commands. There are a lot of things that helps you to solve your every day problems!

Marius Hein
Marius Hein
Head of IT Service Management

Marius Hein ist schon seit 2003 bei NETWAYS. Er hat hier seine Ausbildung zum Fachinformatiker absolviert und viele Jahre in der Softwareentwicklung gearbeitet. Mittlerweile ist er Herr über die interne IT und als Leiter von ITSM zuständig für die technische Schnittmenge der Abteilungen der NETWAYS Gruppe. Wenn er nicht gerade IPv6 IPSec Tunnel bohrt, sitzt er daheim am Schlagzeug und treibt seine Nachbarn in den Wahnsinn.

Terraform Changes

Hallo!

Was vielen von unseren Lesern entgeht, ist das wir auch in unserem Alltag zwischen der ganzen Softwareschreiber- und Kompilier- Tätigkeiten auch ganz viele virtuelle Maschinen und Container zum testen selbiger Software rauf und runter installieren müssen, und das Tag für Tag.

Deshalb versuchen wir uns das Leben mit dafür erstellter Software und deren arbeitserleichternden Funktionen leichter zu machen. Wie mein Kollege schon in seinem Blogpost im März mir vorgegriffen hat, benutzen wir bei der Netways Terraform. Achim wird in weiteren Artikeln darauf eingehen wie man Openstack per Terraform nach seiner Pfeife tanzen lassen kann und Ich möchte mich heute auf ein anderes Terraform Thema beziehen, nämlich dem nahen Release von Terraform 0.12.

Zu dem Zeitpunkt wo ich diese Zeilen niederschreibe, ist auf der aktuellen Website von Hashicorp noch die Aktuelle Version 0.11.13 zu finden.

Aber Terraform hat uns schon vielversprechendes gezeigt mit dem 0.12.0-beta1 pre-release.

Damit kann man schon die vielen Erleichterungen, welche der neue Terraform Release mit sich bringt erahnen und auch schon antesten. Ich versuche die Änderungen Anhand eines kleinen Beispiels zu erläutern.
Vielleicht kann ich den einen oder anderen IaaS Codeschreiber, welcher sich hierfür interessiert, etwas auf den Geschmack zu bringen schon etwas zu testen mit der neuen Version.

Hier der Unterschied zwischen einer (aktuell 0.11.13) alten Terraform Version und einer neuen Version in Terraform 0.12 durch eine Gegenüberstellung.

main.tf (Random Tiernamen Beispiel)

variable "count" { default = 1 } variable "default_prefix" { default = "Giraffe" } variable "zoo_enabled" { default = "0" } variable "prefix_liste" { default = [] } resource "random_pet" "my_pet" { count = "${var.count}" prefix = "${var.zoo_enabled == "0" ? var.default_prefix : element(concat(var.prefix_liste, list (""), count.index)}" }

main.tf HCL2 Version(Random Tiernamen Beispiel)

variable "pet_count" { default = 1 } variable "default_prefix" { default = "Giraffe" } variable "prefix_list" { default = [] } resource "random_pet" "my_pet" { count = var.pet_count prefix = var.zoo_enabled ? element(var.prefix_list, count.index) : var.default_prefix }

Die Unterschiede fallen zuerst etwas weniger ins Auge, sind aber dafür meines Erachtens tiefgreifender für Leute, die IaaS Code schreiben müssen und dienen der Lesbarkeit des Codes.

Vorteil Nummer 1:
Im alten Beispiel musste noch mit „${var.count}“ von einem String zu einer Number evaluiert werden. Mit der neuen HCL2 Schreibweise entfällt das, und es kann mit var.pet_count direkt der korrekte String oder Number Wert adressiert werden.

Vorteil Nummer 2:
Auch die Evaluierung der Liste prefix = „${var.zoo_enabled == „0“ ? var.default_prefix : element(concat(var.prefix_liste, list („“), count.index)}“  wird mit der neuen Notation der HCL2 wesentlich eingängiger. prefix = var.zoo_enabled ? element(var.prefix_list, count.index) : var.default_prefix ist prägnanter. Es entfällt auch die element(concat(x), list(„“), x ) Hack-Situation, um aus einer leeren Liste auch eine Liste mit einem NULL Element zum machen.

Weitere Vorteile: es gibt viel mehr was geändert worden ist, if you want to know more, klick here.

Ich hoffe ich habe euch nicht zu sehr gelangweilt mit C.O.D.E. kurz vor dem Wochenende.

Gruß David


David Okon
David Okon
Senior Systems Engineer

Weltenbummler David hat aus Berlin fast den direkten Weg zu uns nach Nürnberg genommen. Bevor er hier anheuerte, gab es einen kleinen Schlenker nach Irland, England, Frankreich und in die Niederlande. Alles nur, damit er sein Know How als IHK Geprüfter DOSenöffner so sehr vertiefen konnte, dass er vom Apple Consultant den Sprung in unser Professional Services-Team wagen konnte. Er ist stolzer Papa eines Sohnemanns und bei uns mit der Mission unterwegs, unsere Kunden zu glücklichen Menschen zu machen.

Quick and Dirty: OpenStack + CoreOS + GitLab Runner

Wer in GitLab die CI/CD-Features nutzen möchte und nicht zufällig einen ungenutzten Kubernetes-Cluster übrig hat, mit dem man GitLab’s Auto DevOps Funktion einrichten kann, der benötigt zumindest einen GitLab Runner, um Build-Jobs und Tests zum Laufen zu bekommen.
Der GitLab Runner ist eine zusätzliche Anwendung, welche sich ausschließlich darum kümmert, bei einer GitLab-CE/-EE Instanz die CI/CD-Aufträge abzuholen und diese abzuarbeiten. Der Runner muss dabei nicht zwingend auf dem selben System wie das GitLab installiert sein und kann somit auch extern auf einem anderen Host laufen. Der Hintergrund, weshalb man das auch so umsetzen sollte, ist eigentlich recht klar: ein GitLab Runner steht bei einer aktiven CI/CD-Pipeline oftmals unter hoher Last und würde er auf dem gleichen Host wie das GitLab selbst laufen, so könnte er dessen Performance stark beeinträchtigen. Deshalb macht es Sinn, den GitLab Runner z.B. auf eine VM in OpenStack auszulagern.
In diesem Blogpost werde ich kurz darauf eingehen, wie man schnell und einfach eine GitLab Runner VM per CLI in OpenStack aufsetzen kann. Da ich den Runner als Docker-Container starten möchte, bietet sich CoreOS an. CoreOS kommt mit Docker vorinstalliert und es bietet die Möglichkeit per Ignition Config nach dem Start des Betriebssystems Container, oder auch andere Prozesse, automatisch starten zu lassen.

Sobald man sich bei seinem OpenStack-Anbieter in sein Projekt eingeloggt hat, kann man sich dort unter „API Zugriff“ die OpenStack-RC-Datei herunterladen. Damit kann man sich dann recht einfach per CLI bei OpenStack authentifizieren. Voraussetzung für die Nutzung der CLI ist, dass man bei sich den OpenStack Command-Line Client installiert hat.
Sobald man beides hat, kann es auch schon losgehen:

    1. Runner Registration Token abholen
      Dazu loggt man sich als Admin in sein GitLab-CE/-EE ein und navigiert zu „Admin Area“ -> „Overview“ -> „Runners“. Hier findet man den aktuellen Registration Token.
    2. CoreOS Ignition Config
      Die Konfigurationsdatei für CoreOS nennt man z.B. config.ign. Diese legt man sich ebenfalls auf dem Rechner ab.
      Der Inhalt muss im nächsten Schritt geringfügig angepasst werden.

      config.ign

      { "ignition": { "version": "2.2.0", "config": {} }, "storage": { "filesystems": [{ "mount": { "device": "/dev/disk/by-label/ROOT", "format": "btrfs", "wipeFilesystem": true, "label": "ROOT" } }] }, "storage": { "files": [{ "filesystem": "root", "path": "/etc/hostname", "mode": 420, "contents": { "source": "data:,core1" } }, { "filesystem": "root", "path": "/home/core/config.toml", "mode": 644, "contents": { "source": "data:,concurrent=4" } } ] }, "systemd": { "units": [ { "name": "gitlab-runner.service", "enable": true, "contents": "[Service]\nType=simple\nRestart=always\nRestartSec=10\nExecStartPre=/sbin/rngd -r /dev/urandom\nExecStart=/usr/bin/docker run --rm --name gitlab-runner -e 'GIT_SSL_NO_VERIFY=true' -v /home/core:/etc/gitlab-runner -v /var/run/docker.sock:/var/run/docker.sock gitlab/gitlab-runner:v11.8.0 \n\n[Install]\nWantedBy=multi-user.target" }, { "name": "gitlab-runner-register.service", "enable": true, "contents": "[Unit]\nRequires=gitlab-runner.service\n[Service]\nType=simple\nRestart=on-failure\nRestartSec=20\nExecStart=/usr/bin/docker exec gitlab-runner gitlab-runner register -n --env 'GIT_SSL_NO_VERIFY=true' --url https://$URL -r $TOKEN --description myOpenStackRunner--locked=false --executor docker --docker-volumes /var/run/docker.sock:/var/run/docker.sock --docker-image ruby:2.5 \n\n[Install]\nWantedBy=multi-user.target" } ] }, "networkd": {}, "passwd": { "users": [ { "name": "core", "sshAuthorizedKeys": [ "$your-ssh-pub-key" ] } ] } }
    3. Ignition Config anpassen
      Beim Systemd-Unit „gitlab-runner-register.service“ setzt man im Content bei den Variablen „$URL“ den FQDN der eigenen GitLab-Instanz und bei „$TOKEN“ den in Schritt 1 kopierten Registration Token ein.
      Außerdem kann man gleich noch seinen SSH-Key mitgeben, damit man später auch per SSH auf die VM zugreifen kann. Diesen hinterlegt man unter dem Abschnitt „passwd“ im Platzhalter „$your-ssh-pub-key“.
    4. CLI Commands
      Nun kann man sich auch schon das Kommando zum anlegen der VM zusammenbauen.
      Als erstes muss man sich bei OpenStack authentifizieren, indem man die Datei sourced, die man sich eingangs aus seinem OpenStack Projekt geladen hat und dabei sein OpenStack Passwort angibt:

      source projectname-openrc.sh

      Man sollte außerdem sicherstellen, dass in dem Projekt ein CoreOS Image zur Verfügung steht.
      Anschließend kann man nach folgendem Schema die Runner-VM anlegen:

      openstack server create --network 1826-openstack-7f8d2 --user-data config.ign --flavor s1.medium --image CoreOS_Live "GitLab Runner"

      Network, Flavor und Image sollten aber individuell noch angepasst werden.

    Nach ca. zwei Minuten sollte dann der Runner auch schon zur Verfügung stehen. Überprüfen lässt sich das, indem man sich als Admin in seine GitLab-Instanz einloggt und im Bereich unter „Admin Area“ -> „Overview“ -> „Runners“ nach einem Runner mit dem Namen „myOpenStackRunner“ nachsieht.

    Wer noch auf der Suche nach einem OpenStack-Provider ist, der wird bei den NETWAYS Web Services fündig. Mit nur wenigen Clicks hat man sein eigenes OpenStack-Projekt und kann sofort loslegen.

Gabriel Hartmann
Gabriel Hartmann
Senior Systems Engineer

Gabriel hat 2016 als Auszubildender Fachinformatiker für Systemintegrator bei NETWAYS angefangen und 2019 die Ausbildung abgeschlossen. Als Mitglied des Web Services Teams kümmert er sich seither um viele technische Themen, die mit den NETWAYS Web Services und der Weiterentwicklung der Plattform zu tun haben. Aber auch im Support engagiert er sich, um den Kunden von NWS bei Fragen und Problemen zur Seite zu stehen.