Seite wählen

NETWAYS Blog

Hurra, hurra … der Bio-Milch-Mann ist da!

Vor einiger Zeit haben wir über das Billig-Milch-Dilemma bei Aldi, Rewe, etc. diskutiert. Zunächst auf Twitter, dann aber auch mal offline in lockerer Runde. Dass am Ende sehr wenig Ertrag bei unseren Bauern ankommt, steht ausser Frage. Und dass wir das nicht gut gefunden haben, auch. Da wir bei NETWAYS gerne mal Tagesthemen und Probleme angehen, haben wir uns gefragt, wo wir selbst noch nachhaltiger werden können. Dabei ist uns aufgefallen, dass die Paletten an Milch für unseren Kaffee und die myMuesli-Versorgung auch auf dieser Milch-Billig-Schiene basieren. Haltbarmilch, fettarm, aber dennoch … „wir sollten Biomilch einkaufen, fertig, aus.“ war eine spontane Idee von Bernd und Vanessa.
Es ist ein bisschen Gras über die Sache gewachsen. An einem schönen Tag im Büro waren plötzlich keine Milchpackerl mehr da. Stattdessen Biomilch in grösseren Behältnissen, frisch mit Sahne oben drauf. Eine ganz andere Welt, die gut schmeckt, und mit dem Gefühl der Nachhaltigkeit noch deutlich besser schmeckt 🙂

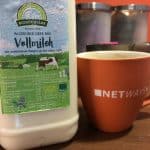
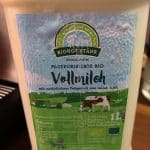
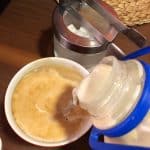
Wer sich nun frägt – „das ist ja Plastik und kein Glas“. Jepp, wir reinigen die Flaschen selbst und geben diese bei unserer wöchentlichen Lieferung wieder zurück. Grössere Kühlschränke brauchen wir jetz halt, aber das kriegn ma auch noch 😉
Ich habe mich selbst dabei ertappt, dass ich im Supermarkt nicht mehr zu meiner „üblichen“ schnellen Milch greife (die auch den 61-Cent-Stempel trägt, wenn man mal genau hinschaut), sondern selektiv Bio-Milch nehme. Kostet zwar einen Euro, dafür schmeckt der Julius-Meinl-Kaffee deutlich besser damit. Die guten Dinge im Leben muss man einfach nachhaltig geniessen ❤️

Continuous Integration with Golang and GitLab

Today you not only develop code and collaborate with other developers in your Git branches and forks. In addition continuous integration helps with „instant“ compile and runtime tests. Which Git commit caused a failure, are there any performance changes with the recent code history?
Today I want to dive into our latest insights into Golang and building our code inside GitLab on each push and merge request. Golang extensively supports unit tests and also their analysis with coverage tests. This ensures that code isolated in test interfaces runs rock-solid and you can focus on the more important tasks and features.
In order to abstract the Go build and install calls, we add a Makefile for convenience. This also allows developers to manually use it, if they want.

$ vim Makefile
.PHONY: all test coverage
all: get build install
get:
        go get ./...
build:
        go build ./...
install:
        go install ./...
test:
        go test ./... -v -coverprofile .coverage.txt
        go tool cover -func .coverage.txt
coverage: test
        go tool cover -html=.coverage.txt

The „coverage“ target runs the tests and stores the coverage results in „.coverage.txt“. This is then converted into HTML and can be opened with a browser for example.
Inside GitLab we need a CI runner configured for our project and job pipeline. This is already available in the NWS app. If you want to learn more about GitLab CI/CD, containers, jobs and pipelines, I’ll invite you to join me for the official GitLab training sessions 🙂
The CI configuration file is stored in „.gitlab-ci.yml“ inside the Git repository and uses the Golang image for Debian Stretch in this example.

$ vim .gitlab-ci.yml
image: golang:1.10-stretch
stages:
  - build
before_script:
  - apt-get update && apt-get install -y make curl
  - curl https://raw.githubusercontent.com/golang/dep/master/install.sh | sh
  - mkdir -p /go/src/git.icinga.com/icingadb
  - ln -s /builds/icingadb/icingadb /go/src/git.icinga.com/icingadb/icingadb
  - cd /go/src/git.icinga.com/icingadb/icingadb
  - dep init && dep ensure
build:
  stage: build
  script:
    - make test

The „before_script“ tasks can be moved into your own Docker image which can be made available in the GitLab container registry too. At some later point when dependencies are fixed, we’ll remove the „dep init“ step and just use the locked versions from inside our Git repository.
The test coverage should also be highlighted in the job output. This can be extracted with a regular expression using the shell output from the tests. Nagivate into „Settings > CI/CD > General pipeline settings > Test coverage parsing“ and add the following regex:

^total:\t+\(statements\)\t+(\d+\.\d+)%

Each pushed branch and merge request will then automatically be built and also shows the test coverage. There’s room for improvement here, the next months will ensure to add more unit and runtime tests ?

Releasing our Git and GitLab training as Open Source

Development is super fast these days, there are many tools and integrations to make it more comfortable. One of the version control systems is Git, next to well-known SVN and CVS. Git got really pushed by GitHub and most recently GitLab which provide entire collaboration suites. Nowadays you not only commit code revisions/diffs, you can also test and deployment changes immediately to see whether your code is good on defined platforms or breaks. Issue and project management is put on top and makes it very easy to collaborate.
Continuous integration (CI) allows for deeper code quality too. Add code coverage reports, unit test results, end2end tests and actually build distribution packages with tests on many platforms included. In addition to CI, continuous deployment (CD) adds the icing on the cake. Once CI tests and package builds are fine, add a new build job to your pipeline for automated deployments. This could for example push updated RPM packages for your repository and immediately install the bugfix release in production on all your client hosts with Puppet or Ansible.
You can do all of this with the ease of GitHub or your own hosted GitLab instance (try it out in NWS right now!). Don’t forget about the basics for development and devops workflows:

  • Untracked files, staging area, … what’s within the .git directory?
  • What is a „good commit„?
  • I want to create patch for an open source project – what’s a „pull request„?
  • Workflow with branches?
  • A developer asked me to „rebase your branch against master“ and „squash the commits“ … what’s that?

Our Git training sessions have been renewed into a two day hands-on session on Git and GitLab. Many of us are using Git on a daily basis at NETWAYS, in addition to GitLab. Knowledge which we share and improve upon. The training starts with the Git basics, diving into good commits, branching, remote repositories and even more. Day 1 also provides your own NWS hosted GitLab instance.
Starting with day 2, you’ll learn about development workflows with branches and real-life use cases. Continuing with CI/CD and generating your own Job pipeline, and exploring GitLab even further. We’ll also discuss integrations into modern development tools (Visual Studio, JetBrains, etc.) and have time to share experiences from daily work. I’ve been working with Git since the beginning of Icinga more than nine years ago.
We have open-sourced our GitLab training material. We truly believe in Open Source and want make it easier for development and contributions on your favourite OSS project, like Icinga.
You are welcome to use our training material for your own studies, especially if you are an open source developer who’s been learning to use Git, GitLab and GitHub. For offline convenience, the handouts, exercises and solutions are provided as PDF too.
Many of the mentioned practical examples and experiences are only available in our two day training sessions at NETWAYS so please consider getting a ticket. There’s also time for your own experience and ideas – the previous training sessions have shown that you can always learn something new about Git. You can see that in the Git repository and the newer Git commits, where this feedback was added to the training material ❤️
See you soon at the famous NETWAYS Kesselhaus for a deep-dive into Git and GitLab!
Please note that the training material is licensed under Creative Commons Attribution-NonCommercial-ShareAlike 4.0 International.

Modern open source community platforms with Discourse

Investing into open source communities is key here at NETWAYS. We do a lot of things in the open, encourage users with open source trainings and also be part of many communities with help and code, be it Icinga, Puppet, Elastic, Graylog, etc.
Open source with additional business services as we love and do only works if the community is strong, and pushes your project to the next level. Then it is totally ok to say „I don’t have the time to investigate on your problem now, how about some remote support from professionals?“. Still, this requires a civil discussion platform where such conversations can evolve.
One key factor of an open source community is to encourage users to learn from you. Show them your appreciation and they will like it and start helping others as you do. Be a role model and help others on a technical level, that’s my definition of a community manager. Add ideas and propose changes and new things. Invest time and make things easier for your community.
I’ve been building a new platform for monitoring-portal.org based on Discourse in the last couple of days. The old platform based on Woltlab was old-fashioned, hard to maintain, and it wasn’t easy to help everyone. It also was closed source with an extra license, so feature requests were hard for an open source guy like me.
Discourse on the other hand is 100% open source, has ~24k Github stars and a helping community. It has been created by the inventors of StackOverflow, building a conversation platform for the next decade. Is is fast, modern, beautiful and both easy to install and use.
 

Setup as Container

Discourse only supports running inside Docker. The simplest approach is to build everything into one container, but one can split this up too. Since I am just a beginner, I decided to go for the simple all-in-one solution. Last week I was already using the 1.9.0beta17, running really stable. Today they released 1.9.0, I’ll share some of the fancy things below already 🙂
Start on a fresh VM where no applications are listening on port 80/443. You’ll also need to have a mail server around which accepts mails via SMTP. Docker must be installed in the latest version from the Docker repos, don’t use what the distribution provides (Ubuntu 14.04 LTS here).

mkdir /var/discourse
git clone https://github.com/discourse/discourse_docker.git /var/discourse
cd /var/discourse
./discourse-setup

The setup wizard ask several questions to configure the basic setup. I’ve chosen to use monitoring-portal.org as hostname, and provided my SMTP server host and credentials. I’ve also set my personal mail address as contact. Once everything succeeds, the configuration is stored in /var/discourse/container/app.yml.
 

Nginx Proxy

My requirement was to not only serve Discourse at /, but also have redirects for other web applications (the old Woltlab based forum for example). Furthermore I want to configure the SSL certificates in a central place. Therefore I’ve been following the instructions to connect Discourse to a unix socket via Nginx.

apt-get install nginx
rm /etc/nginx/sites-enabled/default
vim /etc/nginx/sites-available/proxy.conf
server {
    listen 443 ssl;  listen [::]:443 ssl;
    server_name fqdn.com;
    ssl on;
    ssl_certificate      /etc/nginx/ssl/fqdn.com-bundle.crt;
    ssl_certificate_key  /etc/nginx/ssl/fqdn.com.key;
    ssl_protocols TLSv1.2 TLSv1.1 TLSv1;
    ssl_ciphers ECDHE-RSA-AES128-GCM-SHA256:ECDHE-ECDSA-AES128-GCM-SHA256:ECDHE-RSA-AES256-GCM-SHA384:ECDHE-ECDSA-AES256-GCM-SHA384:DHE-RSA-AES128-GCM-SHA256:DHE-DSS-AES128-GCM-SHA256:kEDH+AESGCM:ECDHE-RSA-AES128-SHA256:ECDHE-ECDSA-AES128-SHA256:ECDHE-RSA-AES128-SHA:ECDHE-ECDSA-AES128-SHA:ECDHE-RSA-AES256-SHA384:ECDHE-ECDSA-AES256-SHA384:ECDHE-RSA-AES256-SHA:ECDHE-ECDSA-AES256-SHA:DHE-RSA-AES128-SHA256:DHE-RSA-AES128-SHA:DHE-DSS-AES128-SHA256:DHE-RSA-AES256-SHA256:DHE-DSS-AES256-SHA:DHE-RSA-AES256-SHA:ECDHE-RSA-DES-CBC3-SHA:ECDHE-ECDSA-DES-CBC3-SHA:AES128-GCM-SHA256:AES256-GCM-SHA384:AES128-SHA256:AES256-SHA256:AES128-SHA:AES256-SHA:AES:CAMELLIA:DES-CBC3-SHA:!aNULL:!eNULL:!EXPORT:!DES:!RC4:!MD5:!PSK:!aECDH:!EDH-DSS-DES-CBC3-SHA:!EDH-RSA-DES-CBC3-SHA:!KRB5-DES-CBC3-SHA;
    ssl_prefer_server_ciphers on;
    # openssl dhparam -out /etc/nginx/ssl/dhparam.pem 4096
    ssl_dhparam /etc/nginx/ssl/dhparam.pem;
    # OCSP Stapling ---
    # fetch OCSP records from URL in ssl_certificate and cache them
    ssl_stapling on;
    ssl_stapling_verify on;
    location / {
        error_page 502 =502 /errorpages/discourse_offline.html;
        proxy_intercept_errors on;
        # Requires containers/app.yml to use websockets
        proxy_pass http://unix:/var/discourse/shared/standalone/nginx.http.sock:;
        proxy_set_header Host $http_host;
        proxy_http_version 1.1;
        proxy_set_header X-Forwarded-For $proxy_add_x_forwarded_for;
        proxy_set_header X-Forwarded-Proto https;
    }
}
ln -s /etc/nginx/sites-available/proxy.conf /etc/nginx/sites-enabled/proxy.conf
service nginx restart

Another bonus of such a proxy is to have a maintenance page without an ugly gateway error.
The full configuration can be found here.
 

Plugins

Installation is a breeze – just add the installation calls into the app.yml file and rebuild the container.

# egrep -v "^$|#" /var/discourse/containers/app.yml
templates:
  - "templates/postgres.template.yml"
  - "templates/redis.template.yml"
  - "templates/web.template.yml"
  - "templates/web.ratelimited.template.yml"
expose:
params:
  db_default_text_search_config: "pg_catalog.english"
env:
  LANG: en_US.UTF-8
  DISCOURSE_HOSTNAME: fqdn.com
  DISCOURSE_DEVELOPER_EMAILS: 'contact@fqdn.com'
  DISCOURSE_SMTP_ADDRESS: smtp.fqdn.com
  DISCOURSE_SMTP_PORT: 587
  DISCOURSE_SMTP_USER_NAME: xxx
  DISCOURSE_SMTP_PASSWORD: xxx
volumes:
  - volume:
      host: /var/discourse/shared/standalone
      guest: /shared
  - volume:
      host: /var/discourse/shared/standalone/log/var-log
      guest: /var/log
hooks:
  after_code:
    - exec:
        cd: $home/plugins
        cmd:
          - git clone https://github.com/discourse/docker_manager.git
          - git clone https://github.com/discourse/discourse-akismet.git
          - git clone https://github.com/discourse/discourse-solved.git
run:
  - exec: echo "Beginning of custom commands"
  - exec: echo "End of custom commands"
./launcher rebuild app

Akismet checks against spam posts as you know it from WordPress. We’ve learned that spammers easily crack reCaptcha, and the only reliable way is filtering the actual posts.
The second useful plugin is for accepting an answer in a topic, marking it as solved. This is really useful if your platform is primarily used for Q&A topics.
 

Getting Started

Once everything is up and running, navigate to your domain in your browser. The simple setup wizard greets you with some basic questions. Proceed as you like, and then you are ready to build the platform for your own needs.
The admin interface has lots of options. Don’t fear it – many of the default settings are from best practices, and you can always restore them if you made a mistake. There’s also a filter to only list overridden options 🙂

Categories and Tags

Some organisation and structure is needed. The old-fashioned way of choosing a sub forum and adding a topic in there is gone. Still Discourse offers you to require a category from users. Think of monitoring – a question on the Icinga Director should be highlighted in a specific category to allow others to catch up.
By the way – you can subscribe to notifications for a specific category. This helps to keep track only for Icinga related categories for example.
In addition to that, tags help to refine the topics and make them easier to search for.

Communication matters

There are so many goodies. First off, you can start a new topic just from the start page. An overlay page which saves the session (!) is here for you to edit. Start typing Markdown, and see it pre-rendered live on the right side.
You can upload images, or paste an URL. Discourse will trigger a job to download this later and use a local cache. This avoids broken images in the future. If you paste a web link, Discourse tries to render a preview in „onebox“. This also renders Github URLs with code preview.
Add emotions to your discussion, appreciate posts by others and like them, enjoy the conversation and share it online. You can even save your draft and edit it amongst different sessions, e.g. after going home.


Tutorials, Trust Level and Rewards

Once you register a new account (you can add oauth apps from Twitter, Github, etc.!), a learning bot greets you. This interactive tutorial helps you learning the basics with likes, quotes, urls, uploads, and rewards you with a nice certificate in the end.
New users don’t start with full permissions, they need to earn their trust. Once they proceed with engaging with the community, their trust level is raised. The idea behind this is not to have moderators and admins regulating the conversation, but let experienced members to it. Sort of self healing if something goes wrong.
Users who really engage and help are able to earn so-called badges. These nifty rewards are highlighted on their profile page, e.g. for likes, number of replies, shared topics, even accepted solutions for questions. A pure motivation plaything built into this nice piece of open source software.


Wiki and Solved Topics

You can change topics to wiki entries. Everyone can edit them, this way you’ll combine the easiness of writing things in Markdown with a full-blown documentation wiki.
Accepting a replay as solution marks a topic as „solved“. This is incredibly helpful for others who had the same problem.


Development

As an administrator, you’ll get automated page profiling for free. This includes explained SQL queries, measured page load time, and even flame graphs.
If you ever need to reschedule a job, e.g. for daily badge creation, admins can access the Sidekiq web UI which really is just awesome.
Plugin development seems also easy if you know Ruby and EmberJS. There are many official plugins around which tested before each release.


Discourse also has a rich REST API. Even a monitoring endpoint.
 

Maintenance

You can create backups on-demand in addition to regular intervals. You can even restore an old backup directly from the UI.


Conclusion

Discourse is used by many communities all over the world – Graylog, Elastic, Gitlab, Docker, Grafana, … have chosen to use the power of a great discussion platform. So does monitoring-portal.org as a #monitoringlove community. A huge thank you to the Discourse team, your software is pure magic and just awesome 🙂
My journey in building a new community forum from scratch in just 5 days can be read here 🙂
monitoring-portal.org running Discourse is fully hosted at NETWAYS, including SSL certificates, Puppet deployment and Icinga for monitoring. Everything I need to build an awesome community platform. You too?
 

Replace spaces with tabs in Visual Studio 2017

Visual Studio has several source code edit settings. This defaults to 4 spaces and no tabs by default and is slightly different to what we use in Icinga 2. There we put focus on tabs in our code style.
Editing the Icinga 2 source code on Windows with Visual Studio requires adjusting the editor settings. Navigate into Tools > Options > Text Editor > C# and C++ and adjust the settings to „Keep tabs“.


I accidentally forgot to specify these settings for C# too, and had the problem that half of the Icinga 2 setup wizard code had 4 spaces instead of tabs. Luckily I’ve found this blog post which sheds some lights in the comments.
Hit Ctrl+H to open the replace search window. Tick the icon to use regular expressions and search for „((\t)*)([ ]{4})“. Add „\t“ as replacement text.

Happy coding for Icinga 2 v2.8 – ready for OSMC 🙂